IVR Tree
The IVR tree can only be installed with an authorized account on the system as Admin.
The IVR tree can only be installed with an authorized account on the system as Admin.
What is IVR?
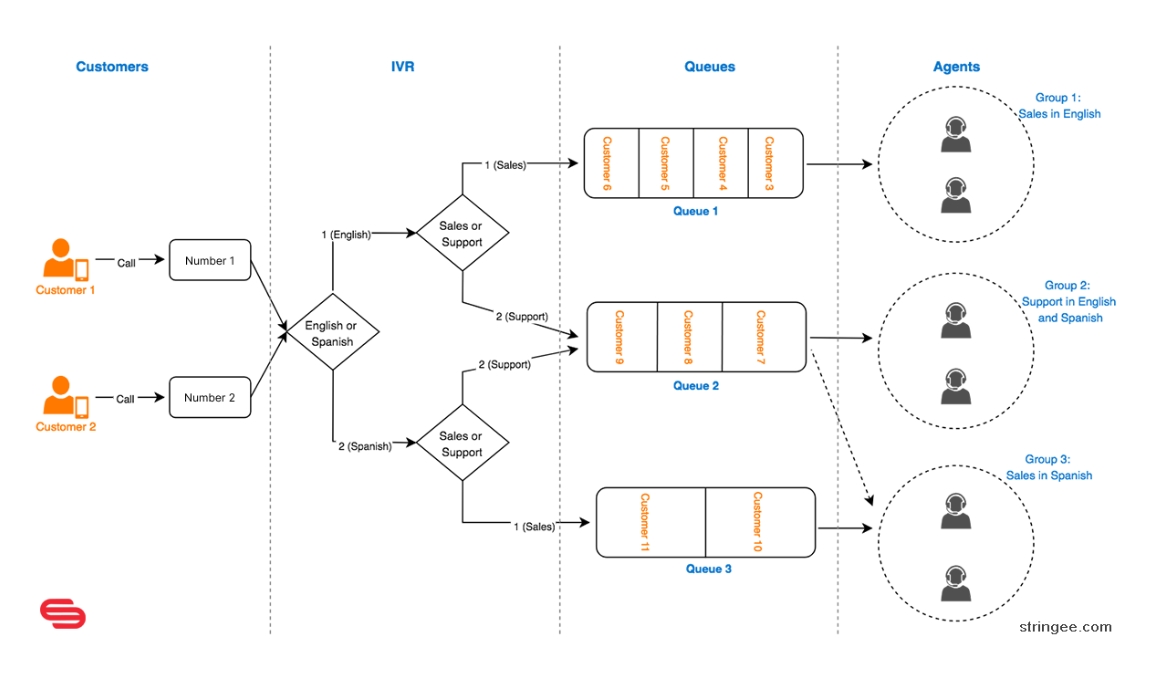
IVR (Interactive Voice Response) is an automatic answering system of the contact center according to an existing scenario proposed by a business or individual.
IVR will guide callers to operate according to certain keypresses so that they can choose the desired service and meet the call center agent suitable for their needs.
In addition, IVR has the purpose to notify, remind, advertise, ... with pre-planned content from the call center to the customer.
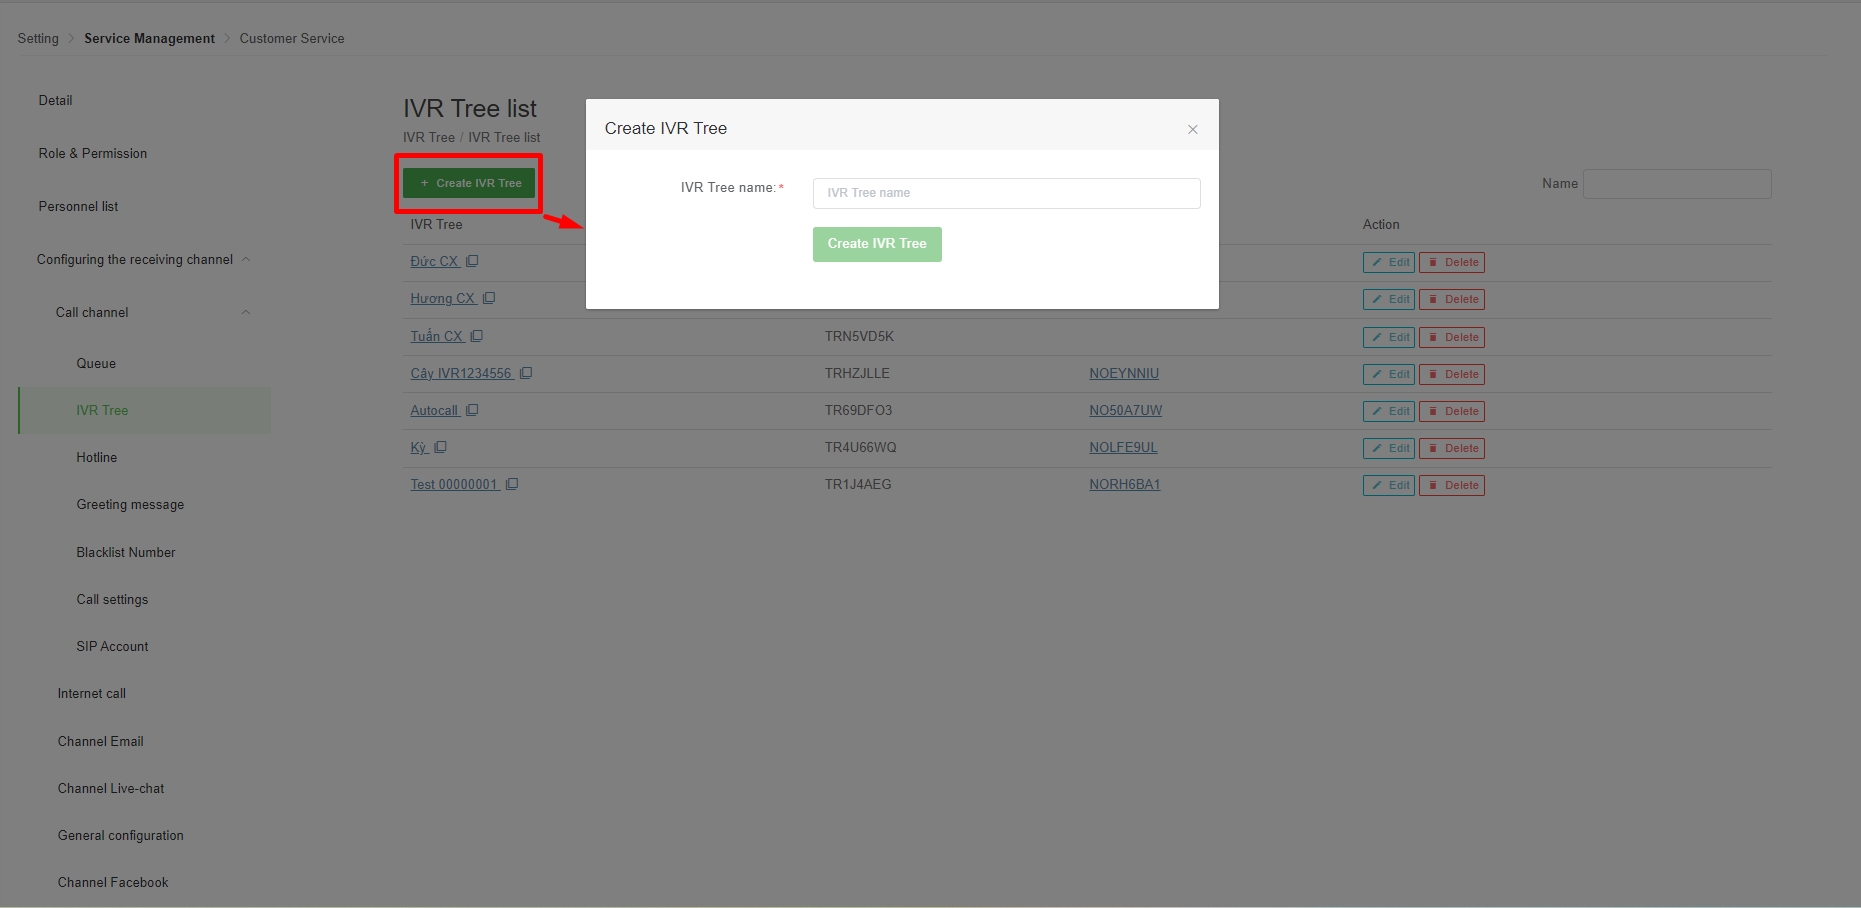
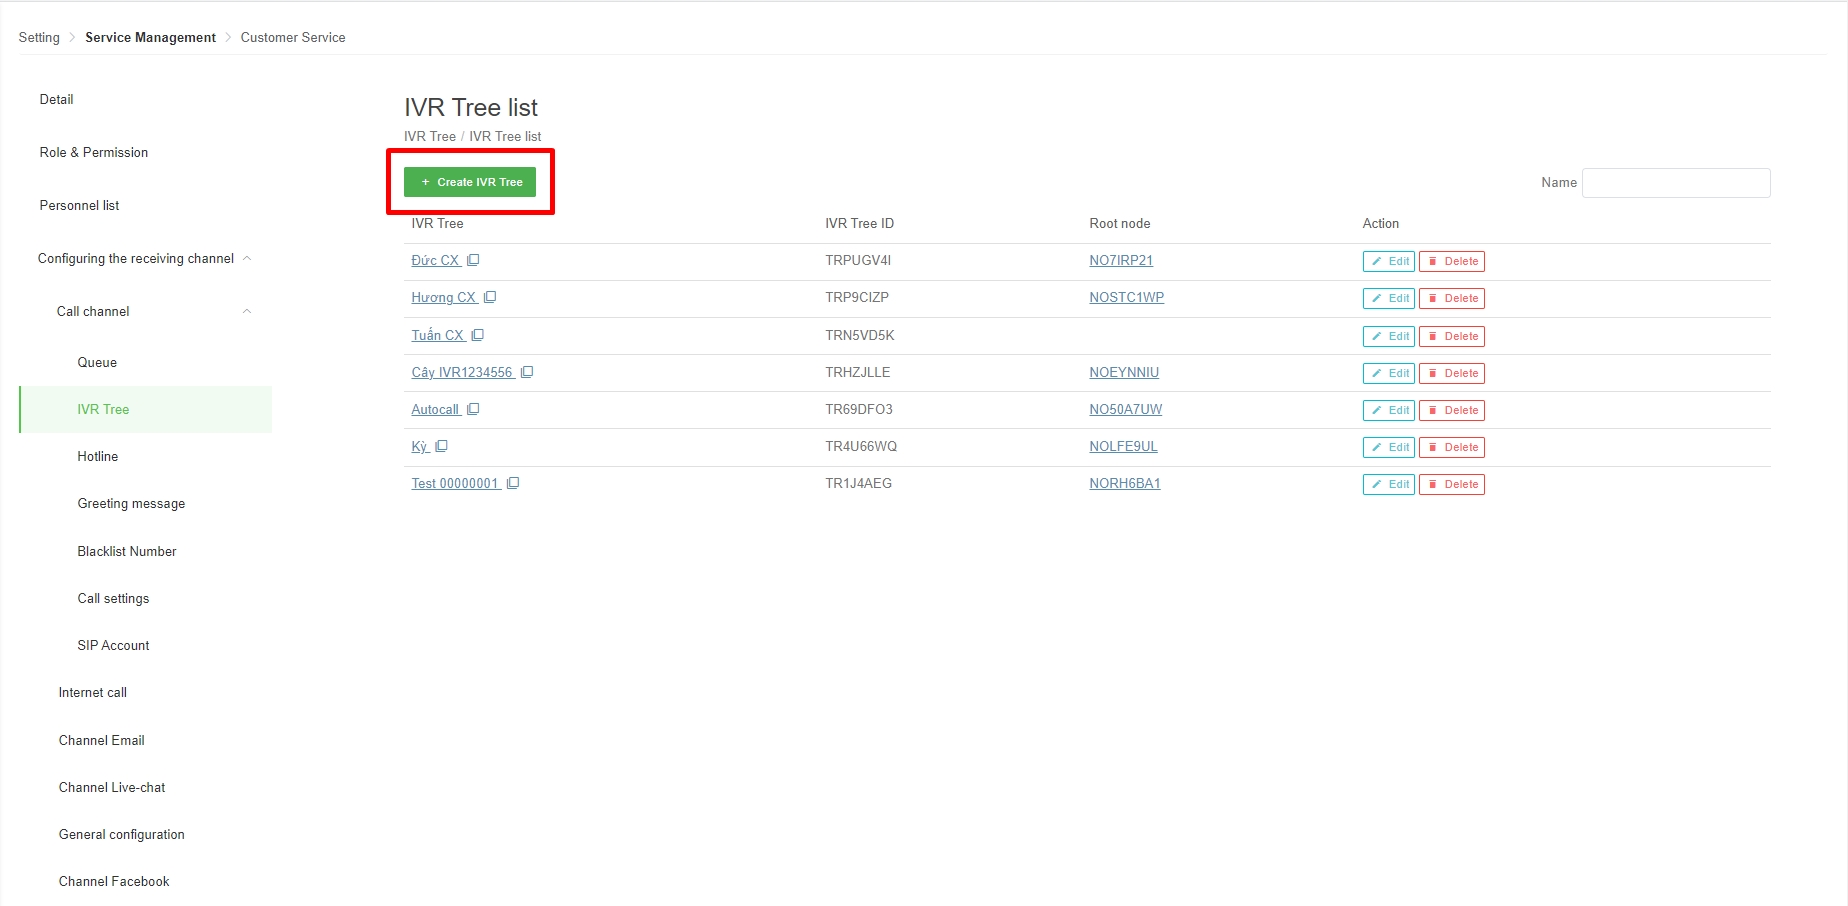
In the IVR tree configuration screen, the user clicks on the "Create IVR tree" button to create a new IVR tree.
After the IVR tree initialization screen appears, the user enters the name of the IVR tree as desired.
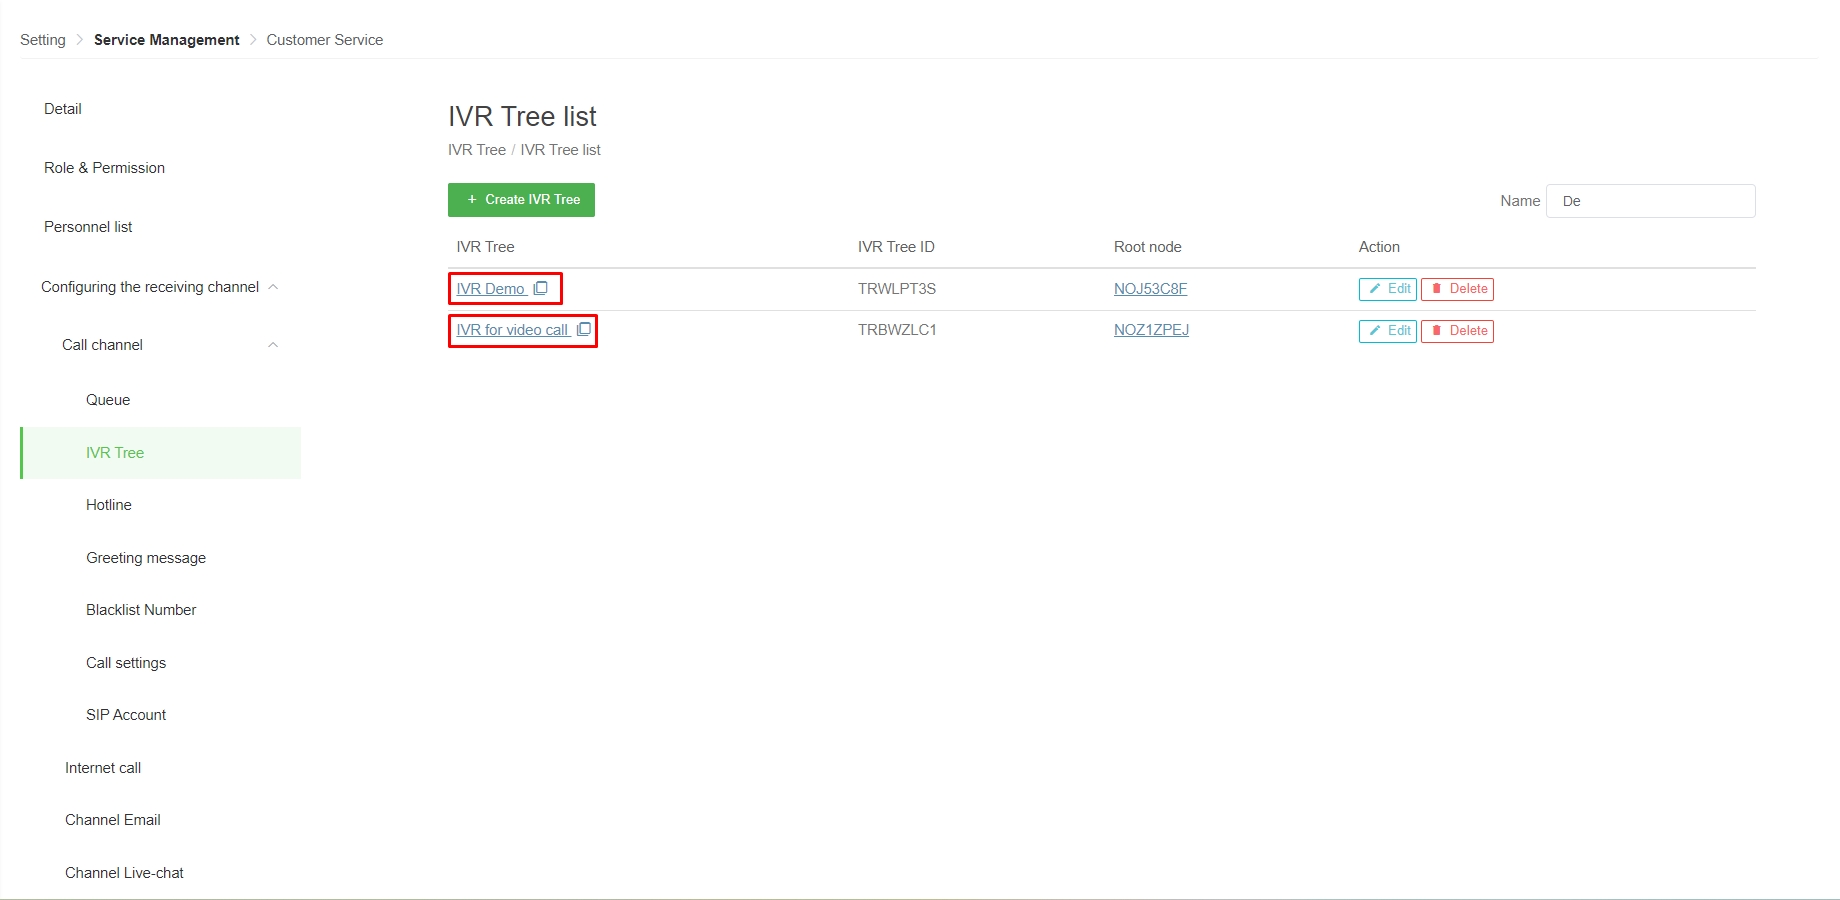
In the IVR tree screen interface, users can observe and track the entire IVR tree created on the Portal.
(1) IVR tree: the name of the IVR tree that is set when creation.
(2) IVR tree ID: unique symbol of each IVR tree.
(4) Action: user can edit IVR tree information or delete IVR tree from Portal.
Users click on an IVR tree to proceed with the detailed installation of the operation flow of that IVR tree.
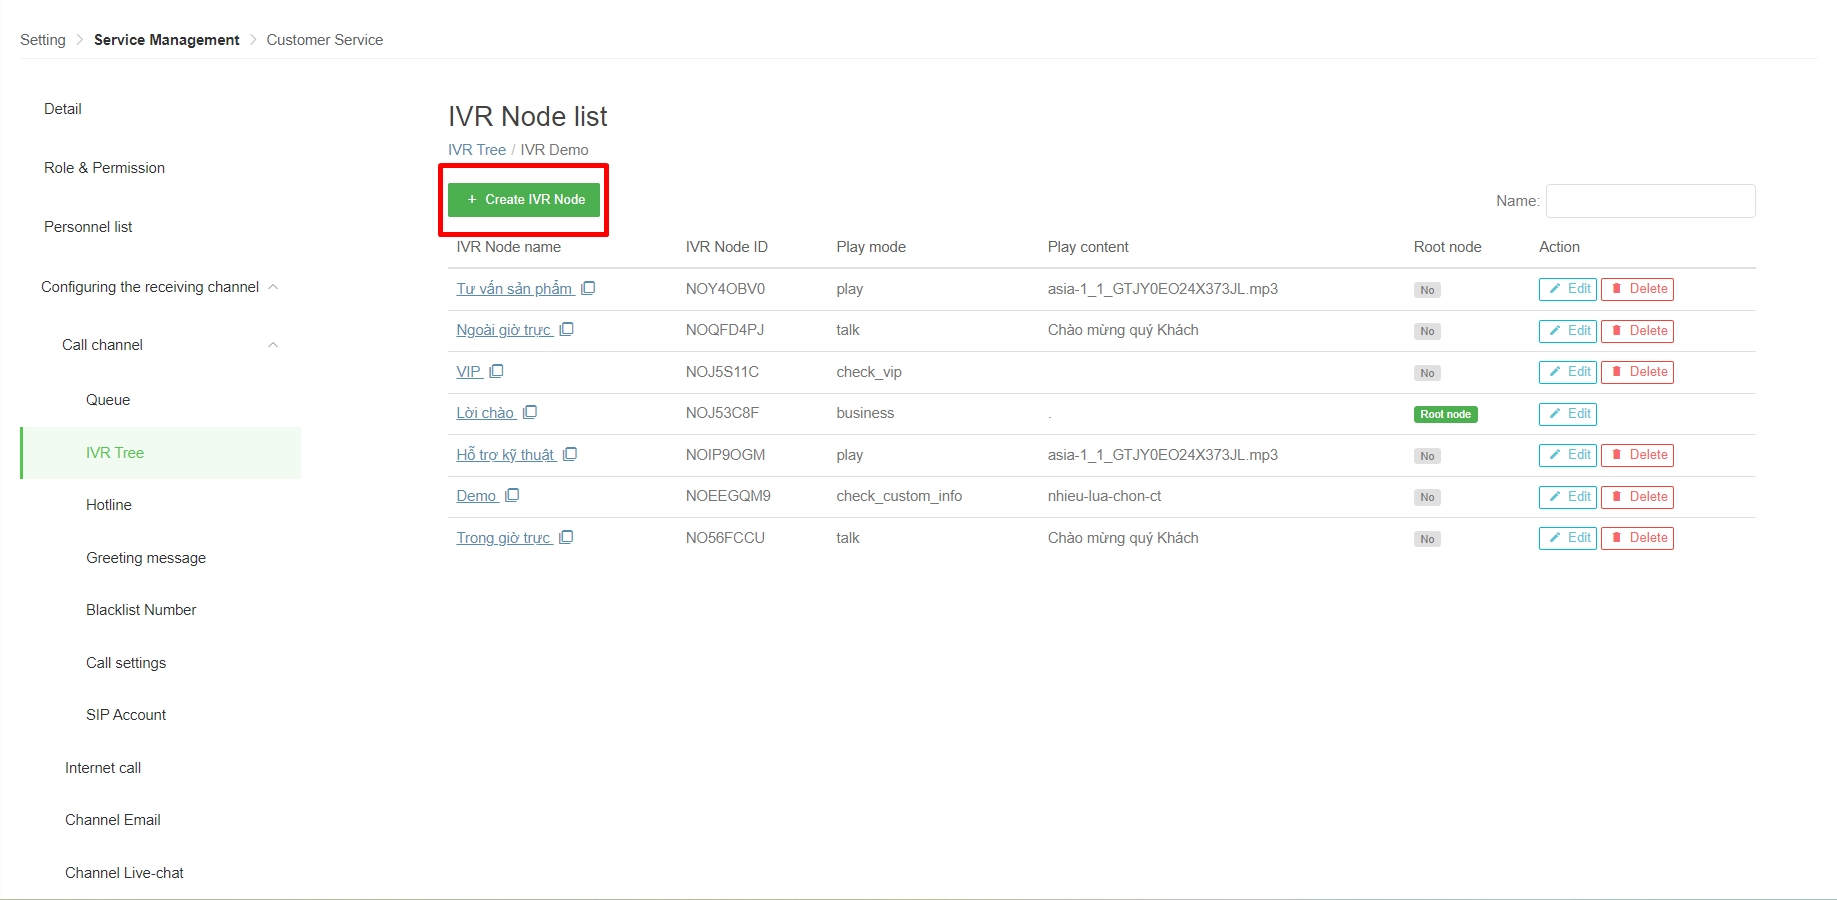
In the IVR Node list interface, the user clicks on the "Create IVR node" button to create a new IVR node.
For the IVR node, users can create with 5 different modes including: Talk, Play, Check VIP, Business, Check VIP by custom field.
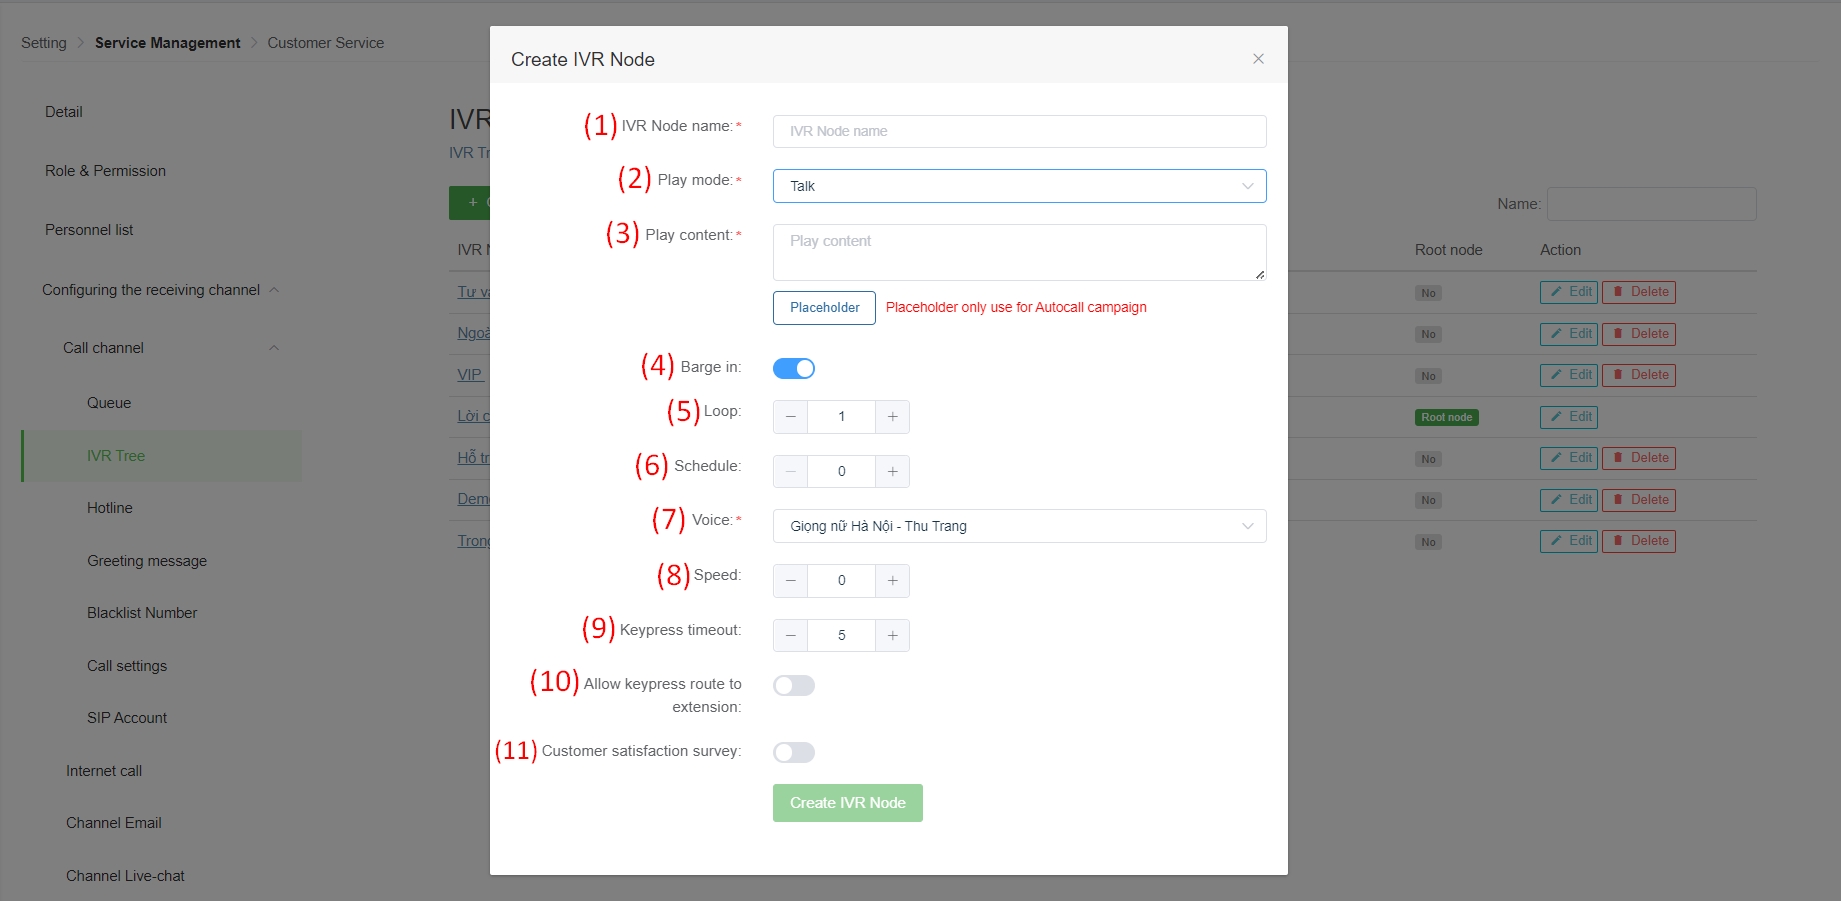
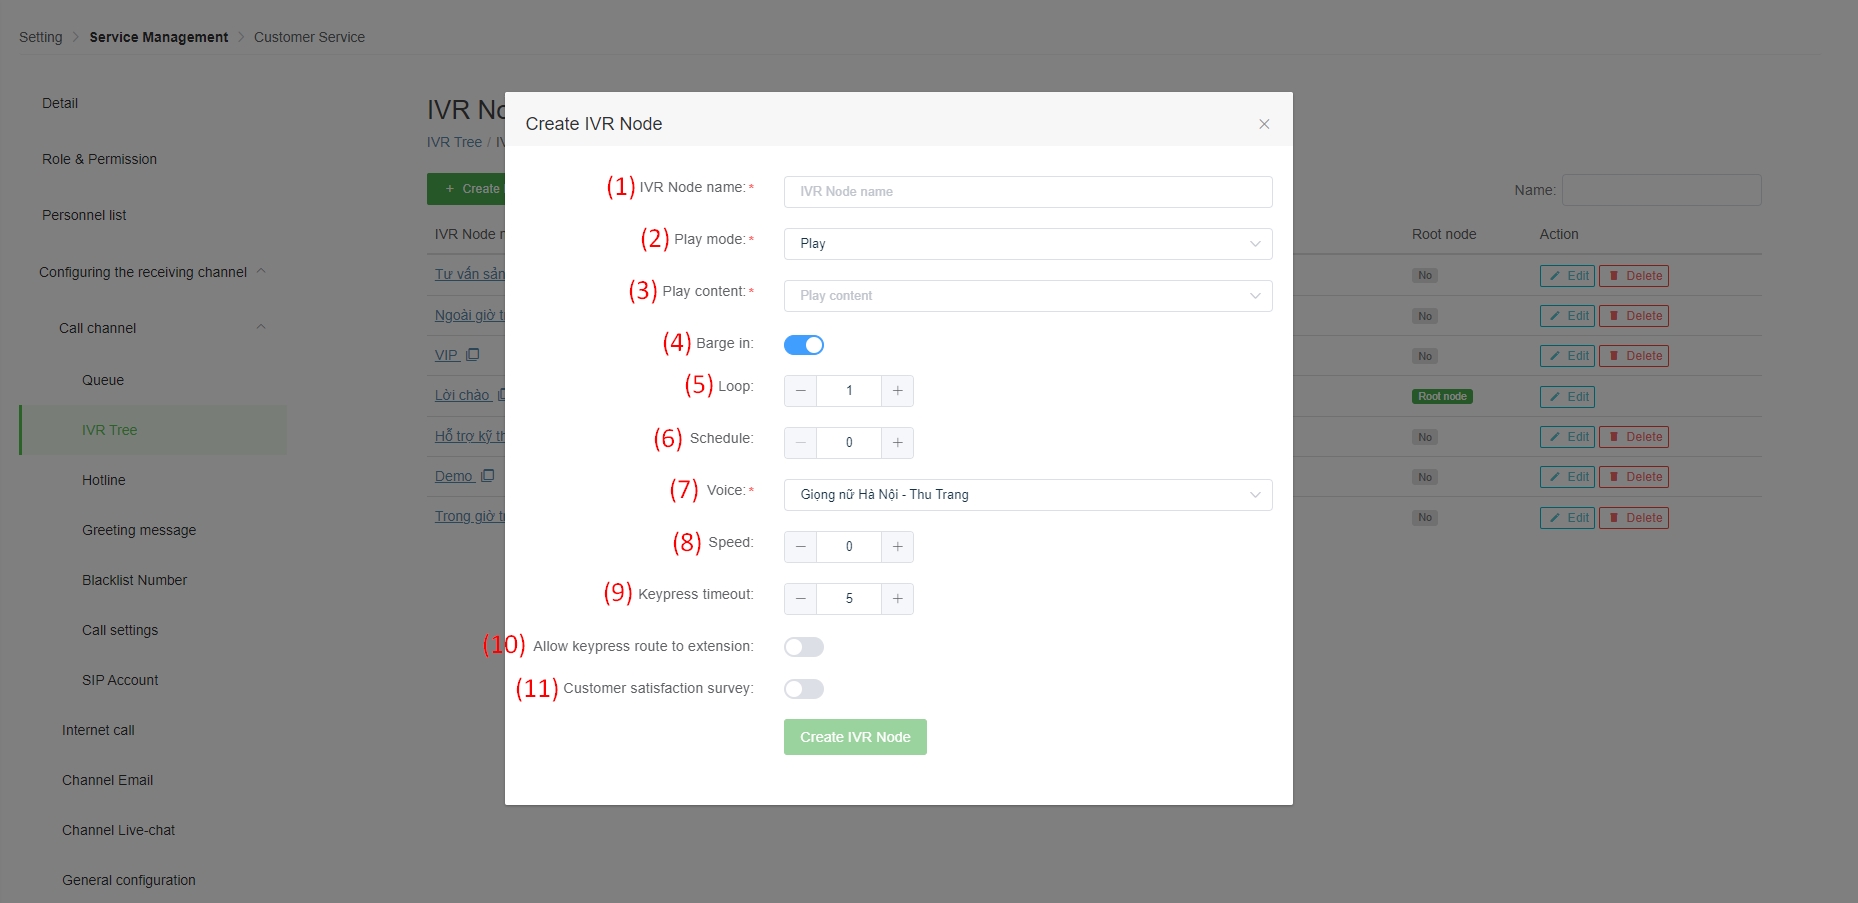
In Talk mode, the system will play text (text to speech) according to user specified script when setting node.
(1) IVR node name: the name of the IVR node.
(2) Play mode: button mode, in this mode is Talk.
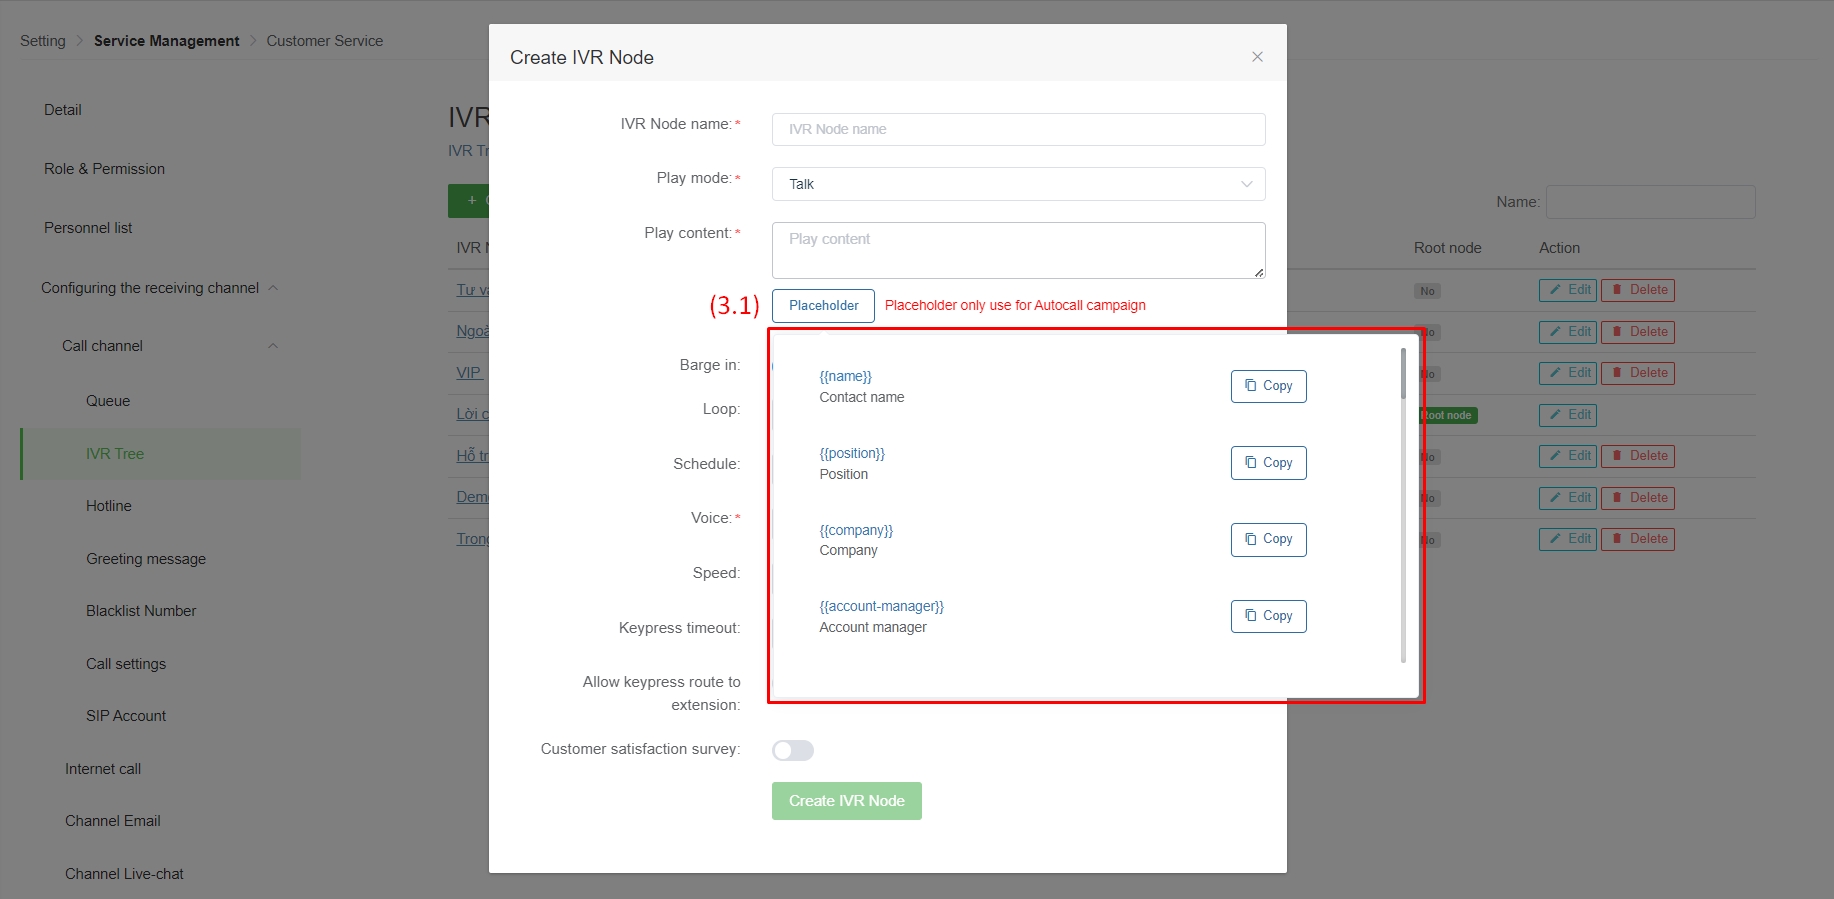
(3) Play content: the user enters the information to be broadcast to the Client. Then the system will automatically switch "text to speech". In this section, the user has one more option to use Placeholder as shown in Image 9 below.
Example: Suppose we have a case like Image 10. We use the field "Contact Name" whose value is stored on the system as John
=> The return result of "Text to speech" will be: "Good morning John. How are you today!."
(4) Barge in: enable/disable the customer to press the key when the system did not finish playing the text in item (3).
(5) Repeat: the number of times the text in item (3) is repeated.
(6) Schedule: time to wait before the system plays the text in item (3).
(7) Voiceover: the user can choose the voice for the text in item (3) depending on his/her demand.
(8) Speed: fast or slow file playback speed of the text in item (3).
(9) Keypress waiting time: is the maximum waiting time from the time when the system has completely finished playing the text in item (3) including the number of repetitions for the Customer to select the appropriate key. After this period of time, if the Customer does not press the key, the system will understand the Customer's choice as "Empty Key" (See detailed configuration for the Empty key in Section 4.1) and perform the action of the key " Empty key” if available.
(10) Allow redirection to extension: enable/disable extension dialing mode for customers to directly meet the agent on the system.
Example: User account A on the system has an extension of 222. Then, when the Customer calls the system, they can press the number 222 on the keypad consecutively to meet User A directly. Then the call will always and only go to User A.
If this mode is enabled, the user needs to set the length for the extension based on the extension number of the User accounts on the system. According to the example above, the length of the extension can be installed will be 3.
(11) Customer Satisfaction Survey: enable/disable customer survey or scoring for services of businesses, companies, etc. To use this section, users need to install IVR button according to customer survey scenario.
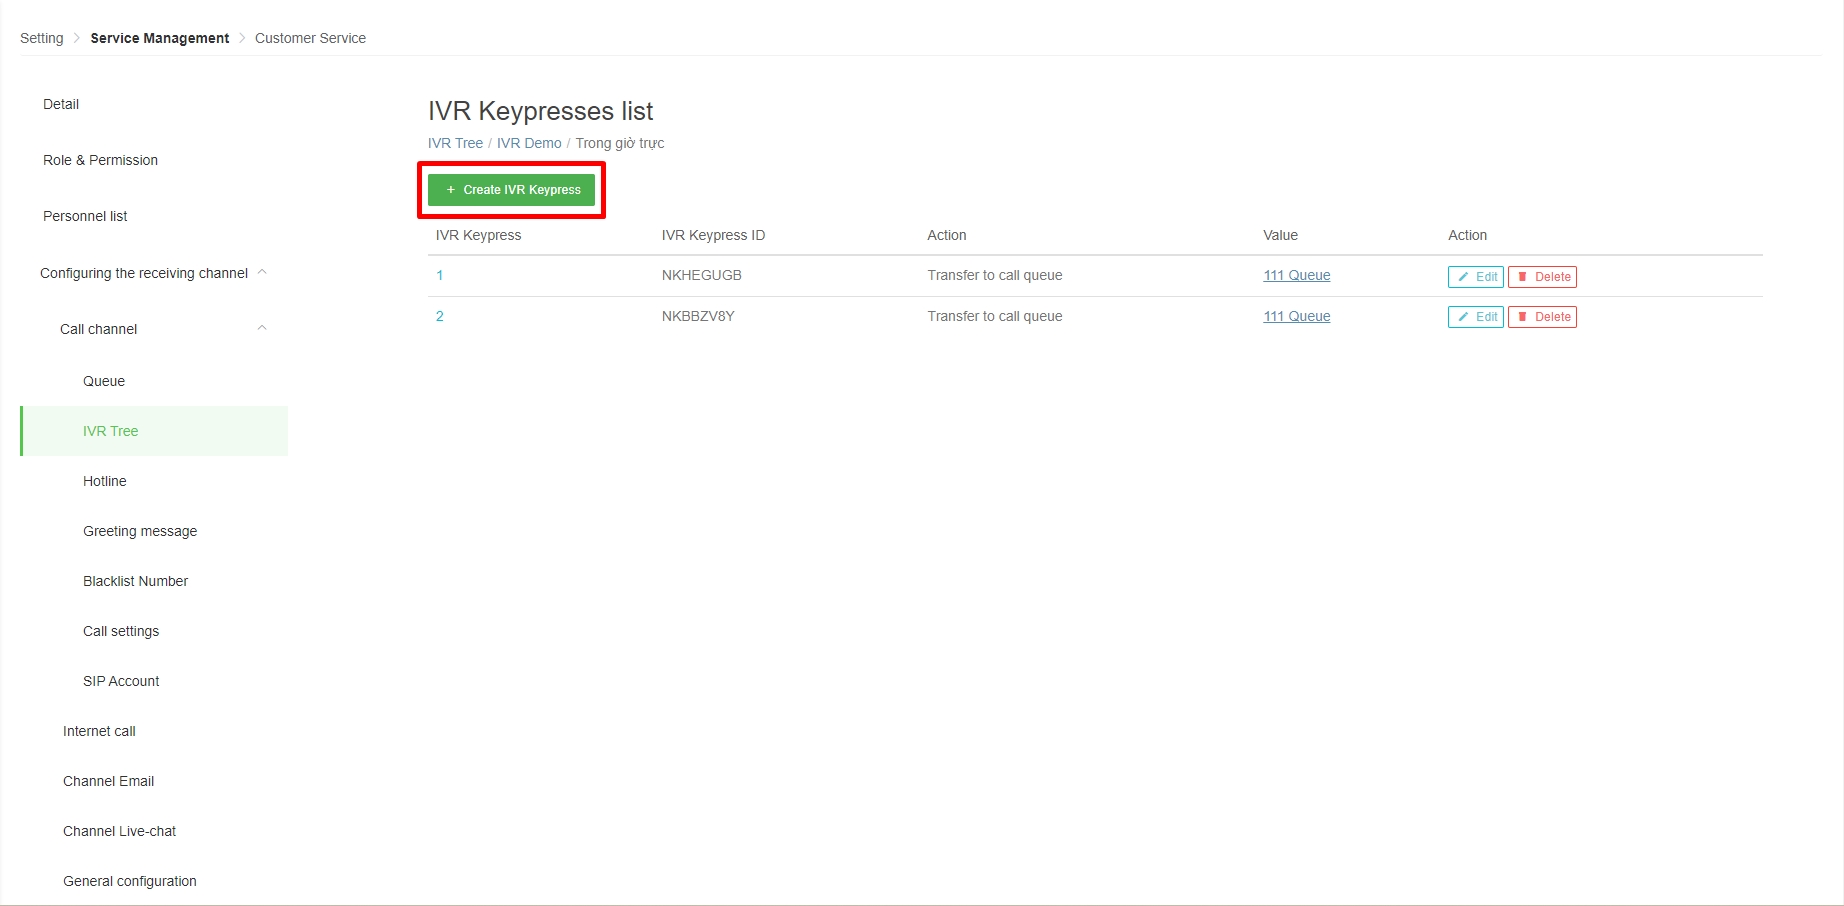
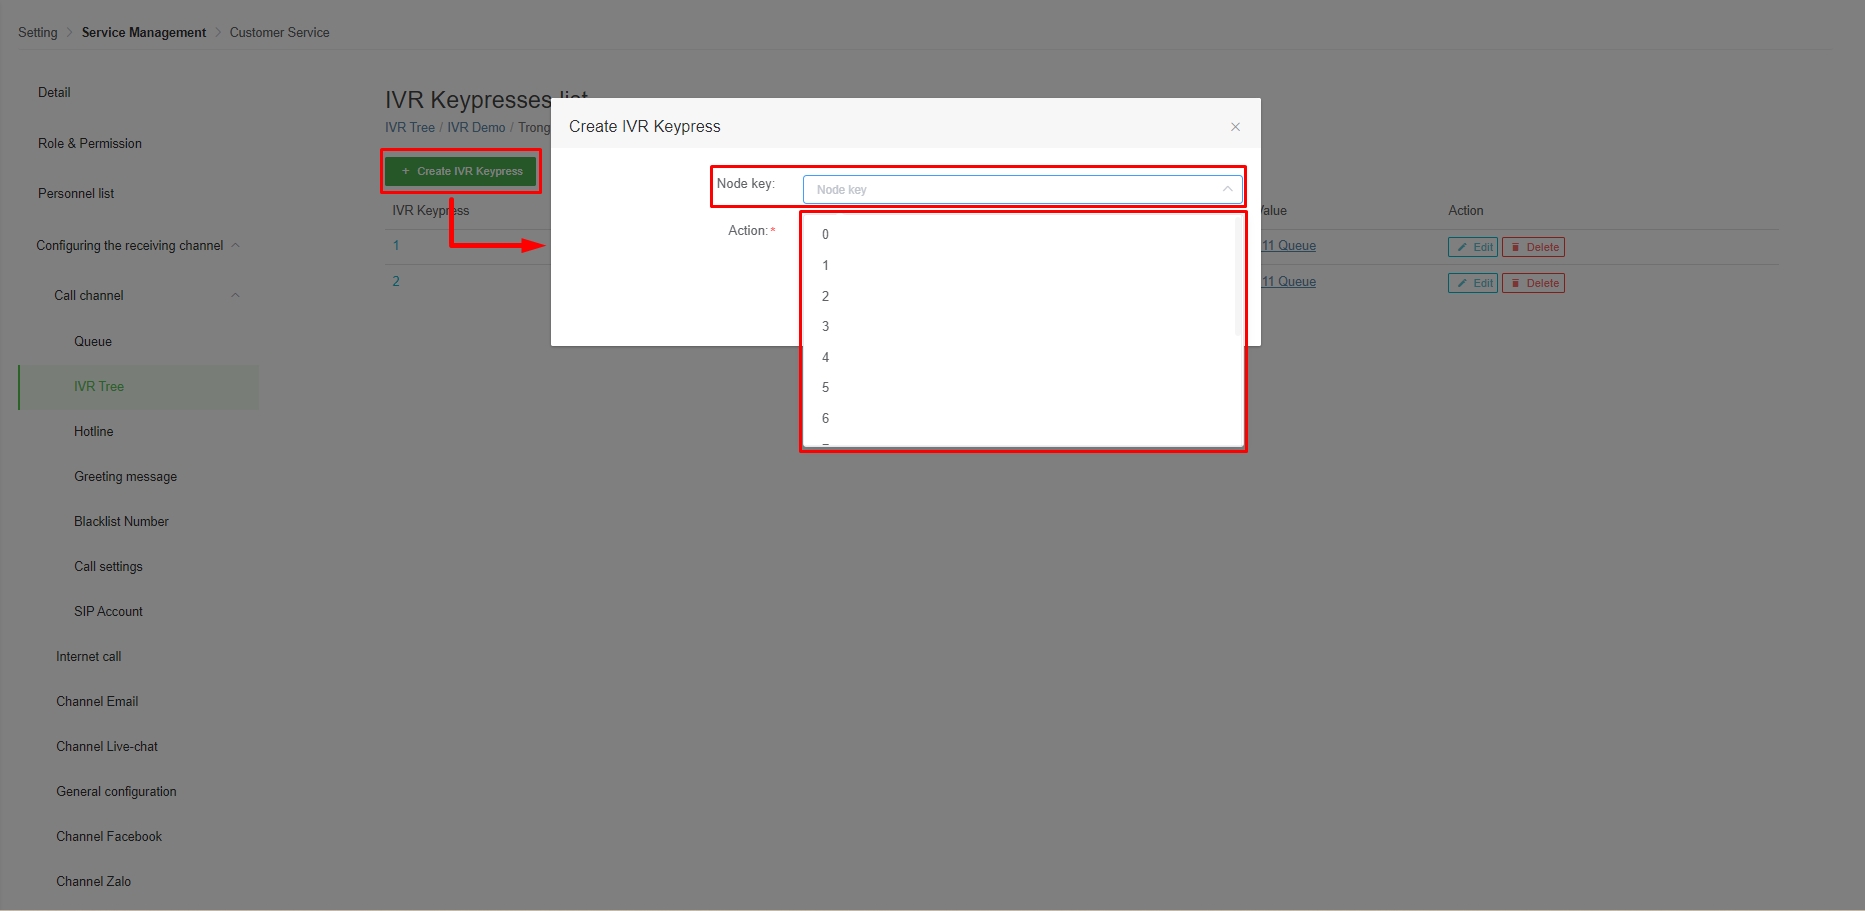
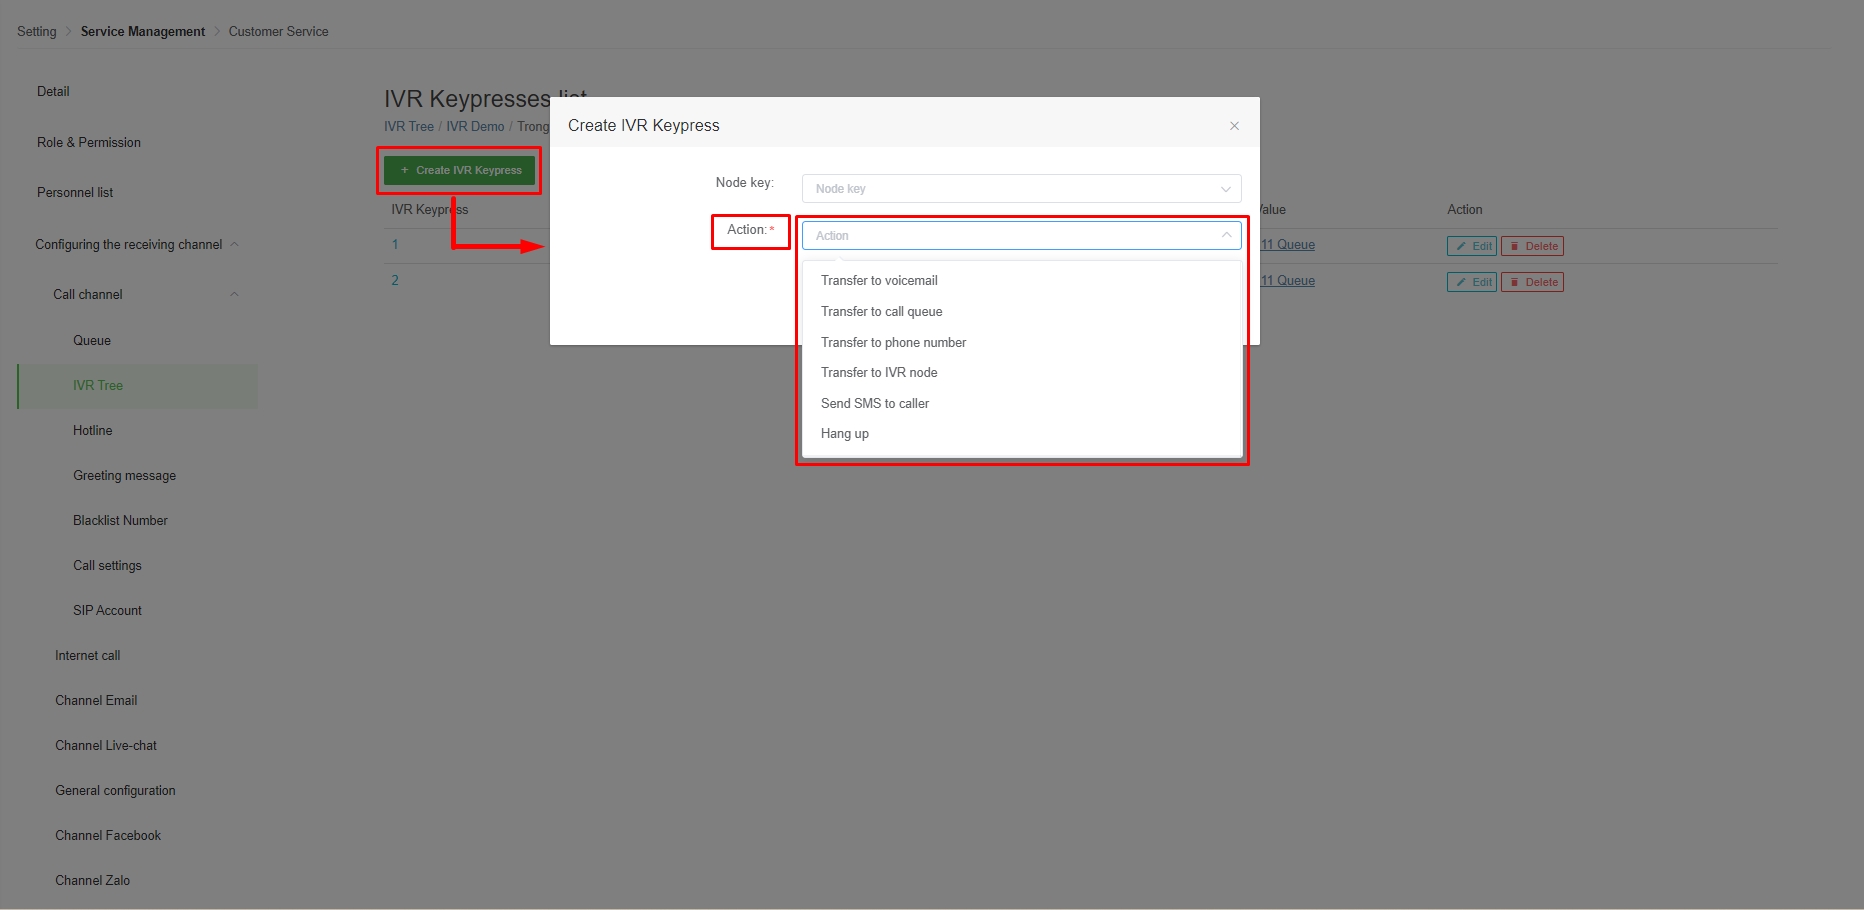
The user clicks on the button to create a key for the IVR button.
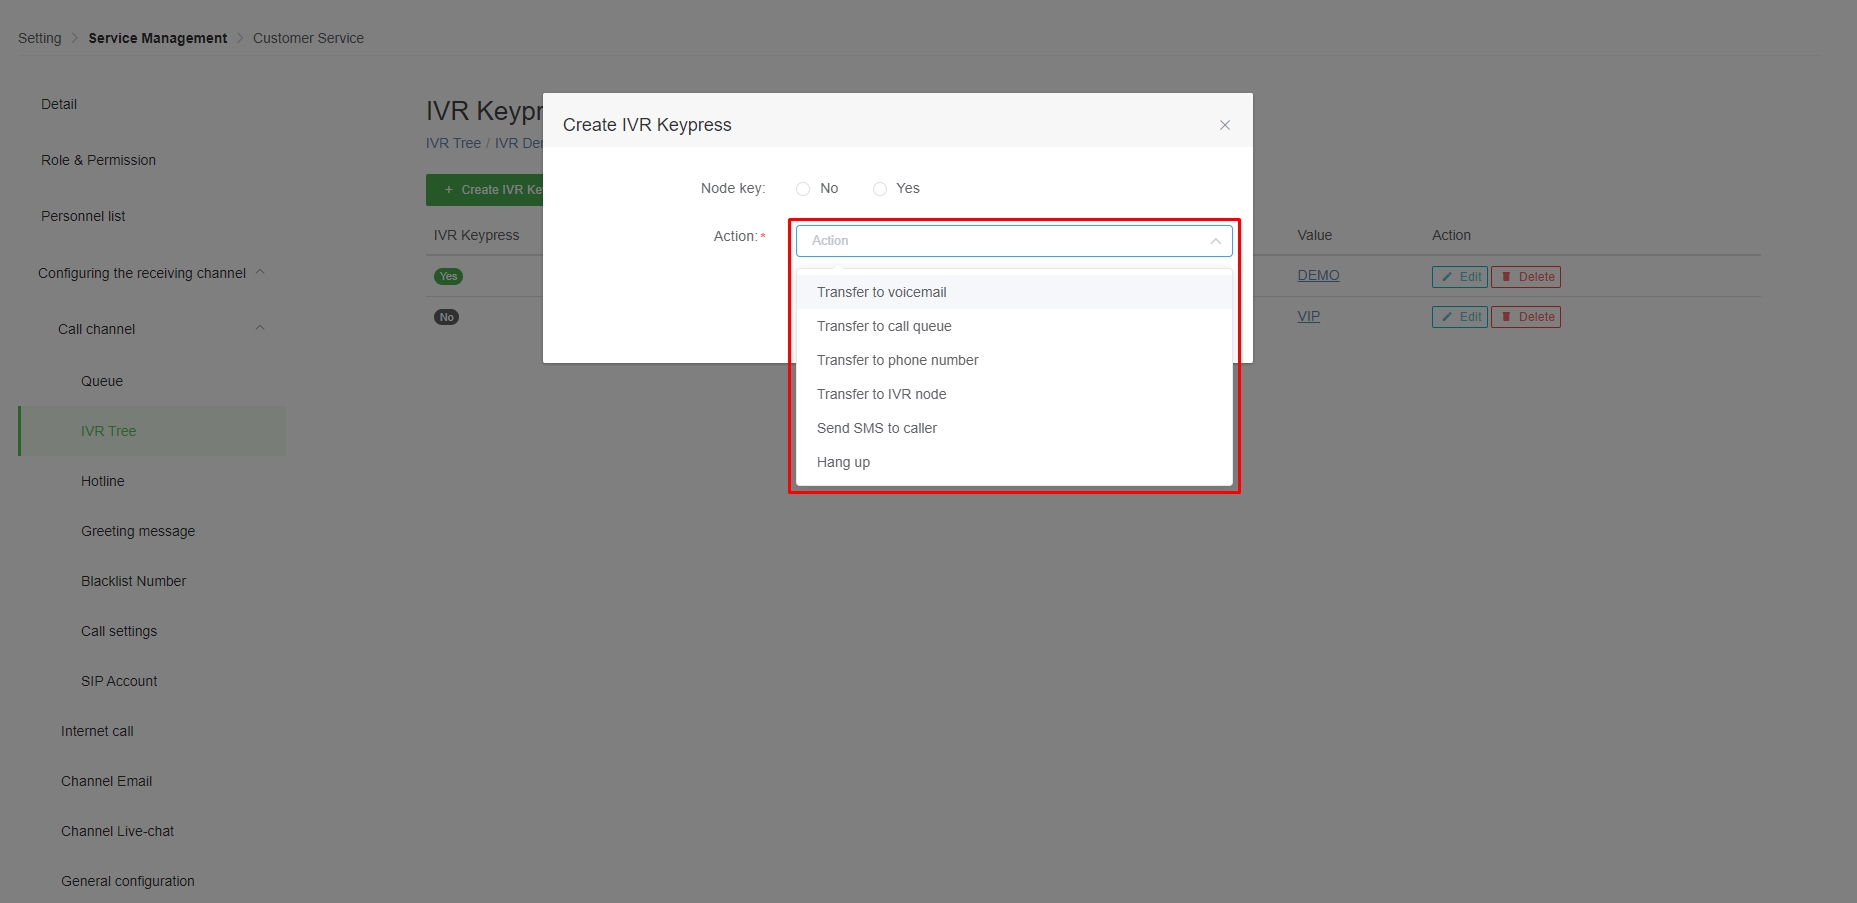
Create IVR Keypress : Users can create keys from 0-9, '#' and '*' to suit the functions of the contact center. Also there are other button modes including: Empty_Key (no key pressed), Invalid_Key (get wrong key configured on IVR).
Select action for the keypress: the system will perform the action after the Customer presses the key.
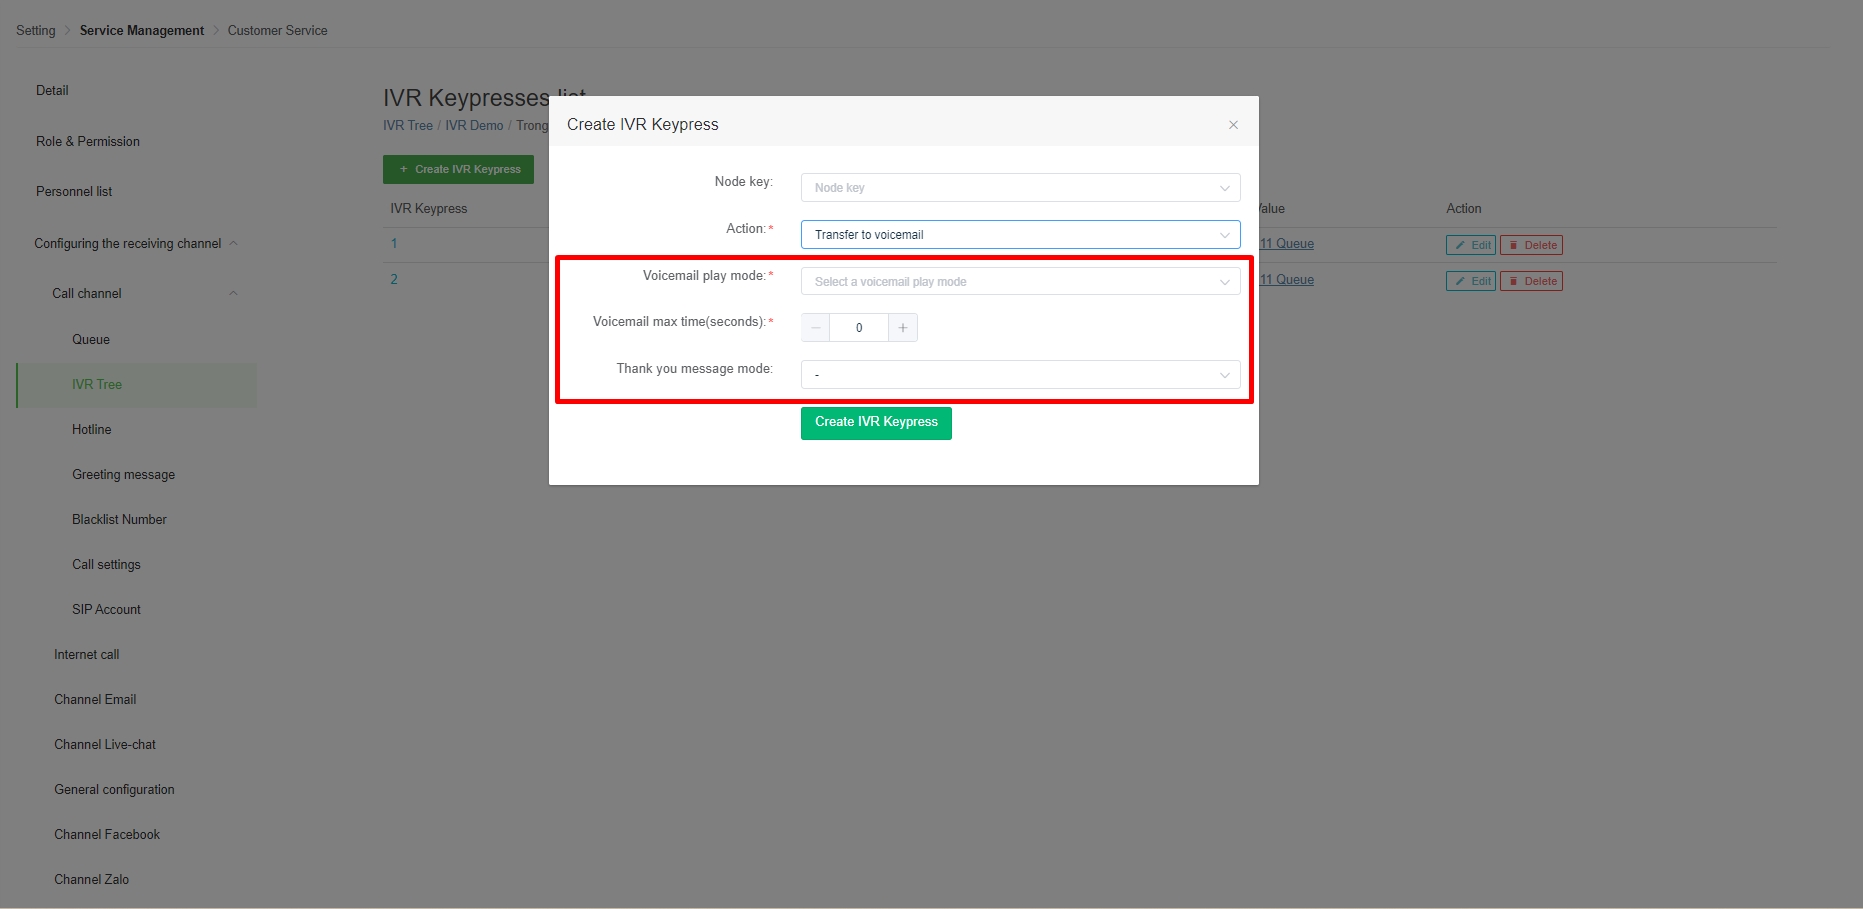
- Transfer to Voicemail: The customer will leave a message for the system. The user will choose the voicemail broadcast mode, the maximum time of voicemail and the thank you greeting (talk or play) after the customer leaves the voicemail.
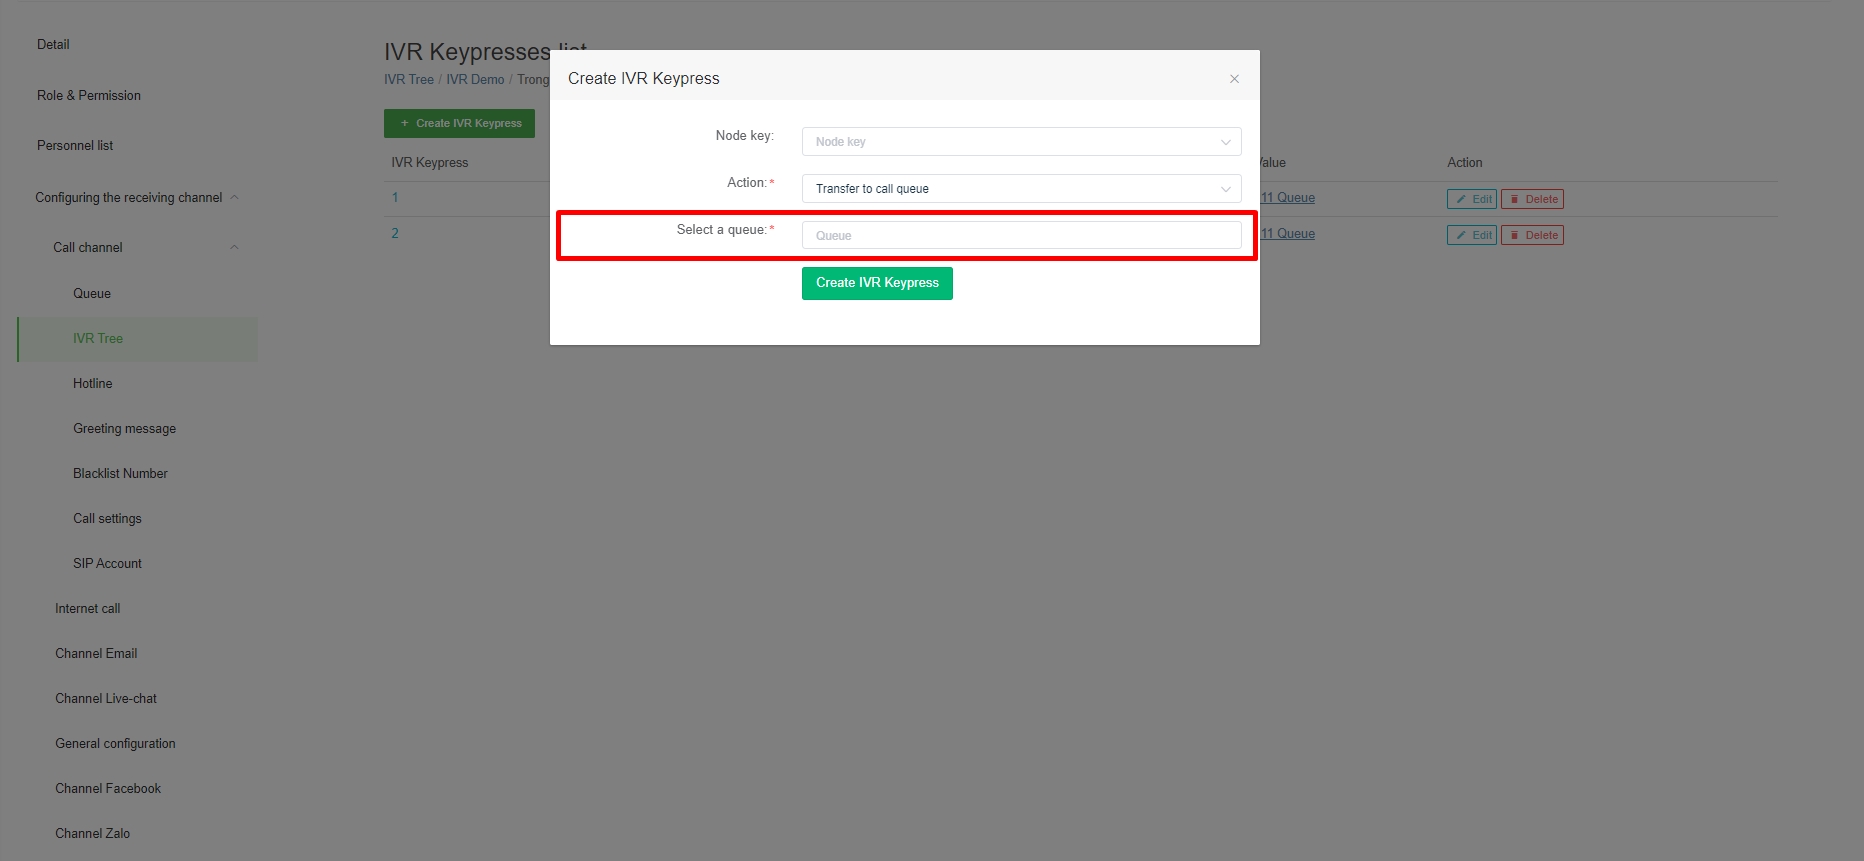
- Transfer to call queue: the user will select the queue that he wants to distribute inbound calls.
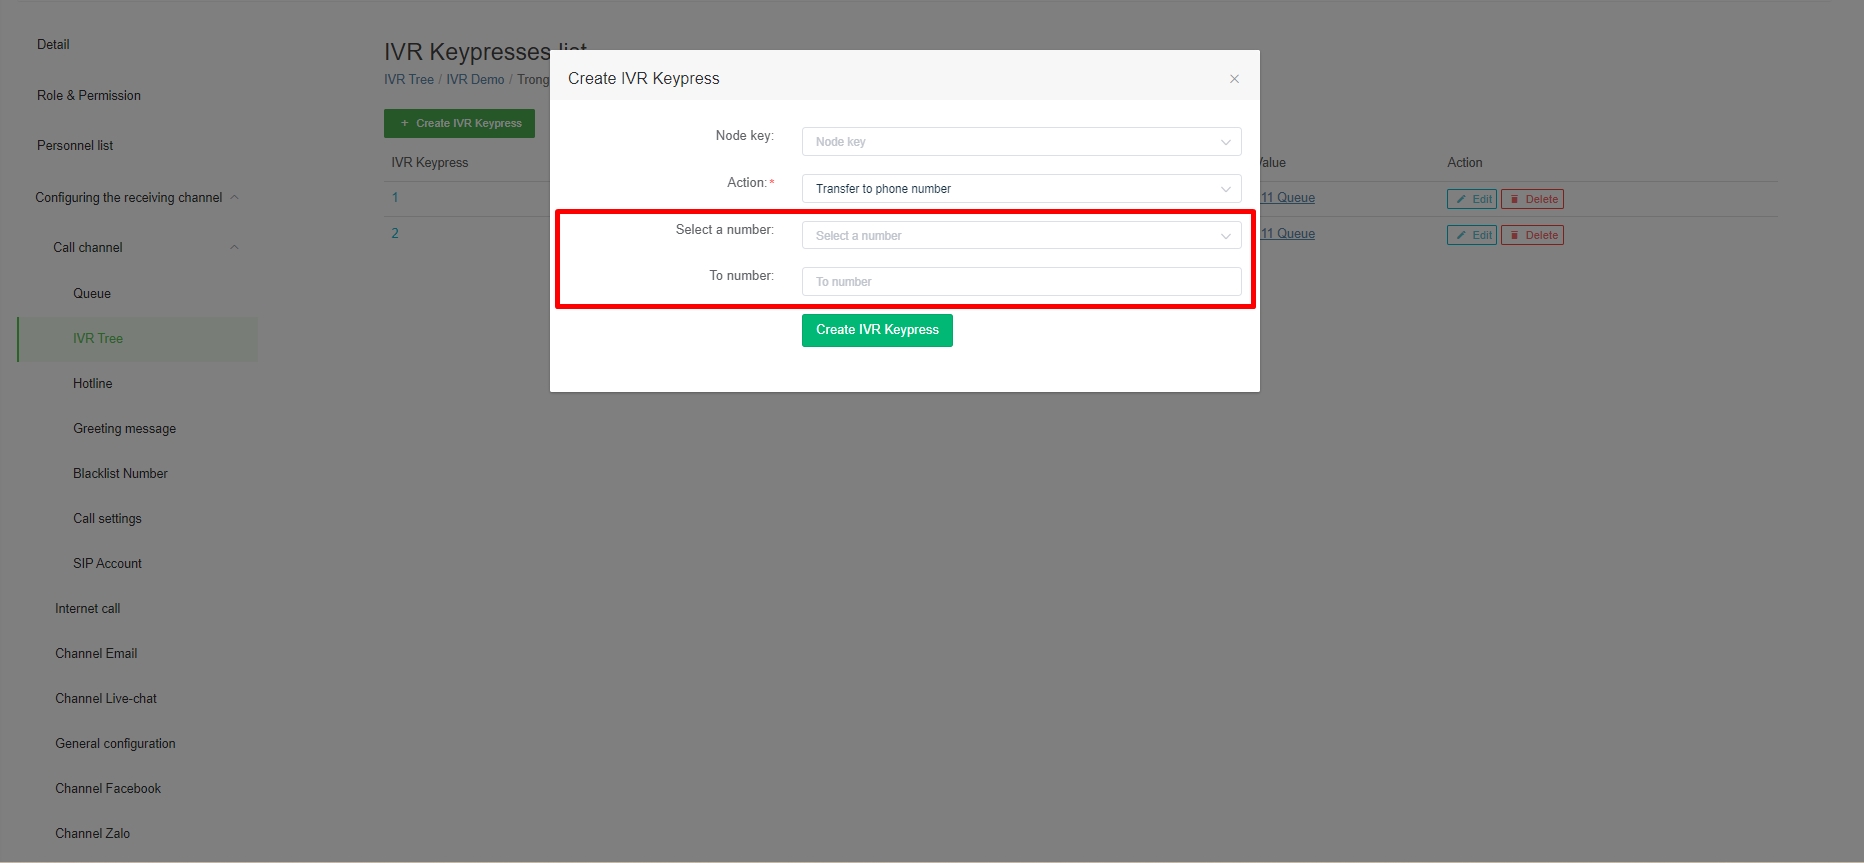
- Transfer to a phone number: the call will be routed to the agent's phone number. The user will select the appropriate hotline number to call the User (Agent/Admin) and enter the User's phone number (Agent/Admin).
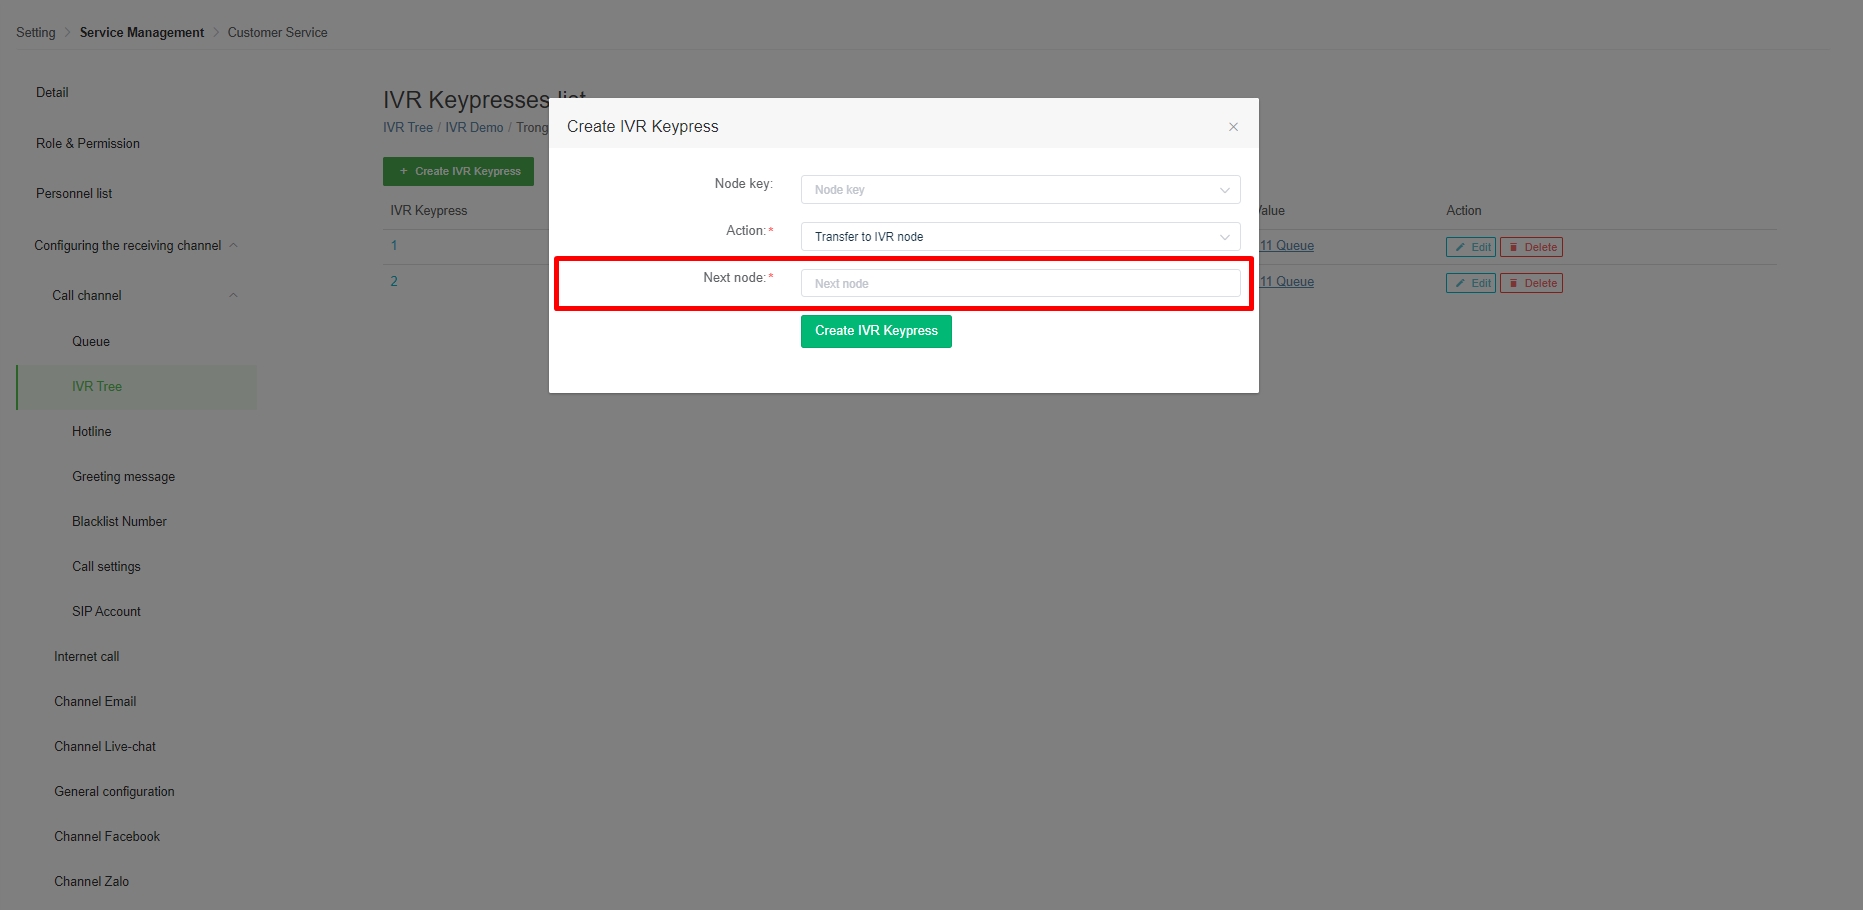
- Transfer to IVR node: the user will give the other IVR node he wants to go to.
- Send an SMS to caller: the user enters the message content to send out to the Customer.
- Hang up: the call will end when the customer presses the key.
(2) Play mode: button mode, in this mode is Play.
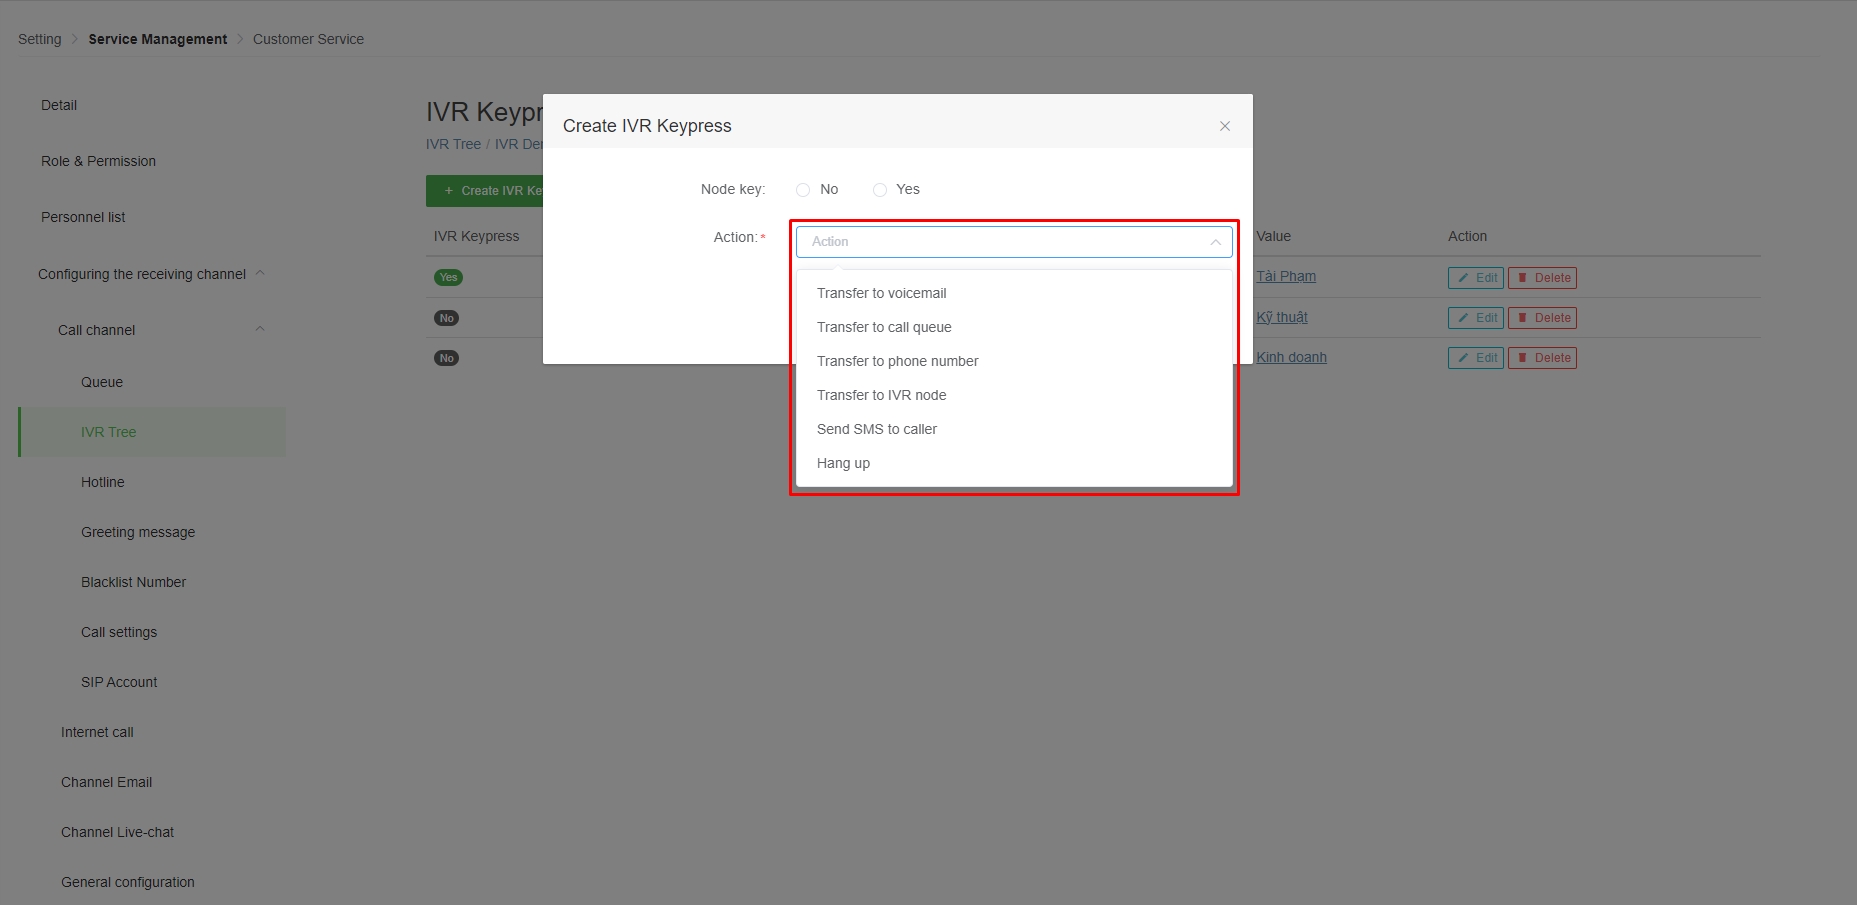
The user clicks on the button to create a key for the IVR button.
Create IVR Keypress : Users can create keys from 0-9, '#' and '*' to suit the functions of the contact center. Also there are other button modes including: Empty_Key (no key pressed), Invalid_Key (get wrong key configured on IVR).
Select action for the keypress: the system will perform the action after the Customer presses the key.
- Transfer to Voicemail: The customer will leave a message for the system. The user will choose the voicemail broadcast mode, the maximum time of voicemail and the thank you greeting (talk or play) after the customer leaves the voicemail.
- Transfer to call queue: the user will select the queue that he wants to distribute inbound calls.
- Transfer to a phone number: the call will be routed to the agent's phone number. The user will select the appropriate hotline number to call the User (Agent/Admin) and enter the User's phone number (Agent/Admin).
- Transfer to IVR node: the user will give the other IVR node he wants to go to.
- Send an SMS to caller: the user enters the message content to send out to the Customer.
- Hang up: the call will end when the customer presses the key.
Regular customers: chưa được lưu liên hệ trên hệ thống hoặc đã được lưu liên hệ trên hệ thống nhưng có xếp hạng là 1 sao.
VIP customers: đã được lưu trên hệ thống và được xếp hạng 2 sao trở lên.
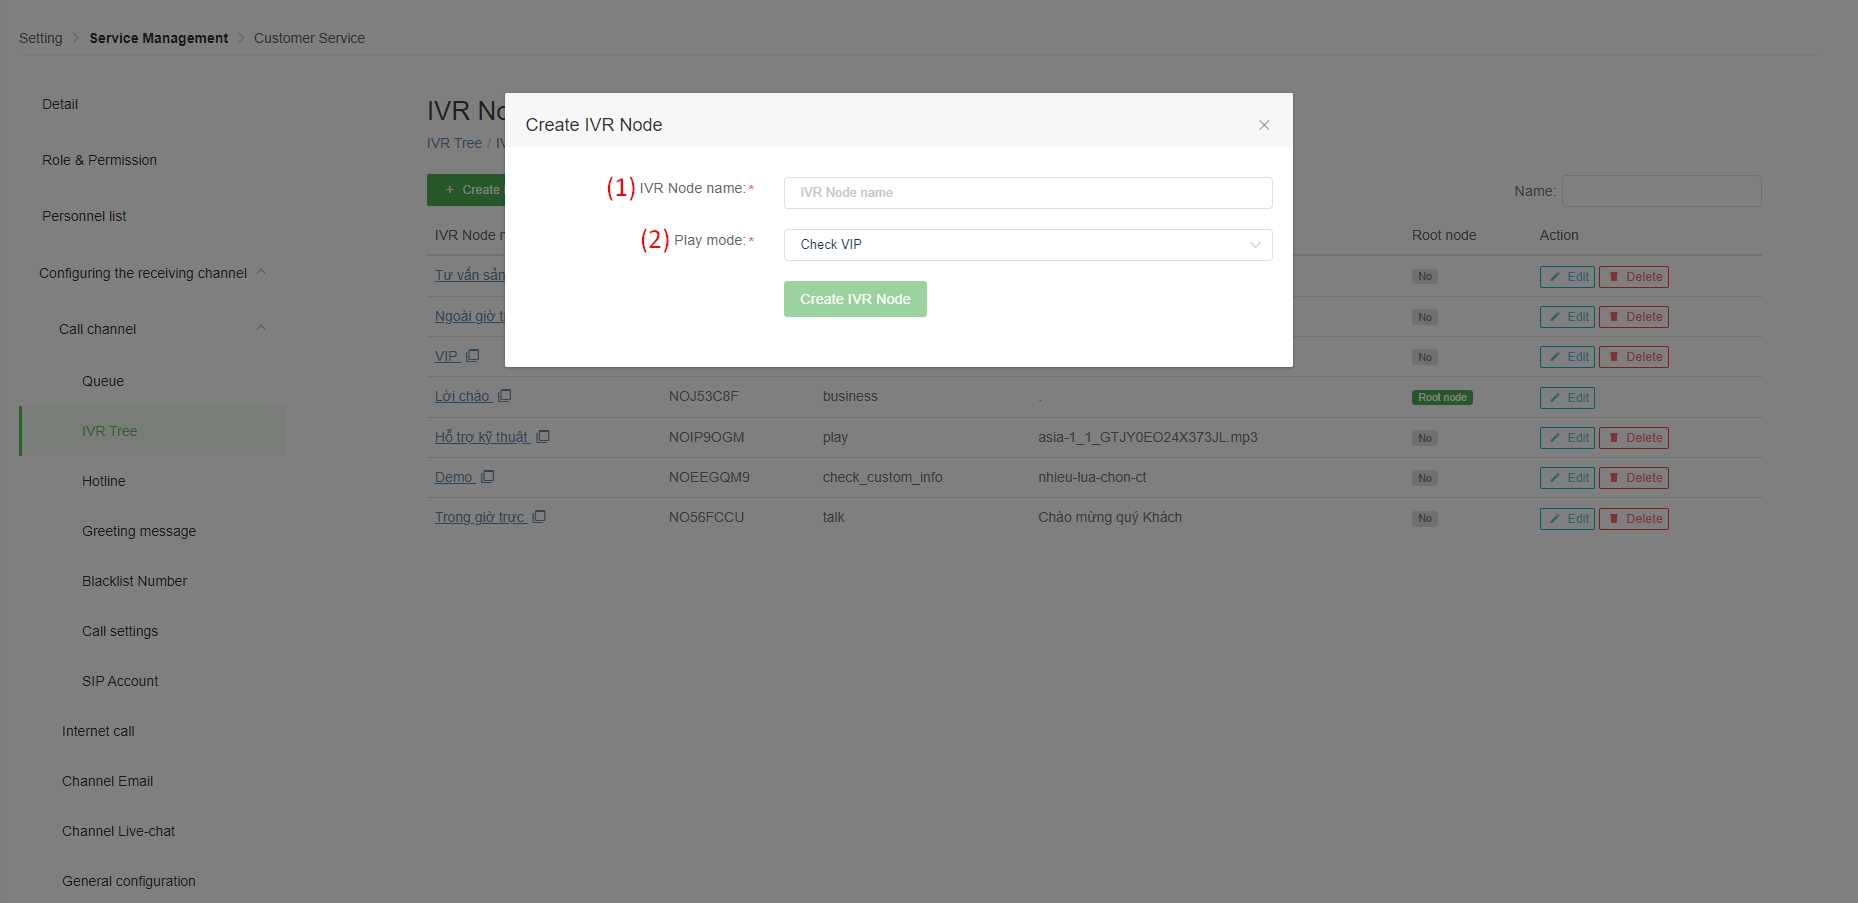
(1) IVR node name: the name of the set IVR node.
(2) Play mode: button mode, in this mode is VIP check.
There are 2 key modes “Yes” or “No”. The system will check the conditions when the caller is satisfied or not and implement one of the two modes.
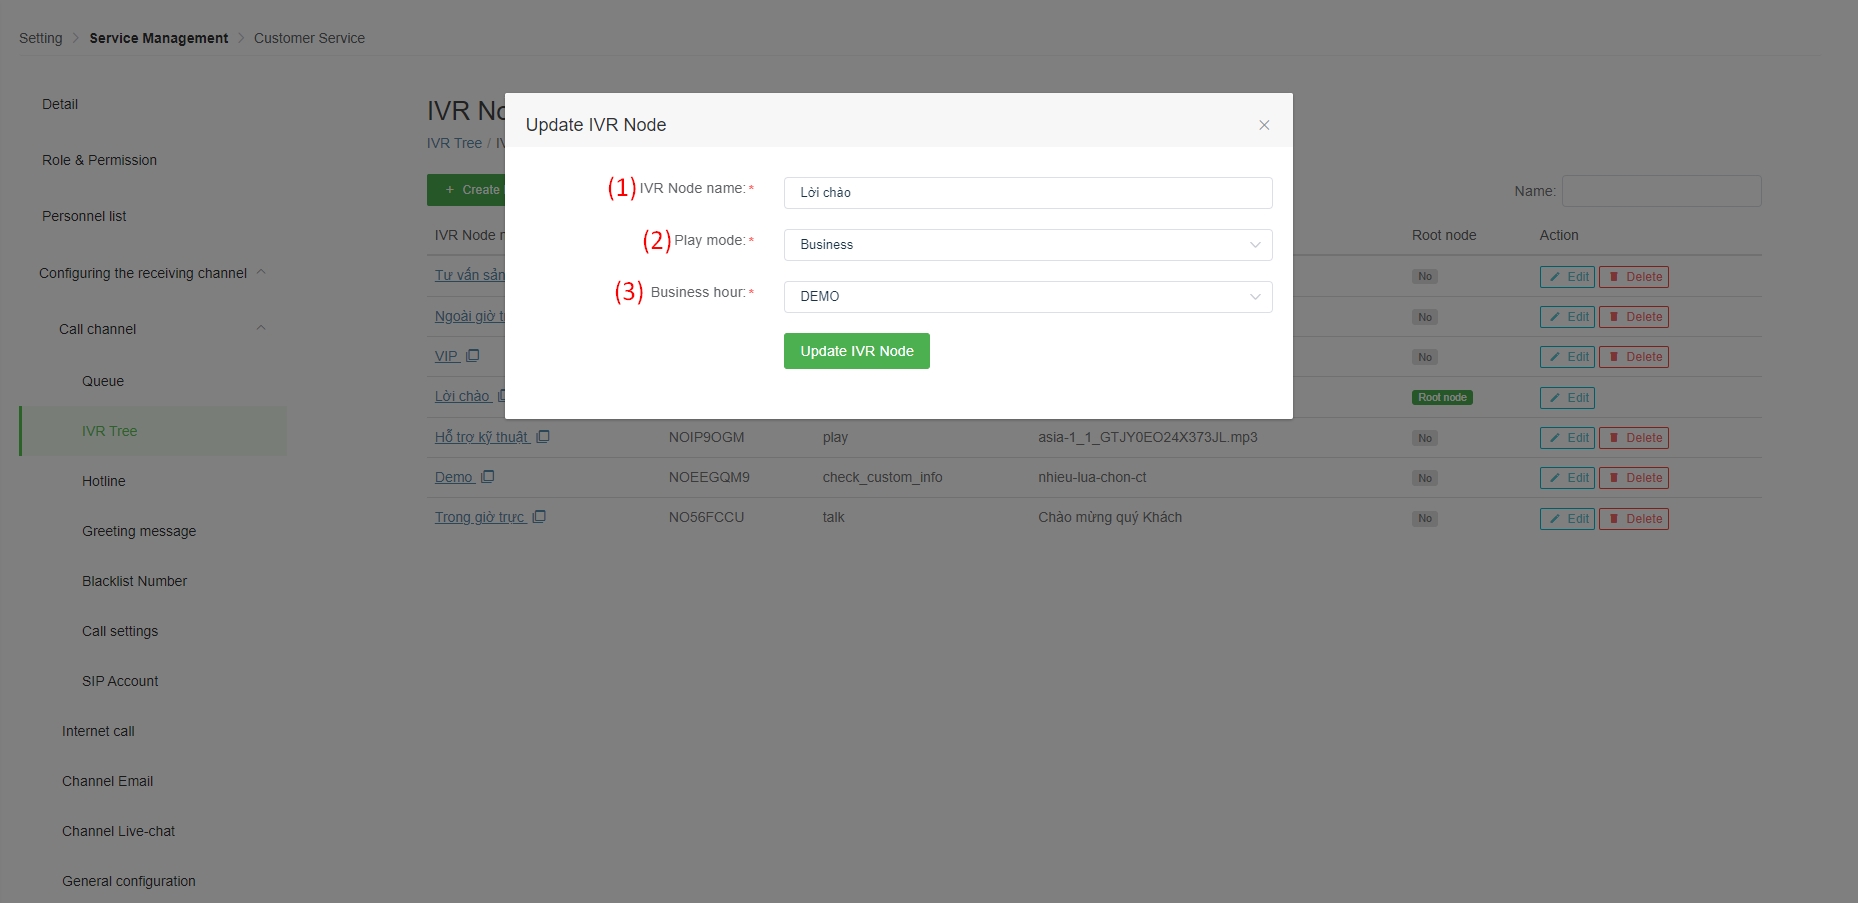
(1) IVR node name: the name of the IVR node set at initialization.
(2) Play mode: button mode, in this mode is Business.
(3) Working hours: the user selects the appropriate working hours created on the system.
Example: Working hours are set as 8:00 – 17:00 from Monday to Friday, then:
- 8:00 – 17:00 from Monday to Friday is the business hours.
- The remaining hours from Monday to Friday and Saturday, Sunday are out of business hours.
There are 2 key modes “Yes” or “No”. The system will check the conditions when the caller is satisfied or not and implement one of the two modes.
(1) IVR node name: the name of the IVR node set at initialization.
(2) Play mode: button mode, in this mode is Check VIP by custom field.
(3) Custom field: the user selects the desired custom field for the system to check Customer information.
The system will appear all the options of the custom field in the contact section. The user will choose the mode of information field to be considered for the system to check.
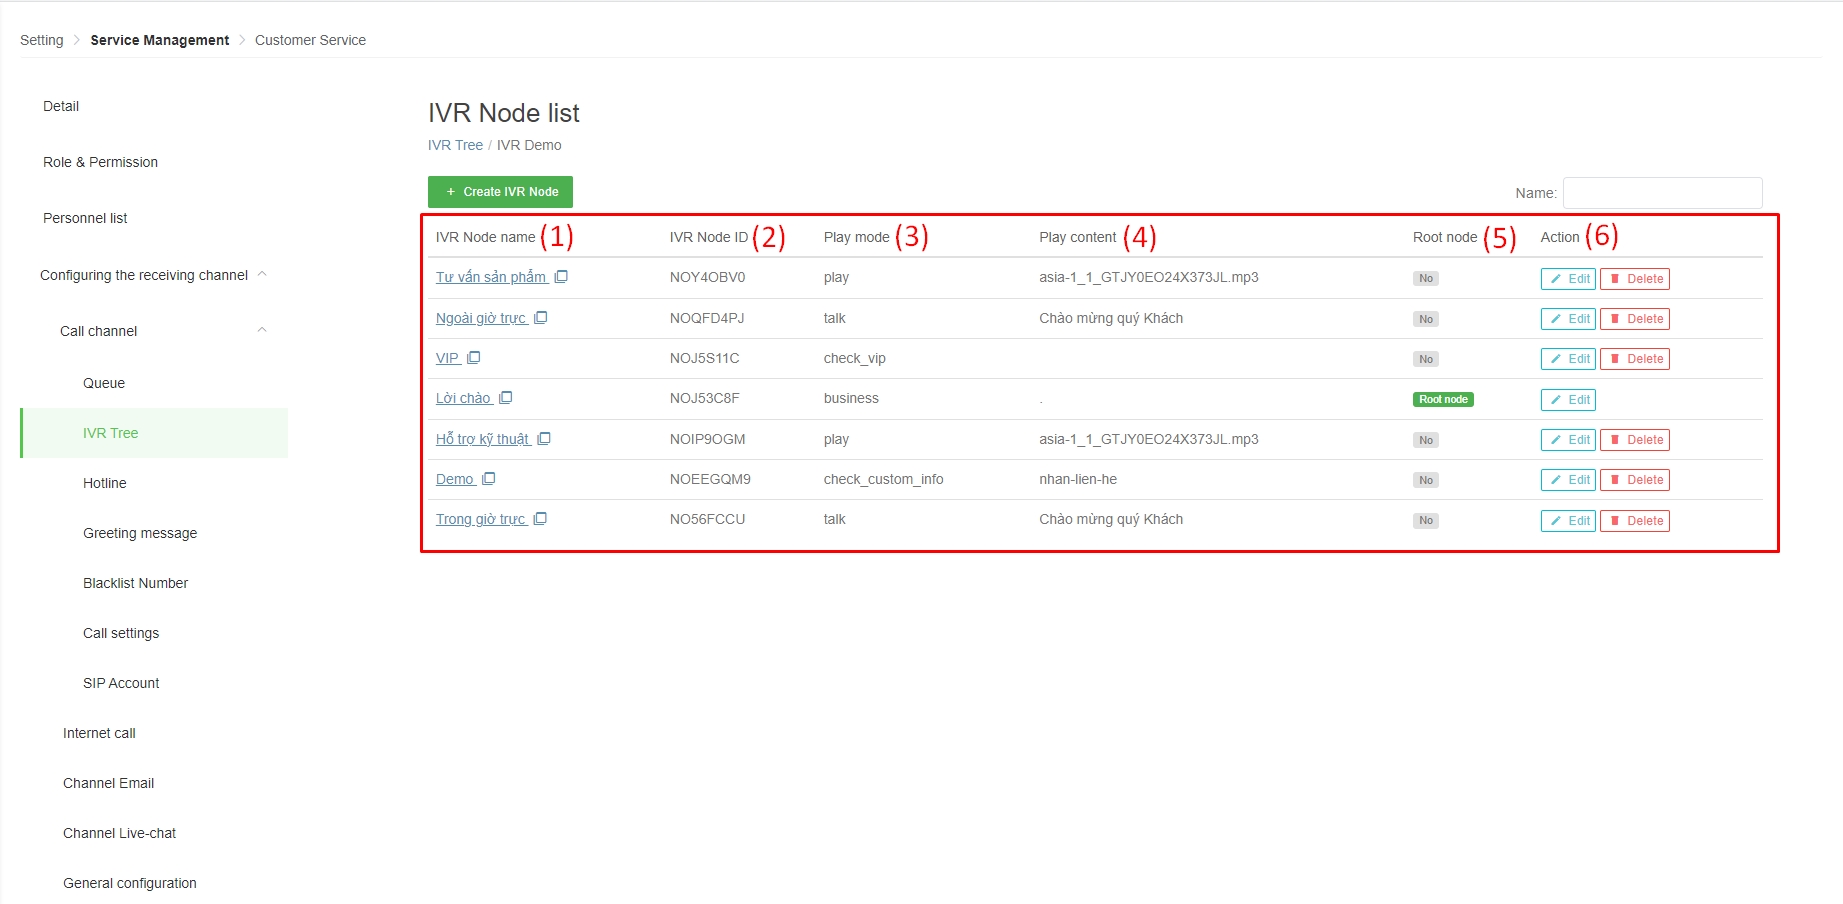
(1) IVR node name: the name of the node when it is initialized.
(2) IVR node ID: IVR button's symbol.
(3) Node broadcast mode: the mode of the IVR node.
(4) Node broadcast content: the content will be played, checked when there is an incoming call.
(5) Root node: is the first node that the call to the Customer's system needs to go through to reach the next nodes of the IVR tree.
(6) Action: User can edit or delete the created IVR node. The Root node alone cannot be deleted.
(3) Root node: also known as root node is the first node that the call to the Customer's system needs to go through to reach the .
(3.1) Placeholder: is the available field information stored in . Especially, this item is only applied when used for on the system.
In Play mode, the system will play the content according to the the user has selected.
For Play mode, items (1), (4), (5), (6), (7), (8), (9), (10), (11) are the same as the section of .
(3) Play content: the user selects the uploaded to the system to suit the desired script.
In VIP check mode, when the Customer calls in, the system will automatically check the saved on the system and will be taken to the correct call flow that has been installed.
The action section is similar to the ones explained in .
In Business mode, when the Customer calls in, the system will automatically check whether the of the Customer call is within the business hours or not and. Then, it will be taken to the correct call flow.
The actions are similar to those explained in .
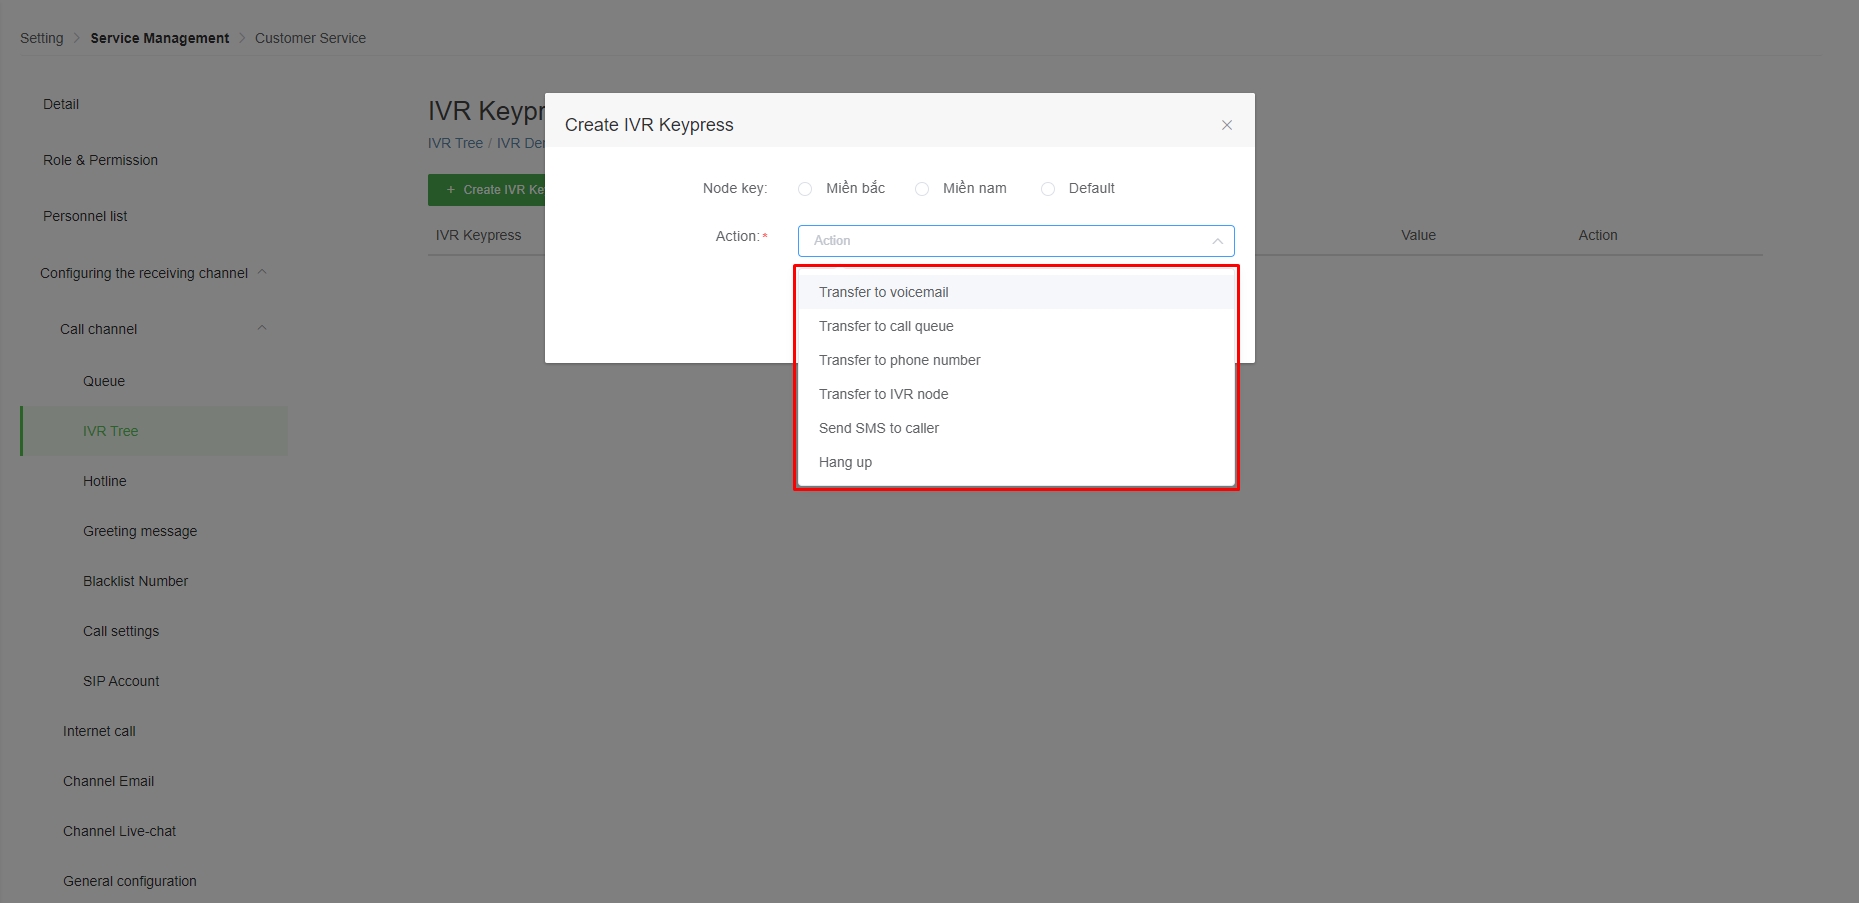
In the Check VIP by custom field mode, when the Customer calls in, the system will automatically check the information. This call will be distributed to the correct call flow.
Example: A contact that has a with 2 option Miền bắc, Miền nam. The system will check if the incoming Customer is saved on the system with any selection of the Contact Profile field. Then the corresponding action will be performed. If the Customer does not have information on the system, the system will make a call with the Default option.
The actions are similar to those explained in .