StringeeX
StringeeXContact UsIntegration
English
English
  • I. Introduction
    • 1. Register a new account
    • 2. Log in - Log out
    • 3. Change user information
    • 4. Making outbound calls
    • 5. Receive inbound calls
    • 6. Actions in the call
    • 7. Account Status
  • II. System Features
    • 1. Dashboard
      • 1.1. Inbound calls
      • 1.2. Outbound calls
      • 1.3. Chats
      • 1.4. Tickets
      • 1.5. Campaign
    • 2. Company
      • 2.1. Company management
      • 2.2. Company details
      • 2.3. Create a company filter
    • 3. Contact
      • 3.1. Contact management
      • 3.2. Contact details
      • 3.3. Create contact filter
    • 4. Ticket
      • 4.1. Ticket management
      • 4.2. Ticket details
      • 4.3. Advanced filter for tickets
    • 5. Advanced filter
    • 6. Reports
      • 6.1 Statistical reports
        • 6.1.1 Call
          • Call reports
          • Call history reports
          • Report on call center performance by time
          • ACD(Automatic Call Distributor) performace
          • History of call distribution to agent
        • 6.1.2 Chat
          • Chat statistics
          • Chat history
          • Agent's chat performance
        • 6.1.3 Agent
          • Agent activity report
          • Agent performance
          • Agent status change history
          • Agent status report
          • Report agent by ticket fields
        • 6.1.4 Ticket
          • Ticket report
          • Deleted ticket report
          • Report of ticket by drop-down field
        • 6.1.5 SMS
          • SMS report
          • SMS history report
        • 6.1.6 SLA
        • 6.1.7 Outbound call campaign
          • Customer report
          • Call report
        • 6.1.8 Email campaign
          • Email campaign report
          • Survey summary report
        • 6.1.9 eKYC
      • 6.2 Real-time monitoring
        • 6.2.1 Call monitoring
        • 6.2.2 Chat monitoring
        • 6.2.3 Agent monitoring
        • 6.2.4 Queue monitoring
    • 7. Chat
      • 7.1. Chat details
      • 7.2. Chat notes
    • 8. Knowledge base
    • 9. Settings
      • 9.1 Service management (Customer service)
        • 9.1.1 Details
        • 9.1.2 Role & Permission
        • 9.1.3 Personnel list
        • 9.1.4 Configure receiving channels
          • Channels
            • Queue
            • IVR Tree
            • Hotline numbers
            • Routing
            • Greeting message file
            • Blacklist numbers
            • Call settings
            • SIP account
          • Internet calls
          • Email
          • Live chat
          • General configuration
          • Facebook
          • Zalo
        • 9.1.5 Ticket configuration
          • Ticket field configuration
          • Marco
      • 9.2 HR & Team management
        • 9.2.1 Personnel
          • Agent list management
          • Set up personnel information
        • 9.2.2 Group
          • Group list management
          • Create a group
      • 9.3 Field configuration
        • 9.3.1 Contact field
        • 9.3.2 Company field
        • 9.3.3 Contact data entry field
        • 9.3.4 Ticket field
      • 9.4 Trigger configuration
        • 9.4.1 Trigger introduction
        • 9.4.2 Trigger list management
        • 9.4.3 Create a new trigger
      • 9.5 SLA & Automation Configuration
        • 9.5.1 Definition of SLA - Automation
        • 9.5.2 List Management
        • 9.5.3 Create new SLA/ Automation
      • 9.6 Other configurations
        • 9.6.1 Custom status
        • 9.6.2 IPs Configuration
        • 9.6.3. Display permission
        • 9.6.4 Portal configuration
          • Time zone & Language
          • Login Method
        • 9.6.5 Working time
      • 9.7 Campaign management
        • 9.7.1 Outbound call campaign
          • Types of campaigns
          • Setup a campaign
          • Steps to participate in a campaign
          • Campaigns
          • Customers
          • Agents
          • Survey template
          • Survey answers
          • Customer warehouse
        • 9.7.2 SMS Campaign
          • Campaigns
          • Customers
          • Campaign history
        • 9.7.3 Email campaign
          • Campaigns
          • Customers
          • Survey template
          • Email template
          • Sendgrid account list
          • Survey answers
          • Do-not-send email list
      • 9.8 Integration
      • 9.9 Knowledge base
      • 9.10 Payment
        • 9.10.1 Topup
        • 9.10.2 Plans
        • 9.10.3 Payment history
      • 9.11 Stringee connection
  • III. Mobile app
    • IOS APP
      • 1. Log in
      • 2. Ticket
      • 3. Contact
      • 4. Make a call
      • 5. Call history
      • 6. Setting
      • 7. Set up call notifications on the phone app
    • Android APP
      • 1. Log in
      • 2. Ticket
      • 3. Contact
      • 4. Make a call
      • 5. Call history
      • 6. Settings
      • 7. Set up call notifications on the phone app
  • IV. Frequently asked questions
    • 1. Forget a password
    • 2. Change a language
    • 3. Permissions for devices (headset/microphone)
    • 4. Setting the method of call distribution for agents
    • 5. Convert contacts from one account to another completely
    • 6. Note when uploading contacts via excel file
    • 7. Delete contacts in bulk
    • 8. Merge duplicate contacts
    • 9. Check a current balance of a portal
    • 10. Manage app notifications
    • 11. Clear browser cache
    • 12. Configure IP Phone connection with Stringee contact center
    • 13. Common errors when making calls
    • 14. Log in and report Captcha Invalid error
    • 15. How to create multiple business hours
    • 16. File formats supported on StringeeX
    • 17. Instructions for getting call code (call ID)
    • 18. Using Google and Microsoft Accounts for Registration, Login, and Account Linking
    • 19. Two-factor authentication
    • 20. Incoming calls have popup but no ringtone
Powered by GitBook
On this page
  • Advanced filter interface
  • (1) Filter information
  • (2) Filter list
  • Instructions for creating advanced filters
  • (1) Combine filter conditions
  • (2) Search
  • (3) Create and authorize filters
  • (4) Export data
  1. II. System Features

5. Advanced filter

StringeeX has designed a smart search filter on the ticket interface, contacts and companies, helping users to quickly search and filter results by specific fields.

Previous4.3. Advanced filter for ticketsNext6. Reports

Advanced filter interface

(1) Filter information

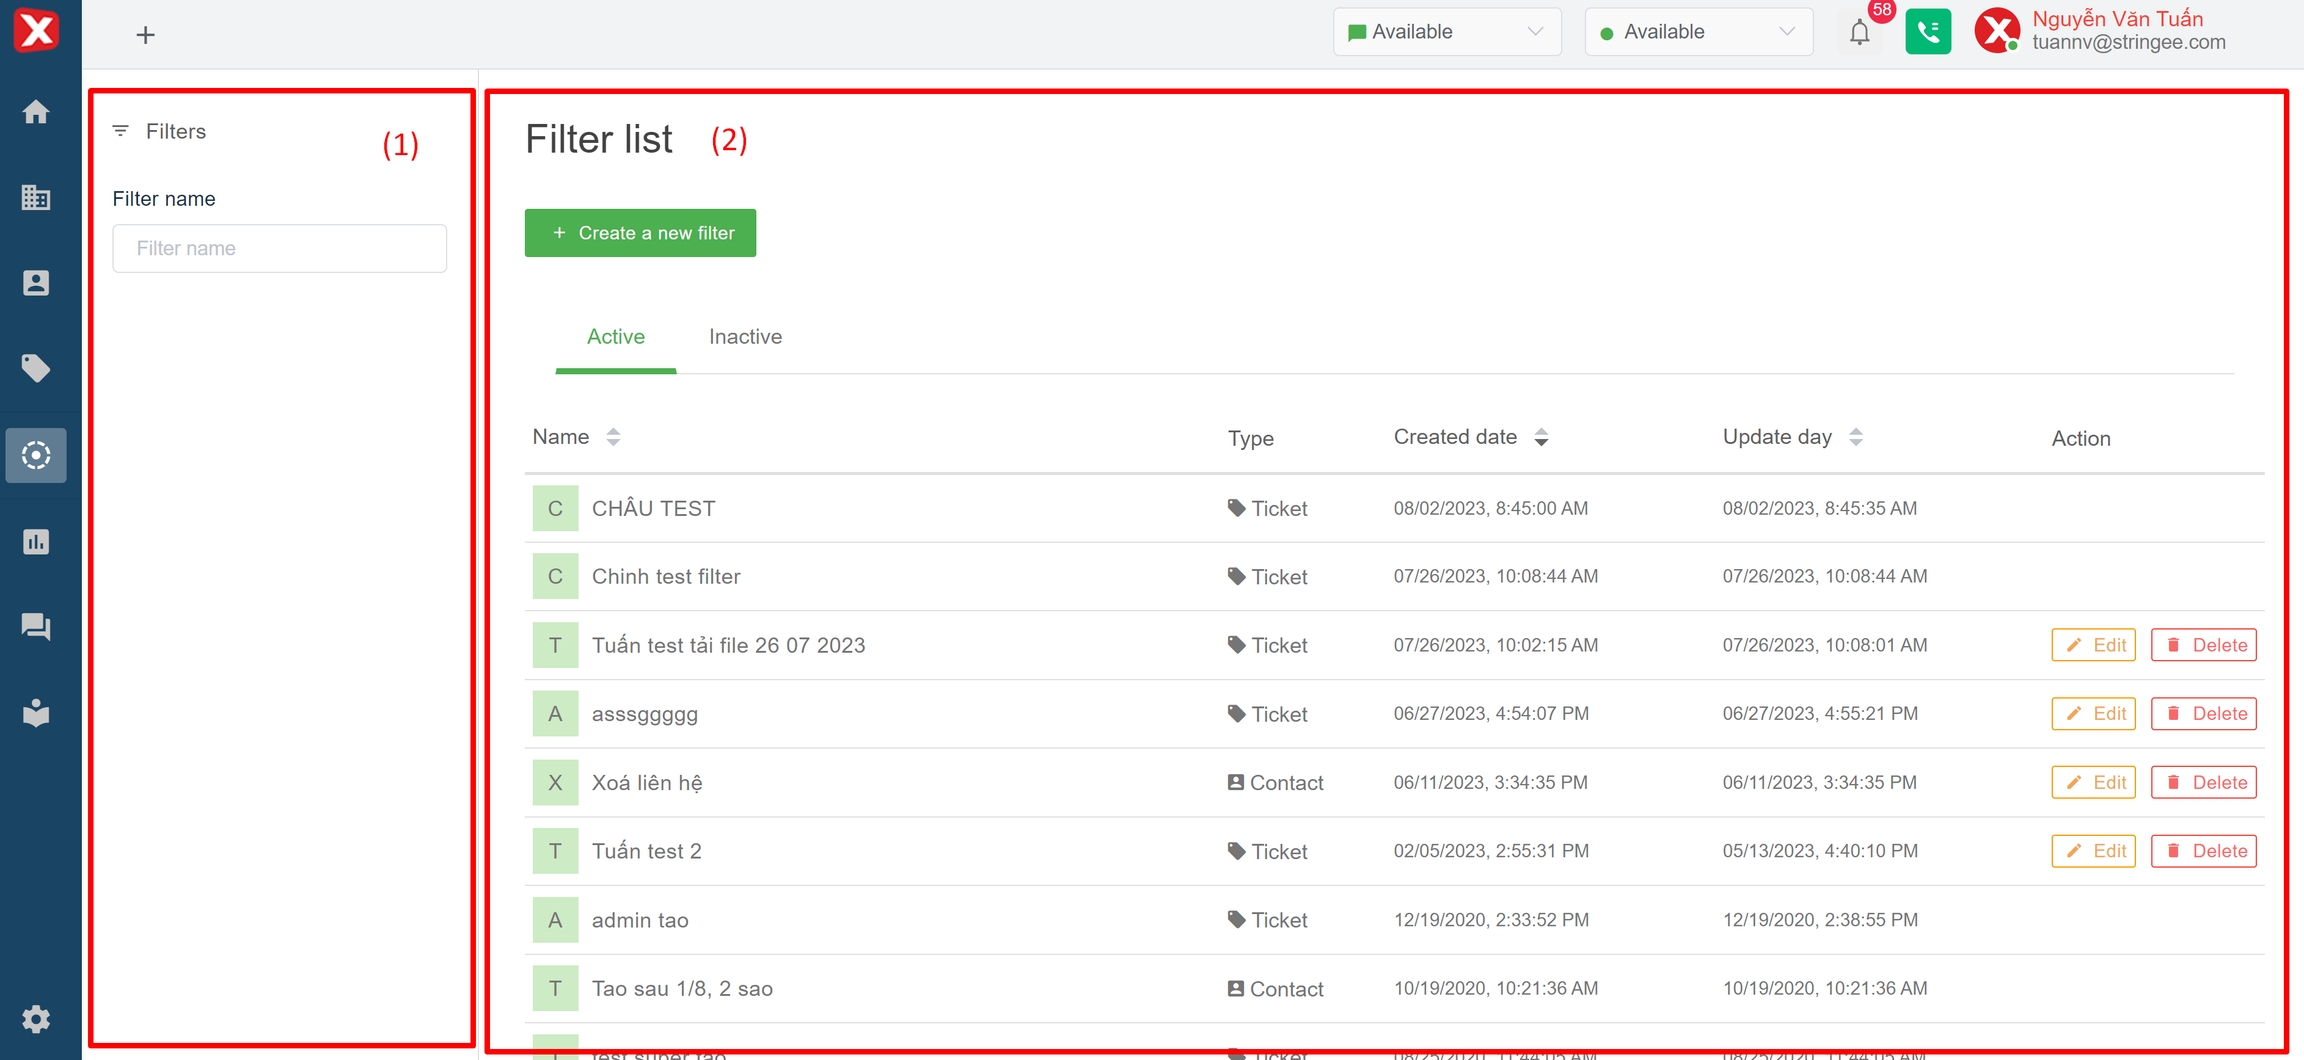
  • Filter name: user can search by filter name

(2) Filter list

Includes two filter lists which are Active and Inactive with the same fields. To switch from active to inactive, the user updates the status in the corresponding correction action (on – off)

  • Name: a name of advanced filter

  • Type: the type of filter

    • Contact: filter to search for contacts by conditions

    • Ticket: filter to search for tickets by conditions

    • Company: filter to search for companies by conditions

  • Created date: the time the filter was created

  • Updated date: the last time the filter was updated

  • Action: action to manipulate the corresponding existing filter

    • Edit: users can only edit filters created by themselves, the content that can edit includes:

      • Filter name: change the current filter name

      • Who can access: select the audience using the filter, the supported objects are “Only me”, “Agents in the group”, “All agents”

      • Status: the status of the filter. If it is on (turn the button up to green), the filter is in the Active list. If it is off (the button is dark), the filter is in the Inactive list. If users want to switch back to the status, the user needs to enter Inactive tab to manipulate Edit

    • Delete: delete the corresponding filter

Instructions for creating advanced filters

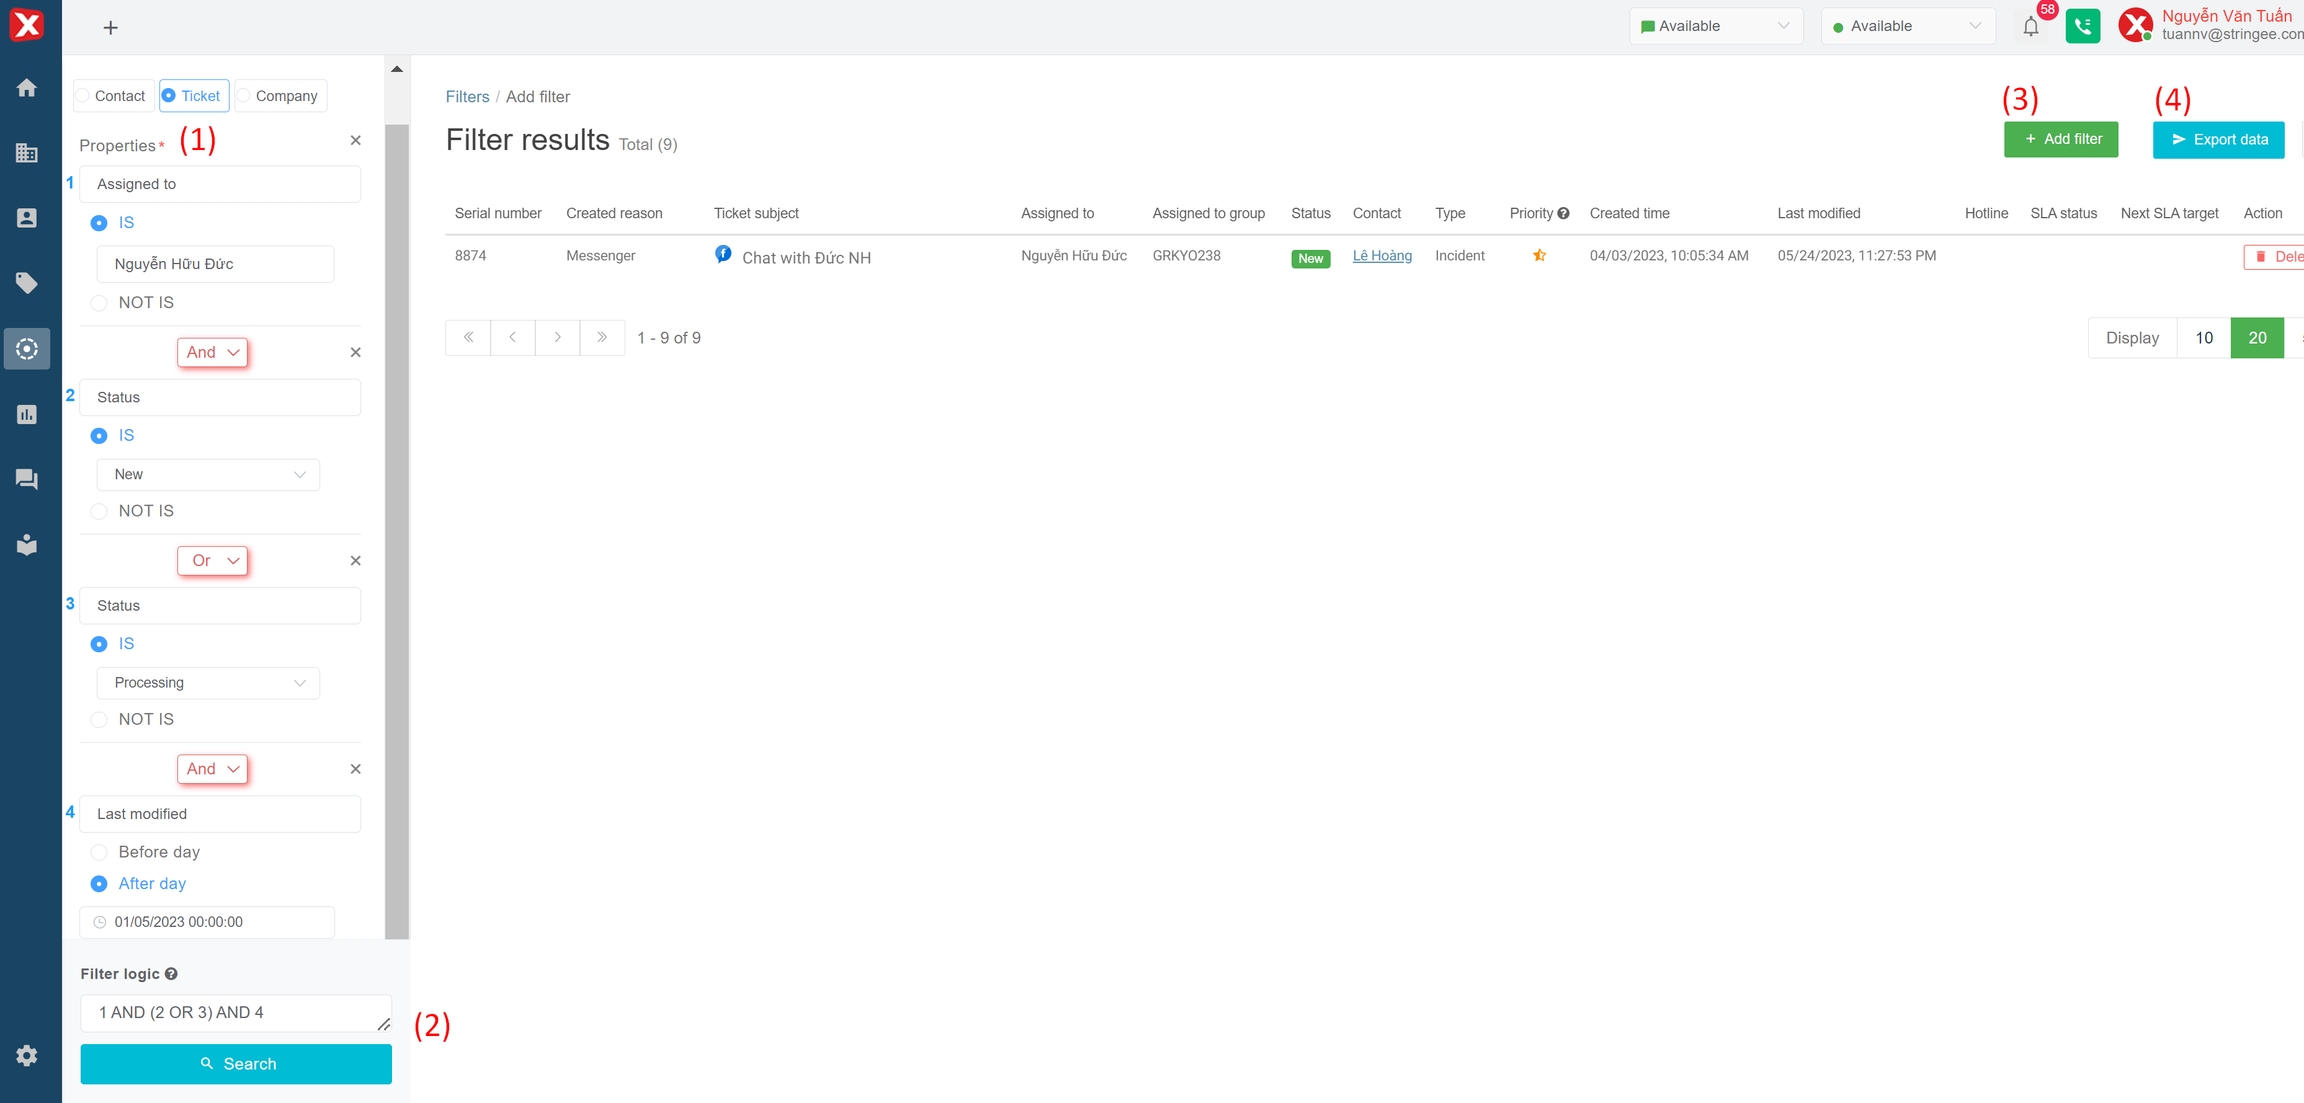
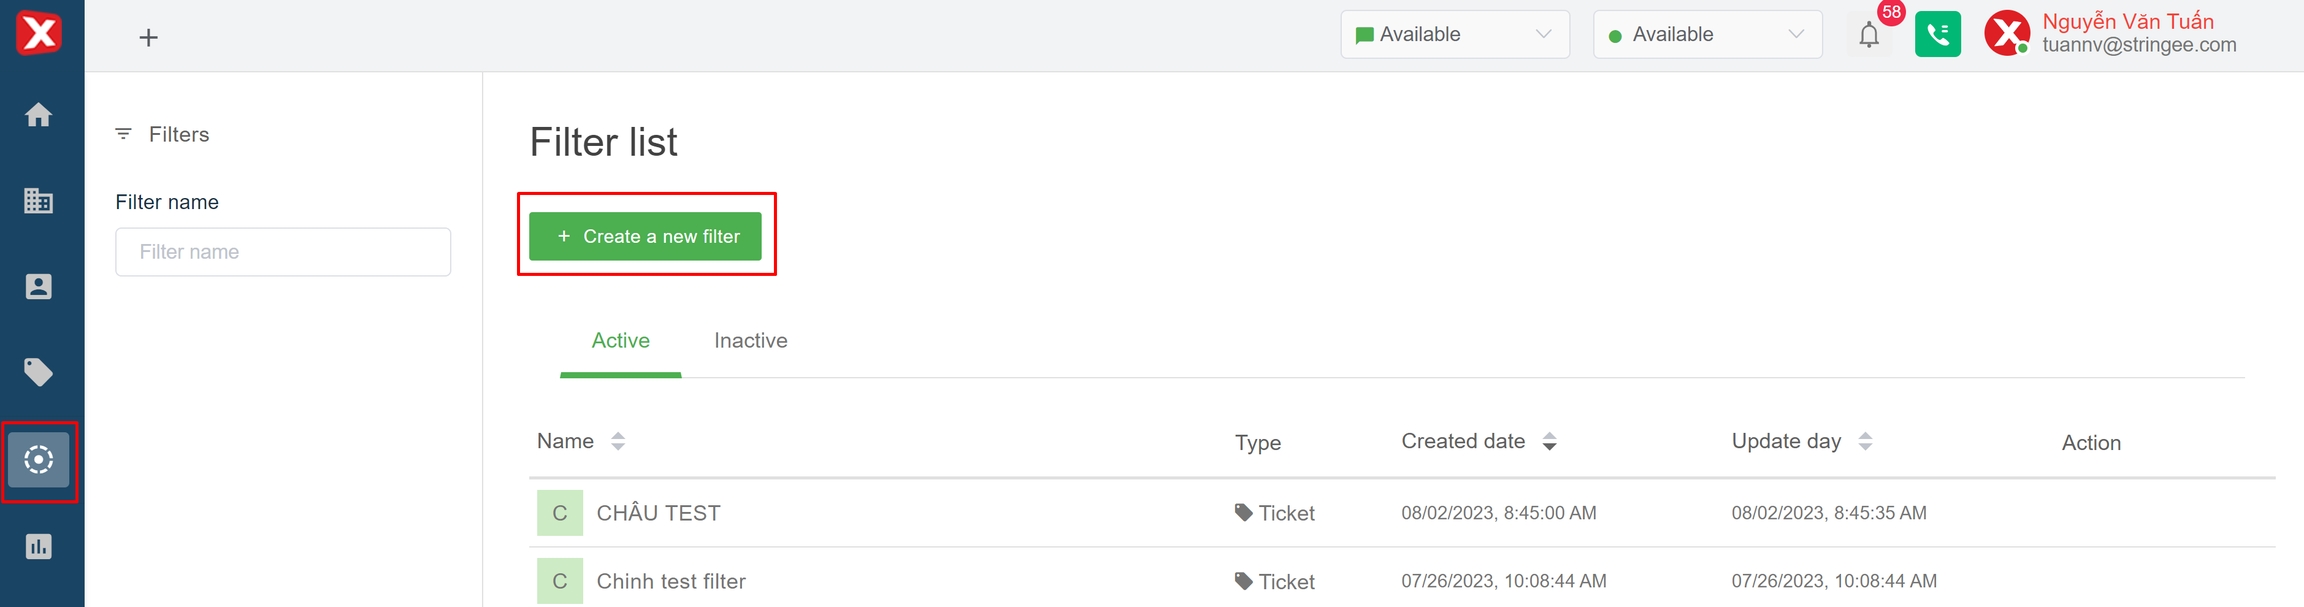
In the filter list interface, users select "Create new filter" to name and combine filter conditions:

(1) Combine filter conditions

The user will select the filter type and combination of filter conditions (filter properties) here

For example: In the figure, create a ticket filter with the following logic: The tickets are assigned to the agent named Nguyen Huu Duc (condition 1), the ticket status is new (condition 2) or the ticket status is processing (condition 3). These tickets were last updated after 00:00 on May 1st, 2023.

Note: Because there is conditional matching (advanced), it is necessary to combine logic in the Filter Logic section. In the example in this figure, the logic will be: 1 AND (2 OR 3) AND 4

  • AND: returns a result that satisfies both conditions ("and")

  • OR: returns a result that satisfies one of two conditions ("or" condition).

  • Round brackets: processing priority, can use more than 1 pair of brackets to define priority, for example: ((1 OR 2) AND 3) OR 4

Users manipulate and combine similar conditions when creating contact and company filters

(2) Search

Click to let the system return results according to the filter logic

(3) Create and authorize filters

The user saves the newly created filter for the next quick use. When clicking on Create filter, the user sets the "Filter name" and selects the "Who can access" permission according to the purpose.

  • Only me: Only the person who created the filter can view, edit, and delete this filter.

  • Agents in groups: Users can select multiple groups. All agents in the selected group can see the filter. Only filter creators can edit or delete filters.

  • All agents: All agents in the system can view the filter. Only filter creators can edit or delete filters.

(4) Export data

Export device search data in excel format.

Step 1: On the Advanced Filter list, the user clicks on a filter to export → the screen displays a list of tickets (tickets, contacts, companies) of the filter.

Step 2: Users select the arrow next to display the desired information fields. The information fields displayed at the returned result interface will be exported to the corresponding excel

Step 3: The user clicks on the "Export data" button → a popup screen will be displayed containing the email information to receive the data file (default is the current user's email). Here the user can enter another email, then press the “OK” button. The system will automatically send an email containing this data file and display the message "Success".