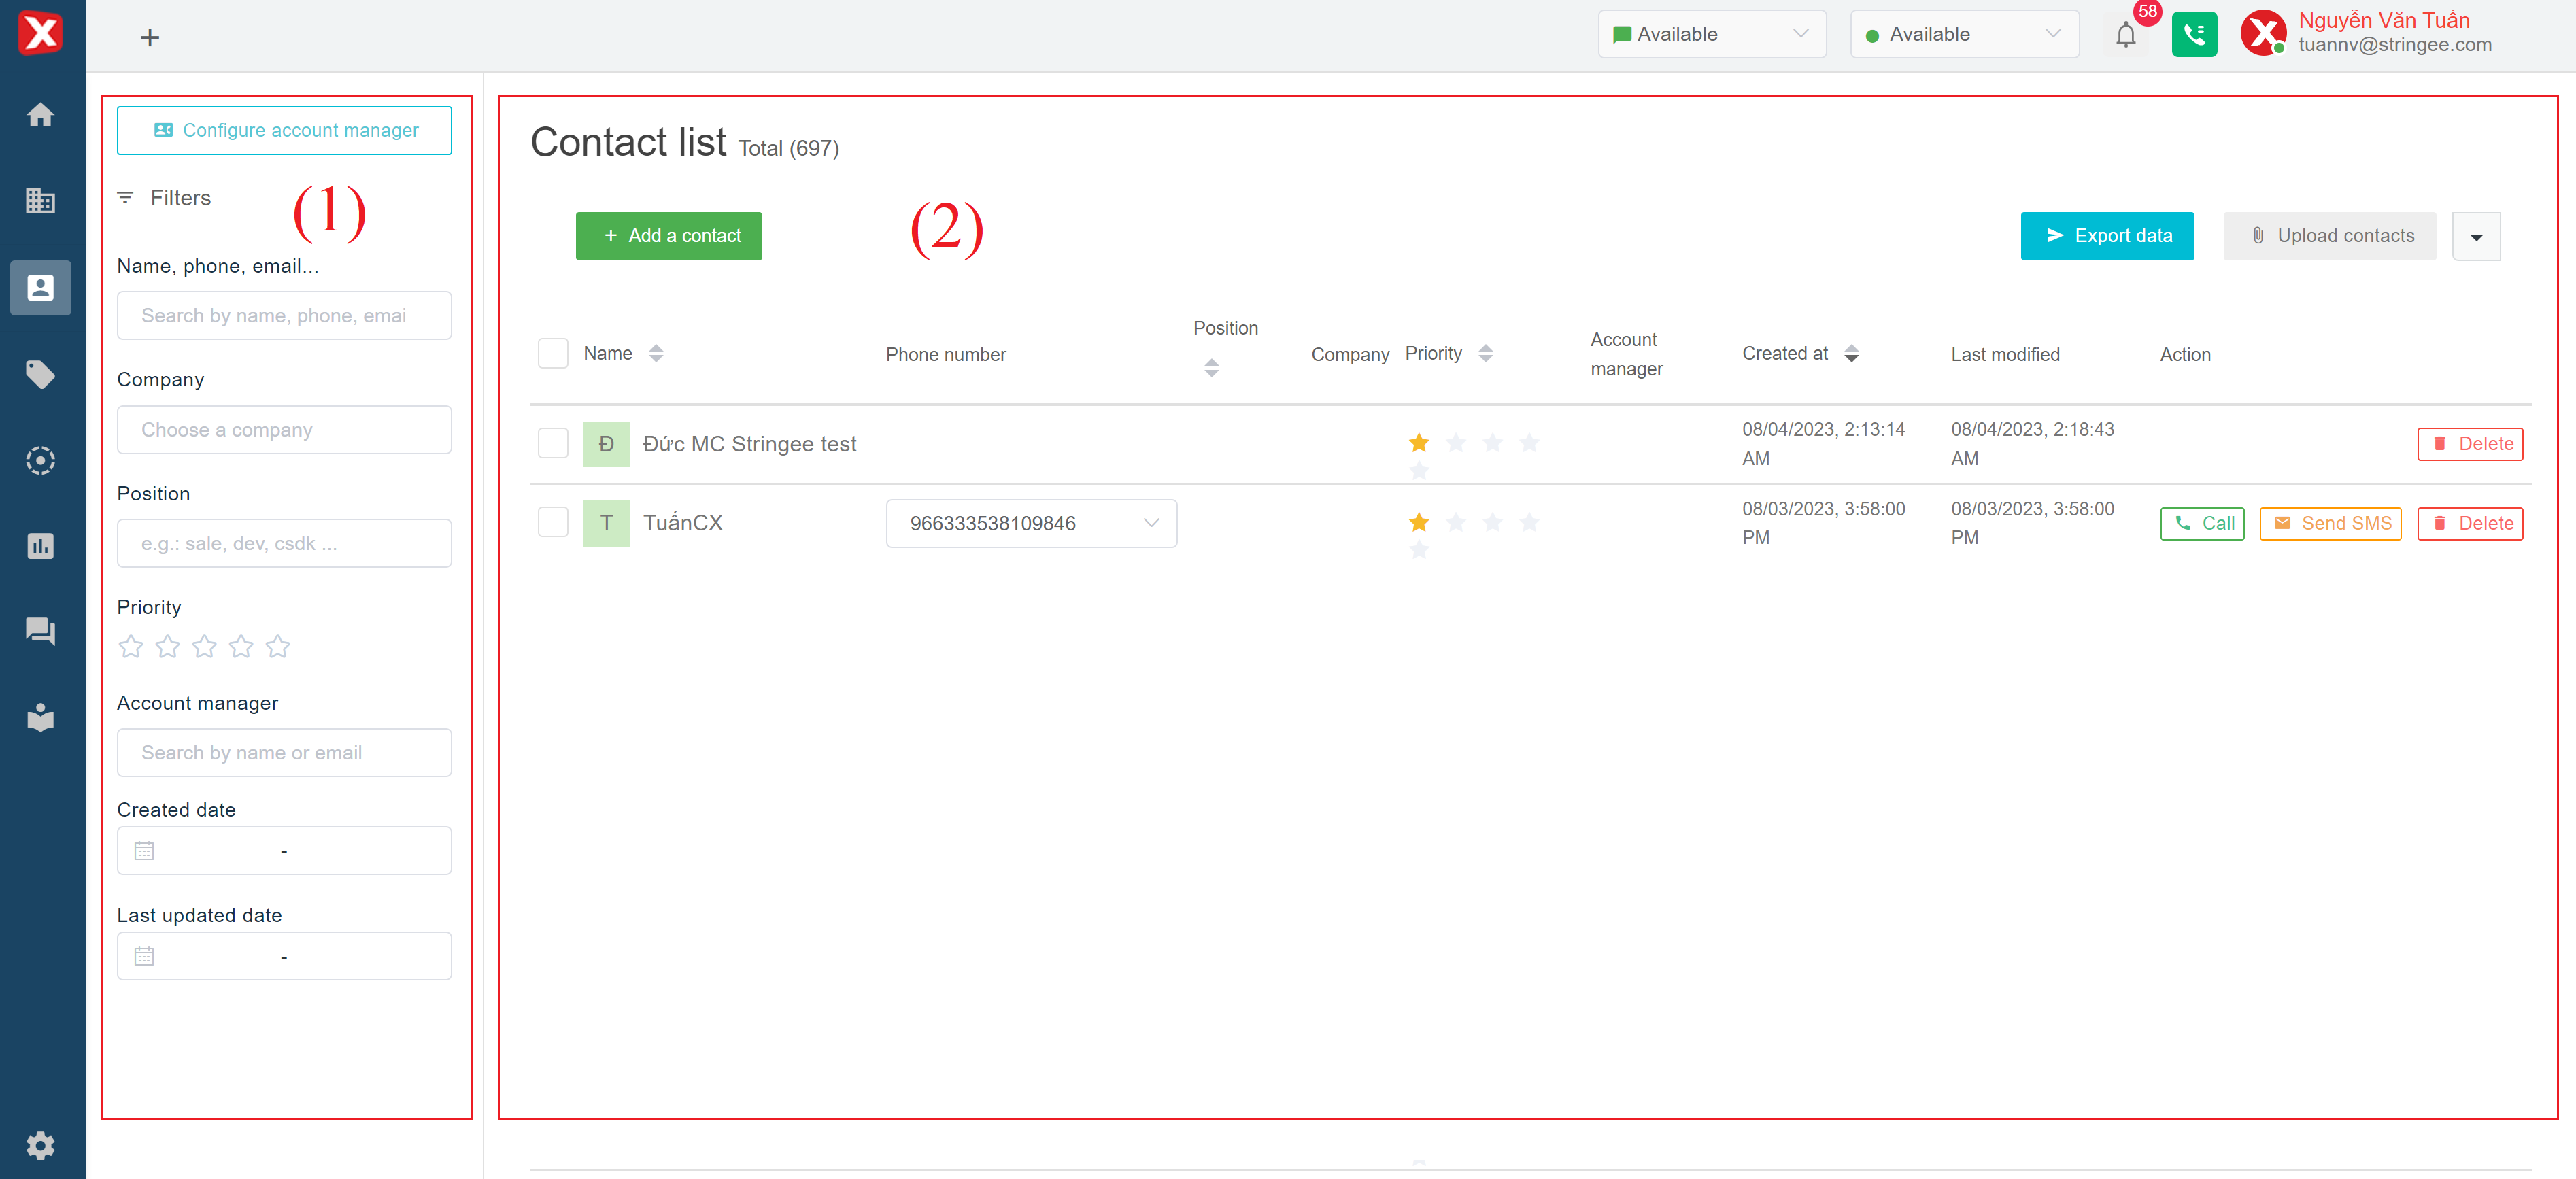
# 3.1. Contact management
## Contact management interface
### (1) Search filter
* **Name, phone, email:** filter based on one of the fields name, email, phone number
* **Company:** filter contacts by business information field
* **Position:** filter contact by position information field
* **Priority:** filter by rating (number of stars represents high rating - vip)
* **Account manager:** filter contacts by an account manager (i.e. agent on the system)
* **Created date:** filter by contact creation time
* **Last updated date:** filter by contact updating time
* **Customer list:** filter contacts by customer list (the customer list is in the campaign inventory). This filter field is typically used for customers in a campaign's contact list
### (2) Contact list
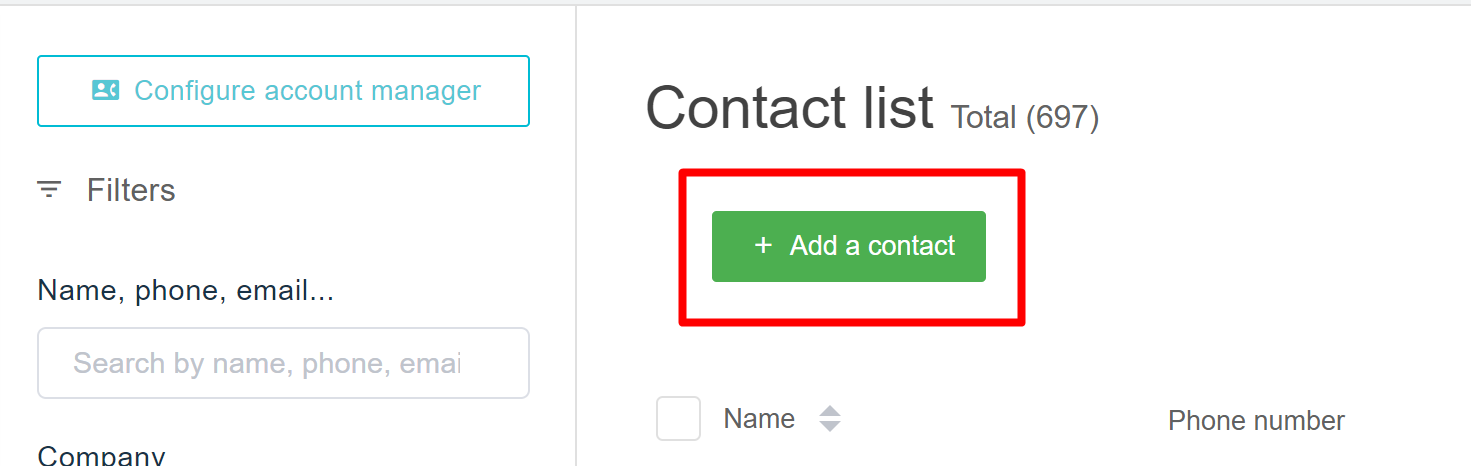
* **Add a contact:** manual creation of new contact
* **Export data:** export excel data file to device
* **Upload contact:** Upload contacts in bulk to the system by the excel file. Refer to the steps to upload contacts in the section How to upload contacts
* **Name:** the name of the contact
* **Phone number:** the phone number of the contact
* **Position:** the position of the contact
* **Company:** the company information of the corresponding contact
* **Priority:** the contact's rating (the number of stars represents a high rating - vip)
* **Account manager:** the account which the agent manages contacts
* **Created date:** time to create the contact
* **Last updated date:** the last time the contact was updated
* **Action:**
* **Gọi:** call out to the respective contact via hotline
* **SMS:** send SMS to the respective contact. Note: customers who want to use this feature need to notify salesman to integrate the business's Brand name sale that has been registered with the telecommunication providers into the system.
* **Delete:** Delete the respective contact
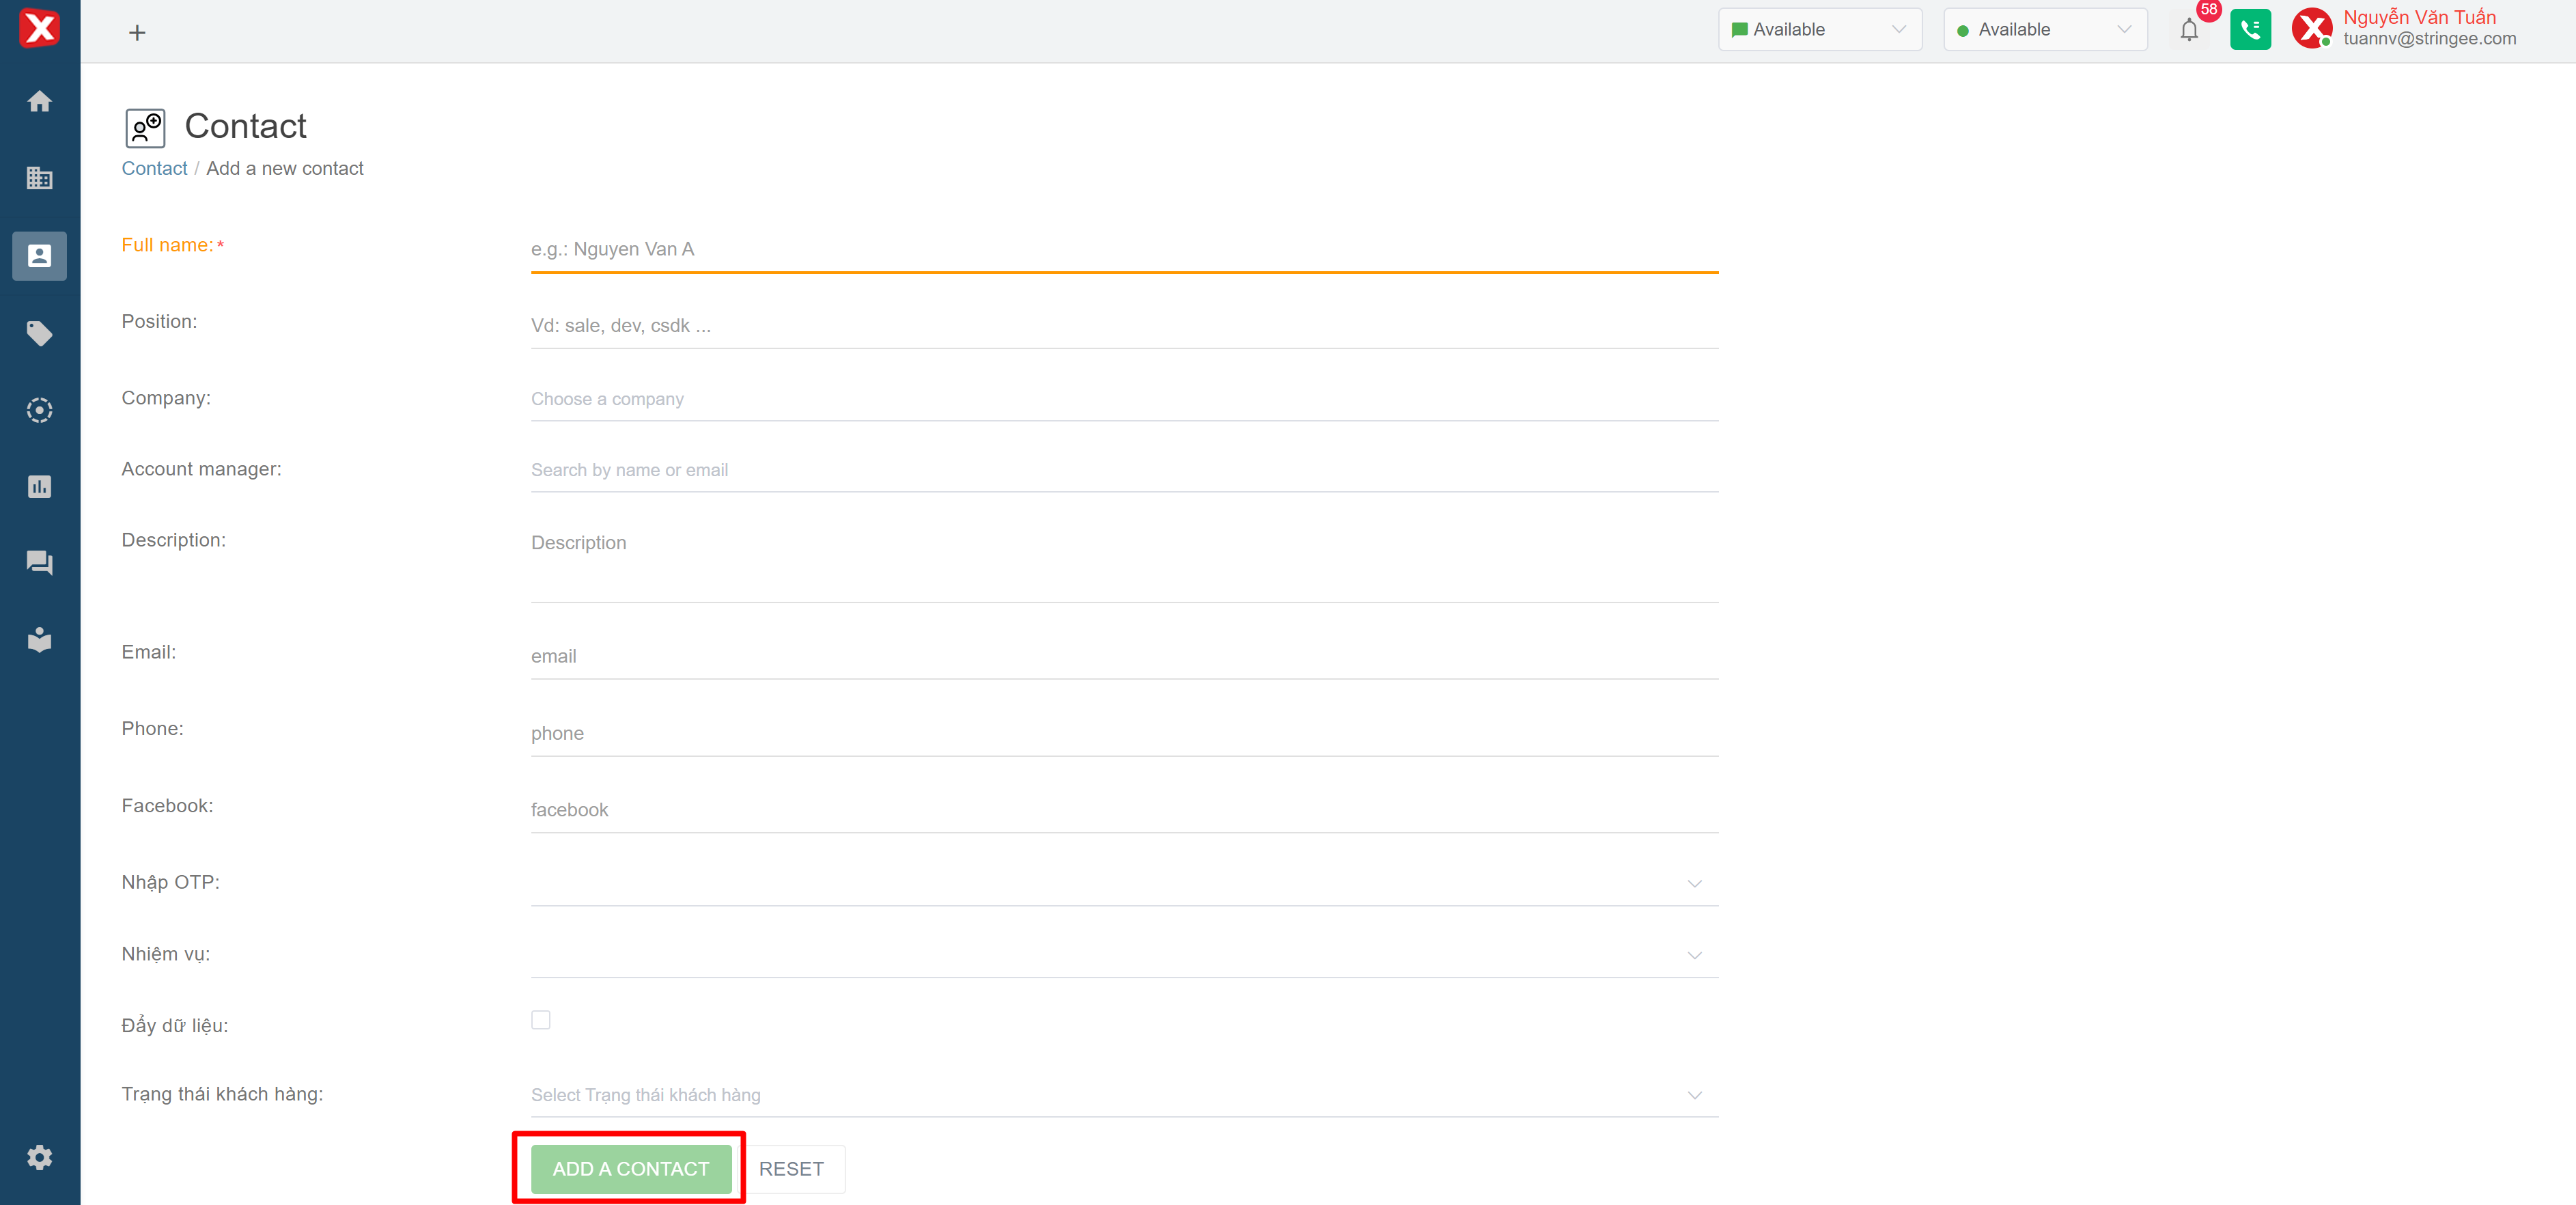
## Create a manual contact
Users click on “Add a contact” in the contact management interface to create a new contact manually:
Depending on the information fields that have been configured in the contact field configuration (see more in the contact field configuration), the admin fills in the corresponding information and clicks on the “Add to contact” icon (the icon will light up when all required information is filled) to create.
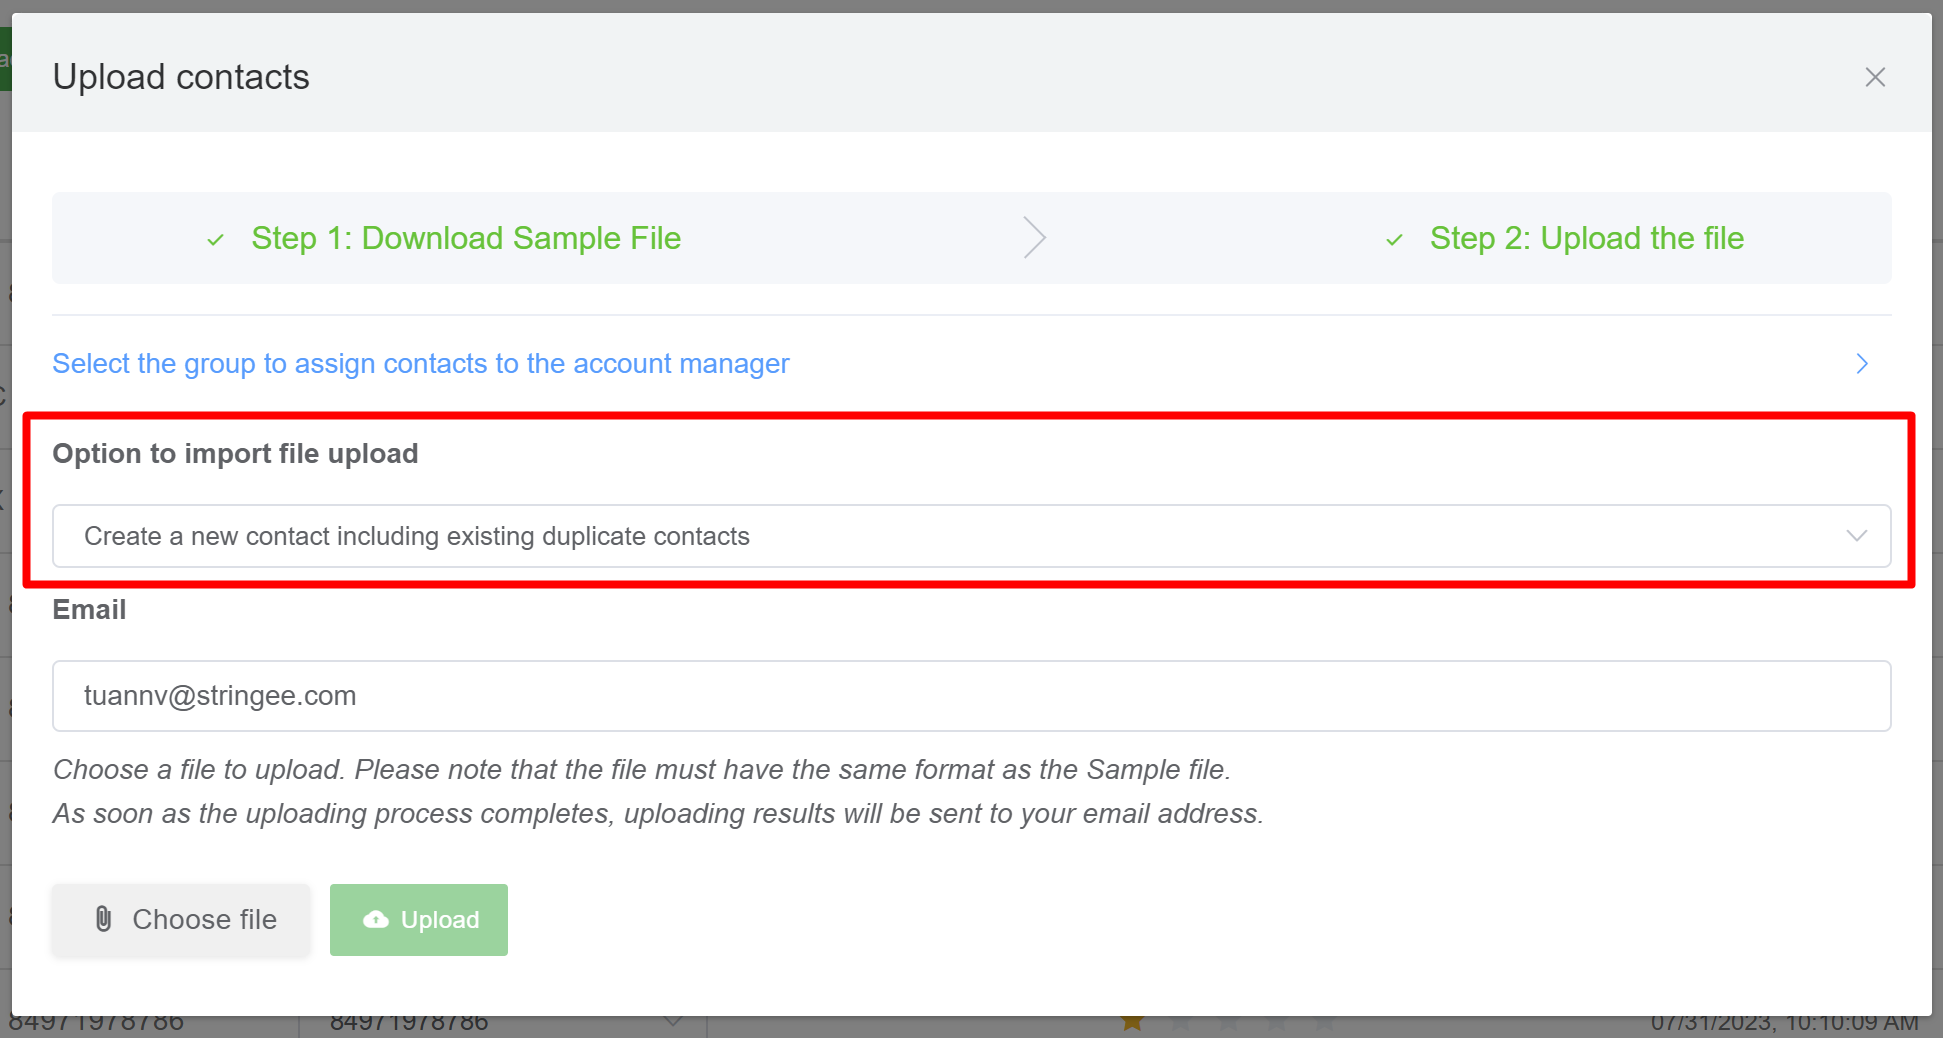
## Upload contacts via excel files
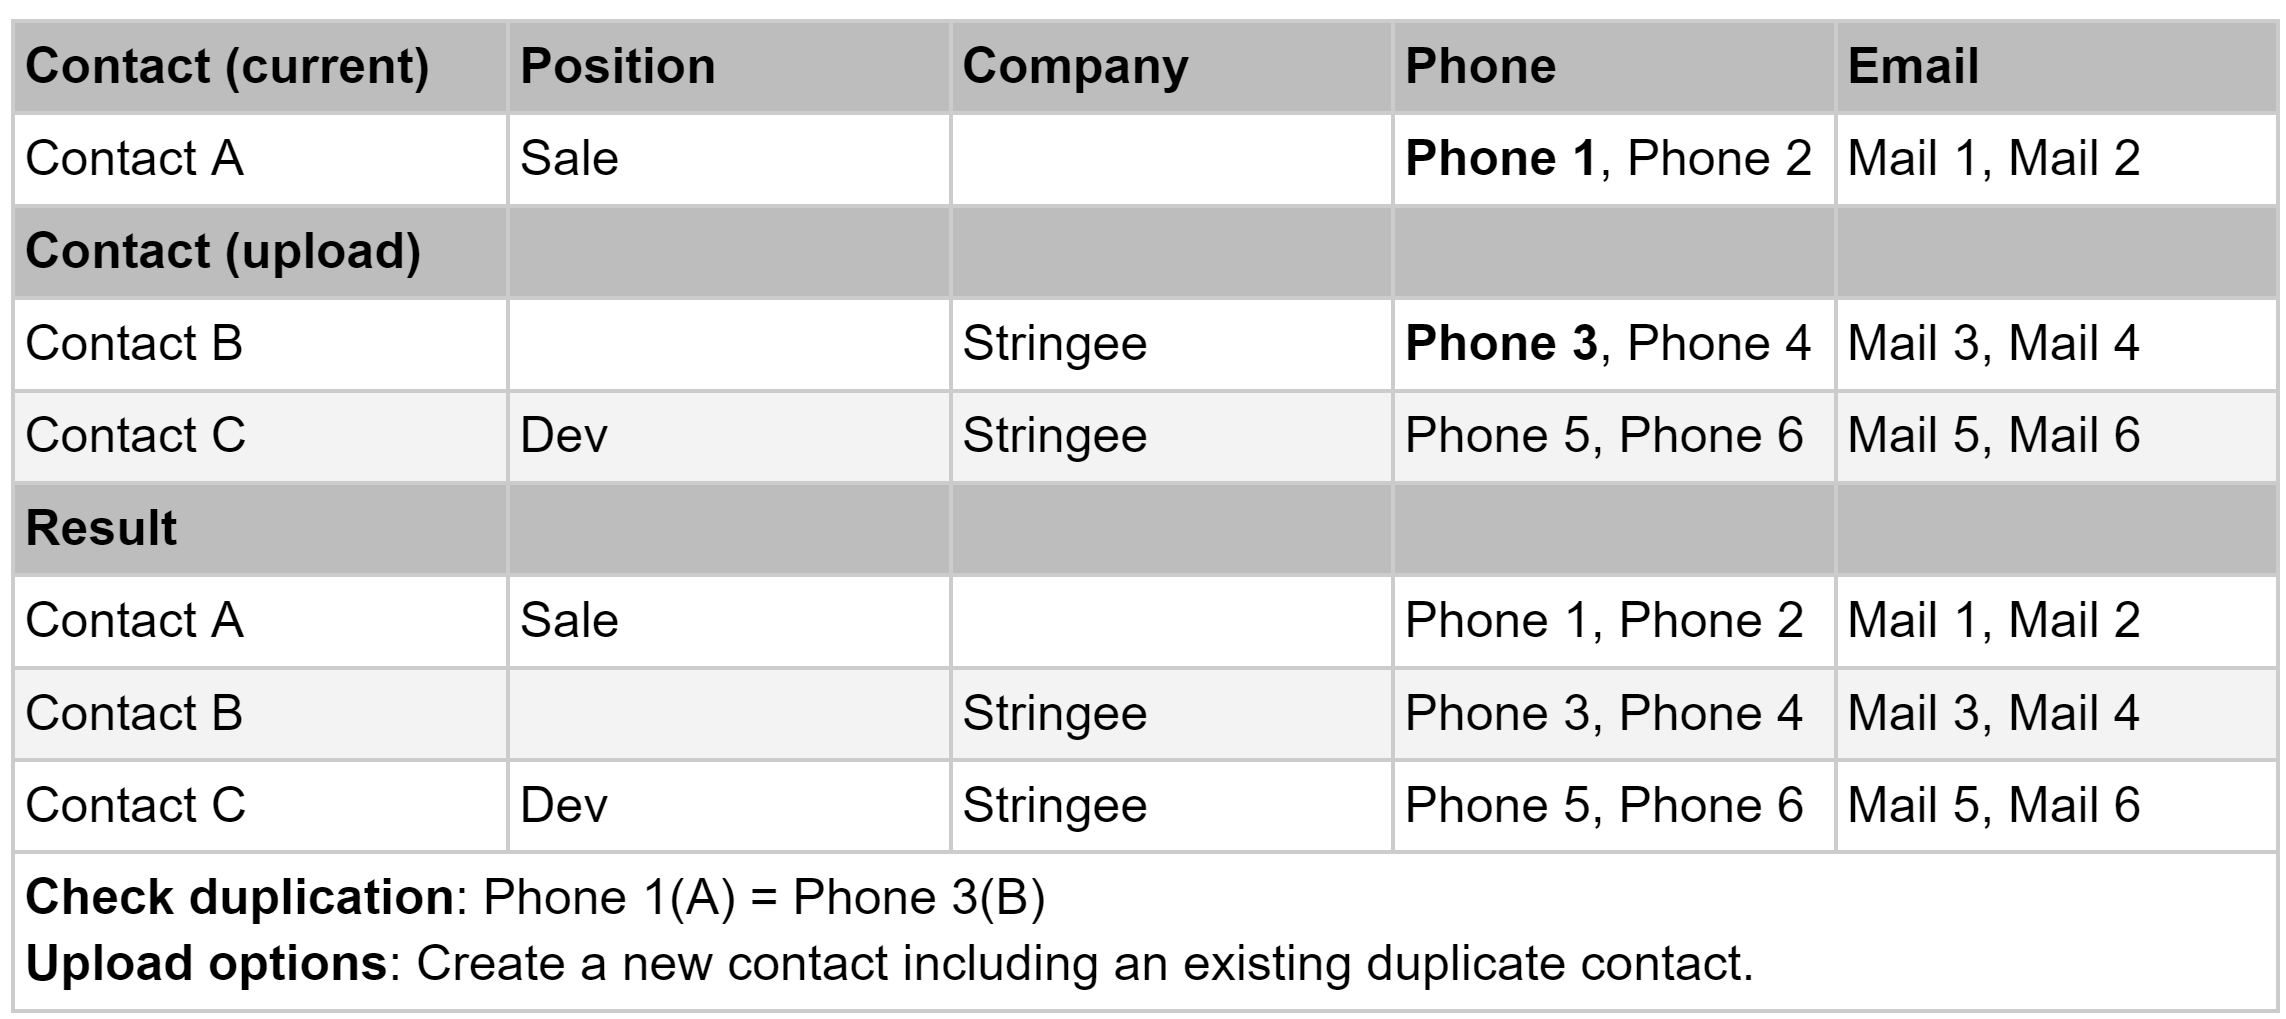
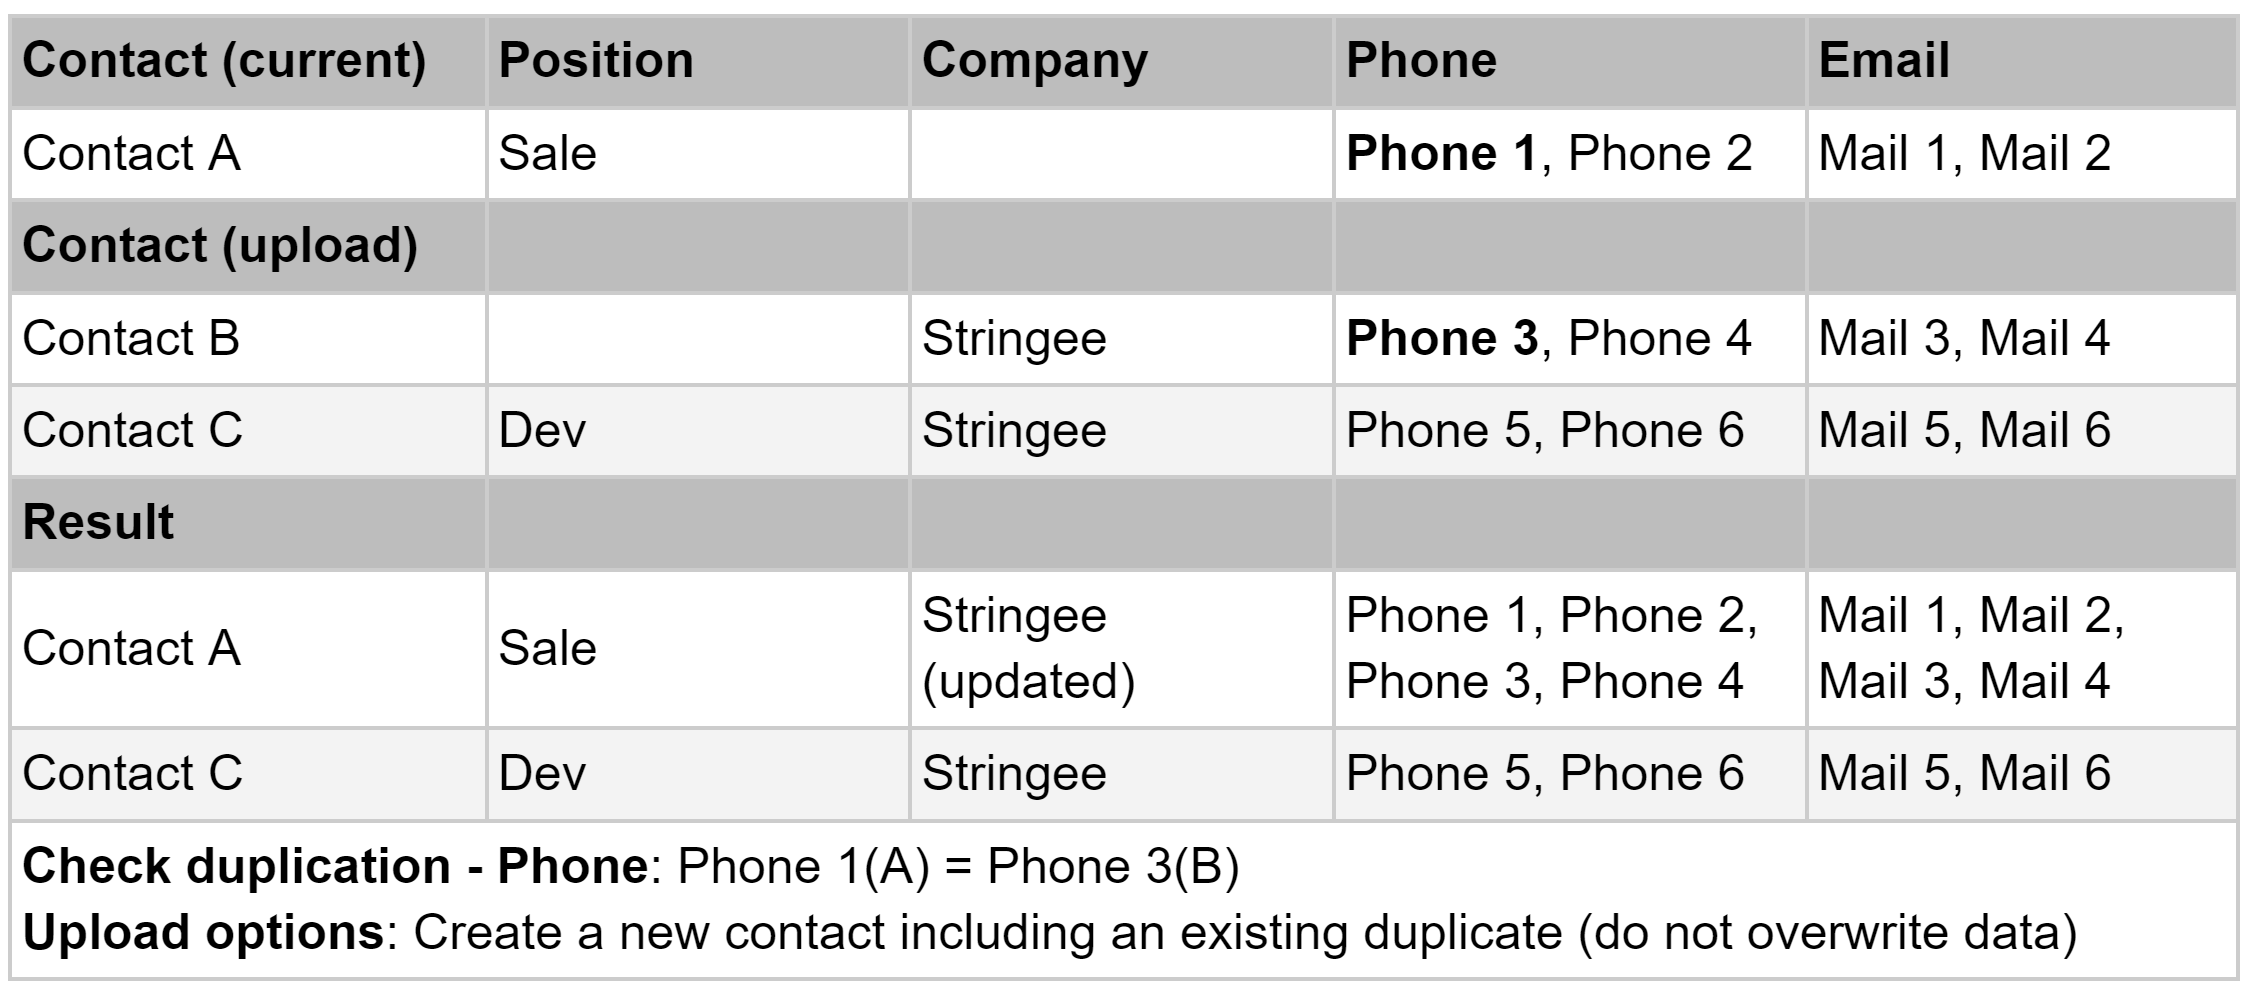
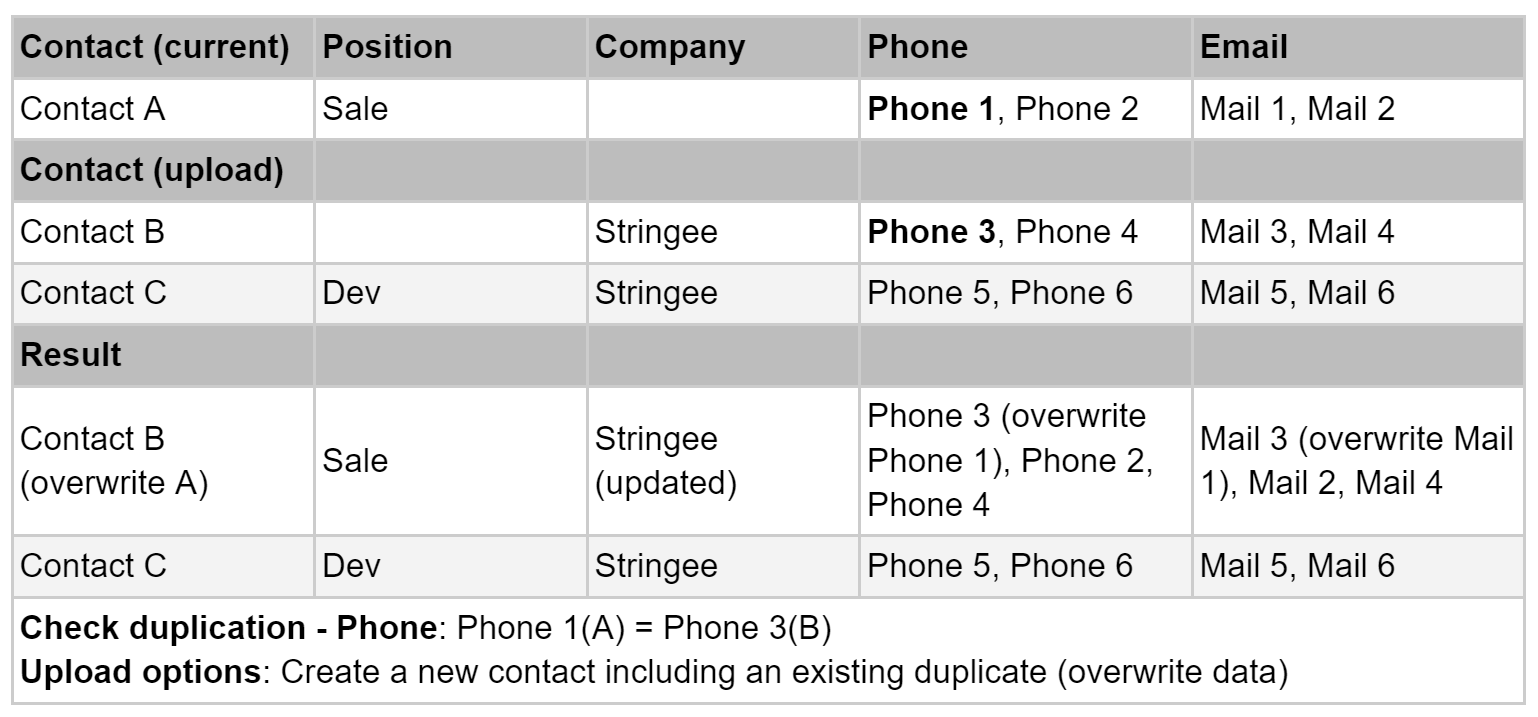
The Contact Upload feature checks for data duplication including options for importing file uploads, allowing users to configure how to overwrite existing contacts with existing information when uploading.
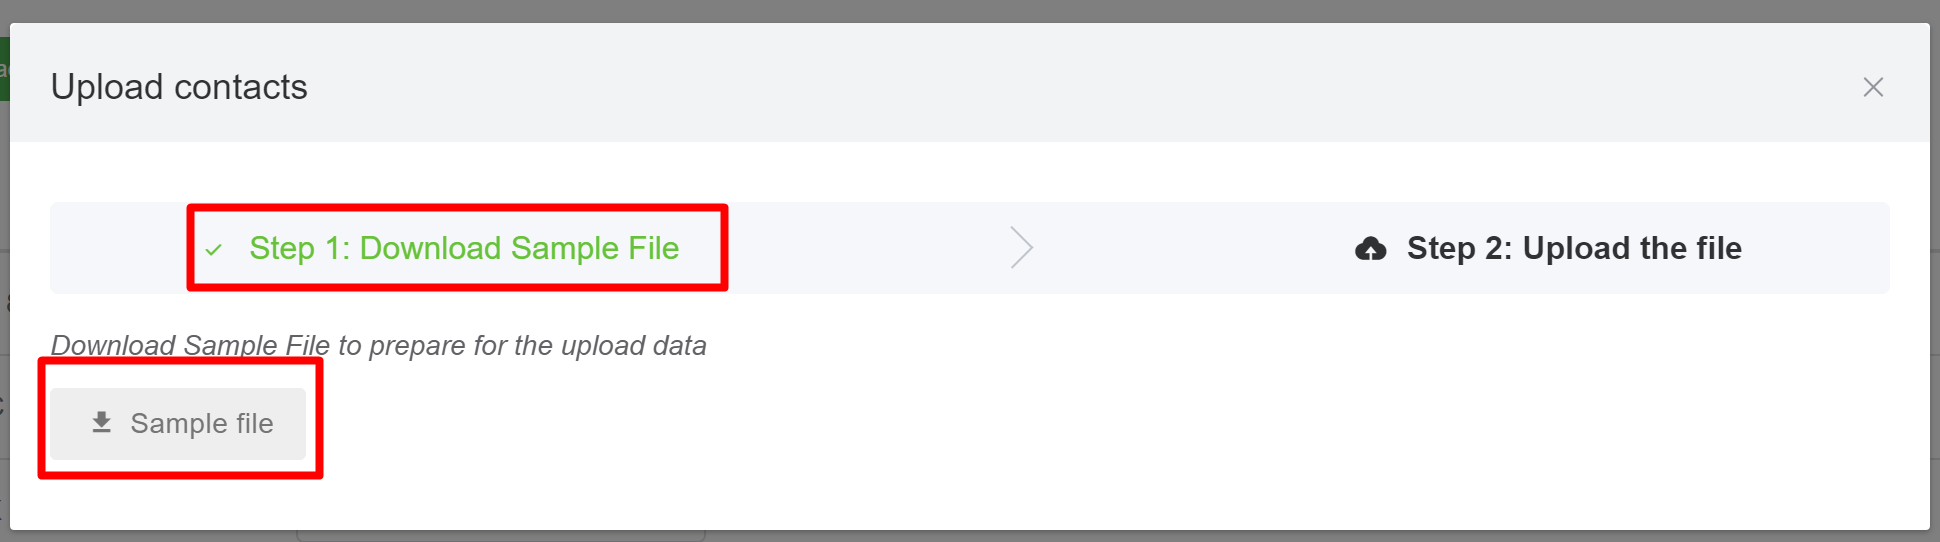
### **Step 1:** Upload contacts
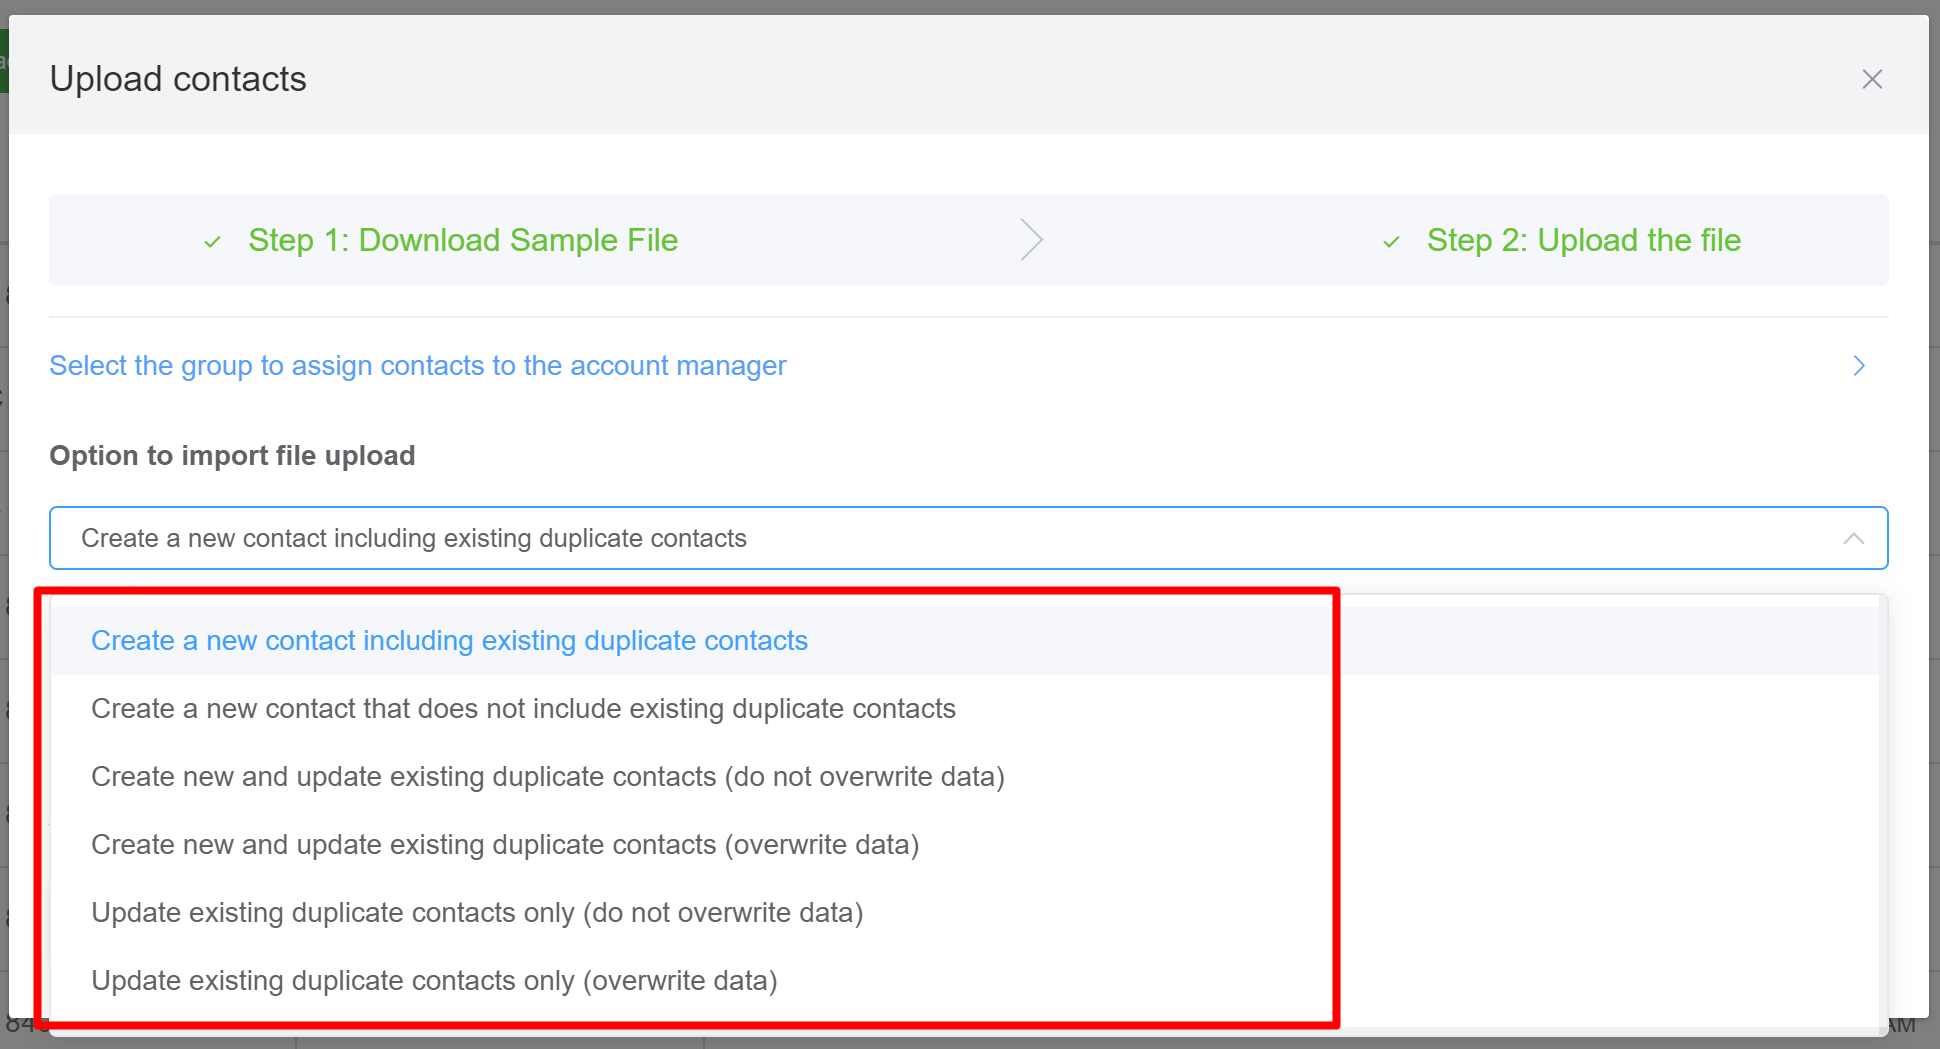
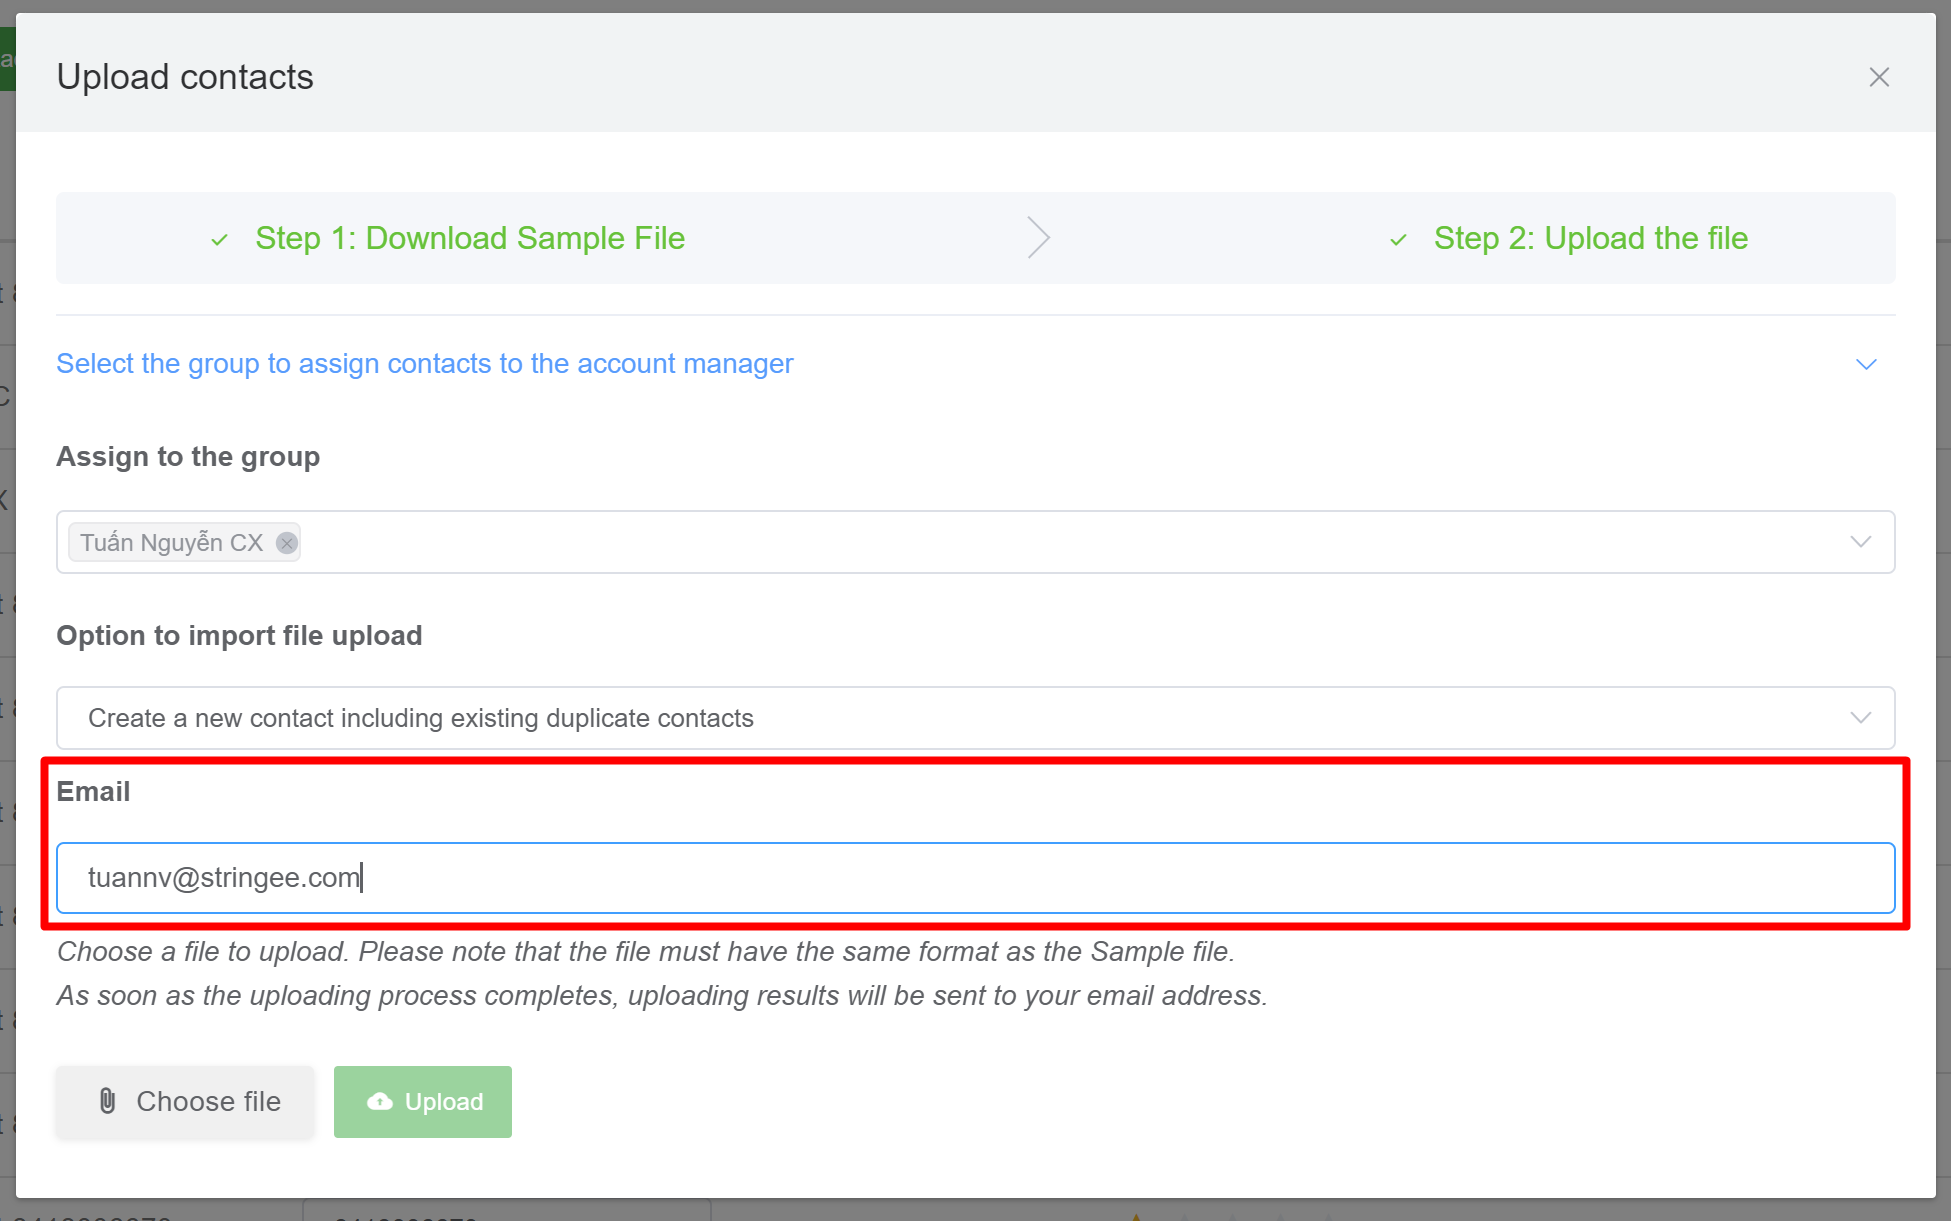
Contact Interface => Click Upload contacts. Optional popup appears as shown
### **Step 2:** Select upload type
At "Option to import file upload" choose upload type
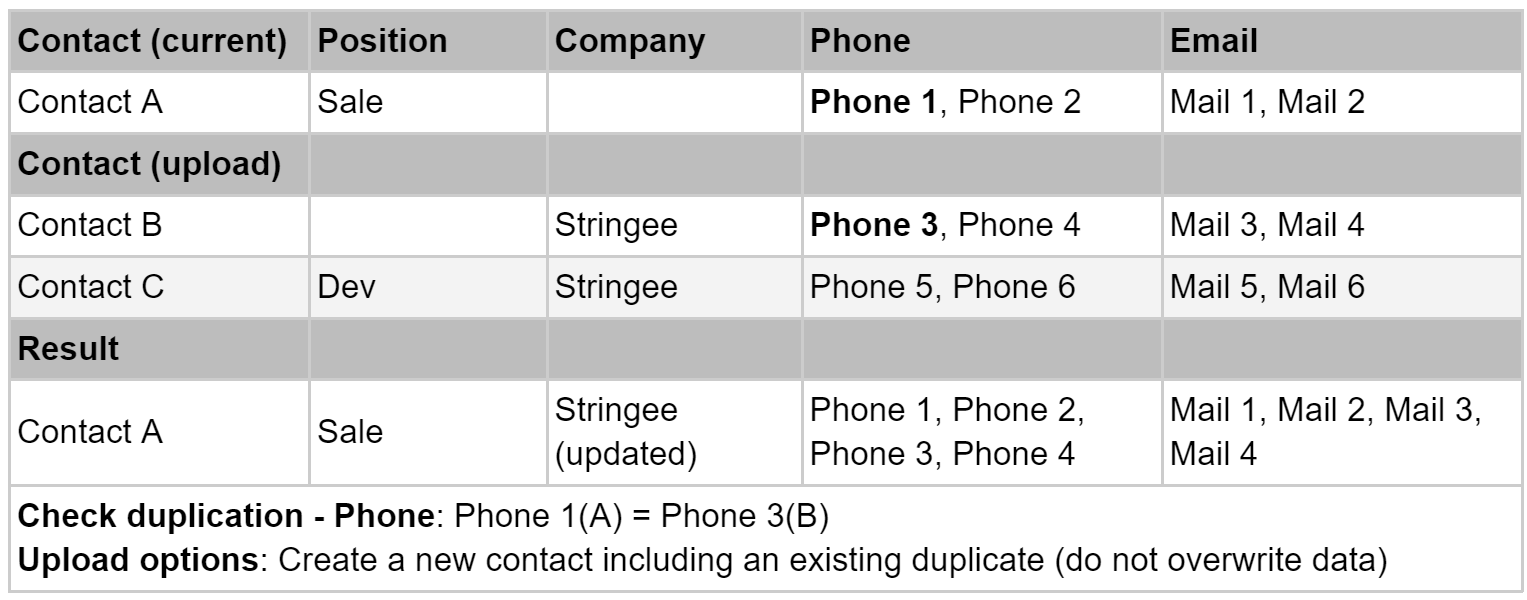
* **Create a new contact including existing duplicate contacts:** Allows uploading of new contacts and contacts with existing data
* **Create a new contact that does not include existing duplicate contacts:** Upload new contacts and don't upload duplicate contacts
* **Create new and update existing duplicate contacts (do not overwrite data):** Upload a new contact, update the blank information and do not overwrite the existing data with the contact with the same data selected
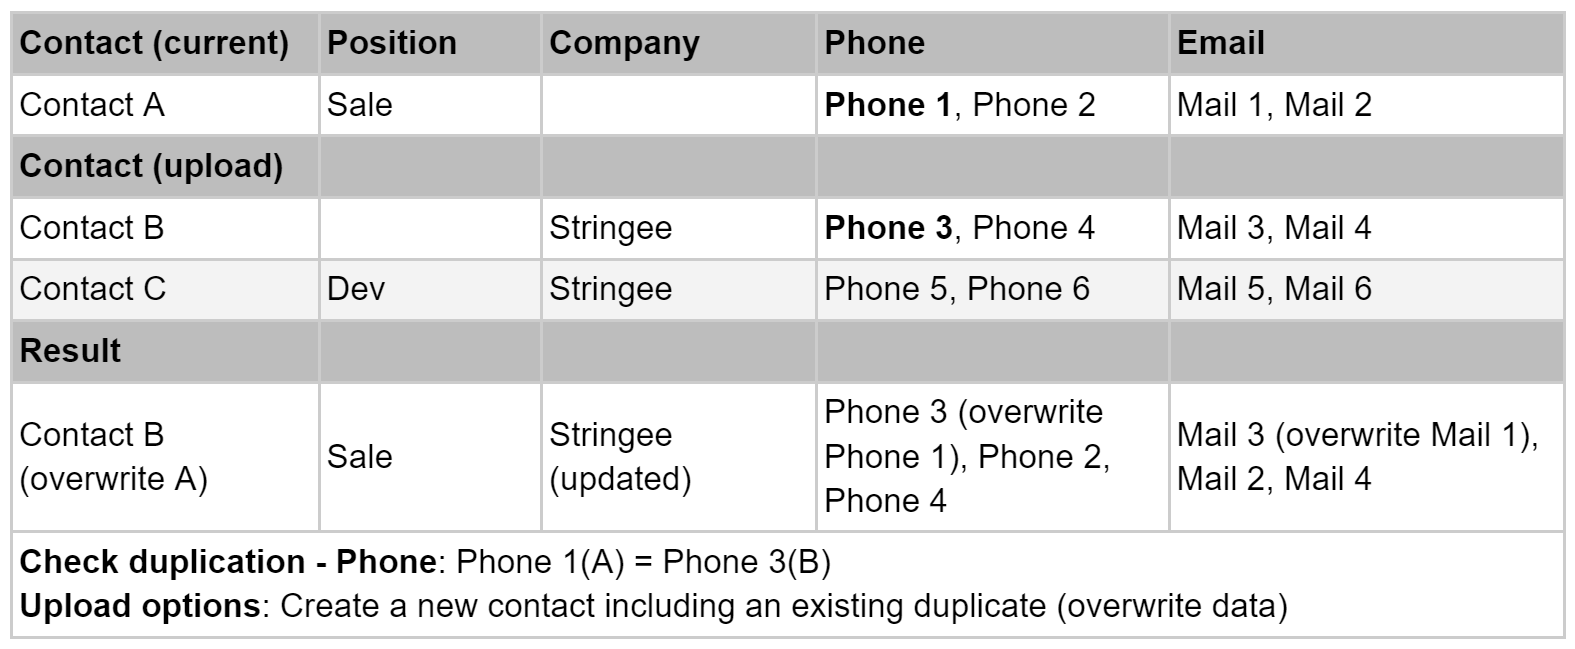
* **Create new and update existing duplicate contacts (overwrite data):** Upload a new contact, update the empty information, and overwrite the first record with the contact with the same selected data
* **Update existing duplicate contacts only (do not overwrite data):** Do not add new contacts that do not exist, only update information that is empty and do not overwrite existing data with the same contact selected data
* **Update existing duplicate contacts only (overwrite data):** Don't add new contacts that don't exist yet, just update the blank information and overwrite the first record with the same selected contact
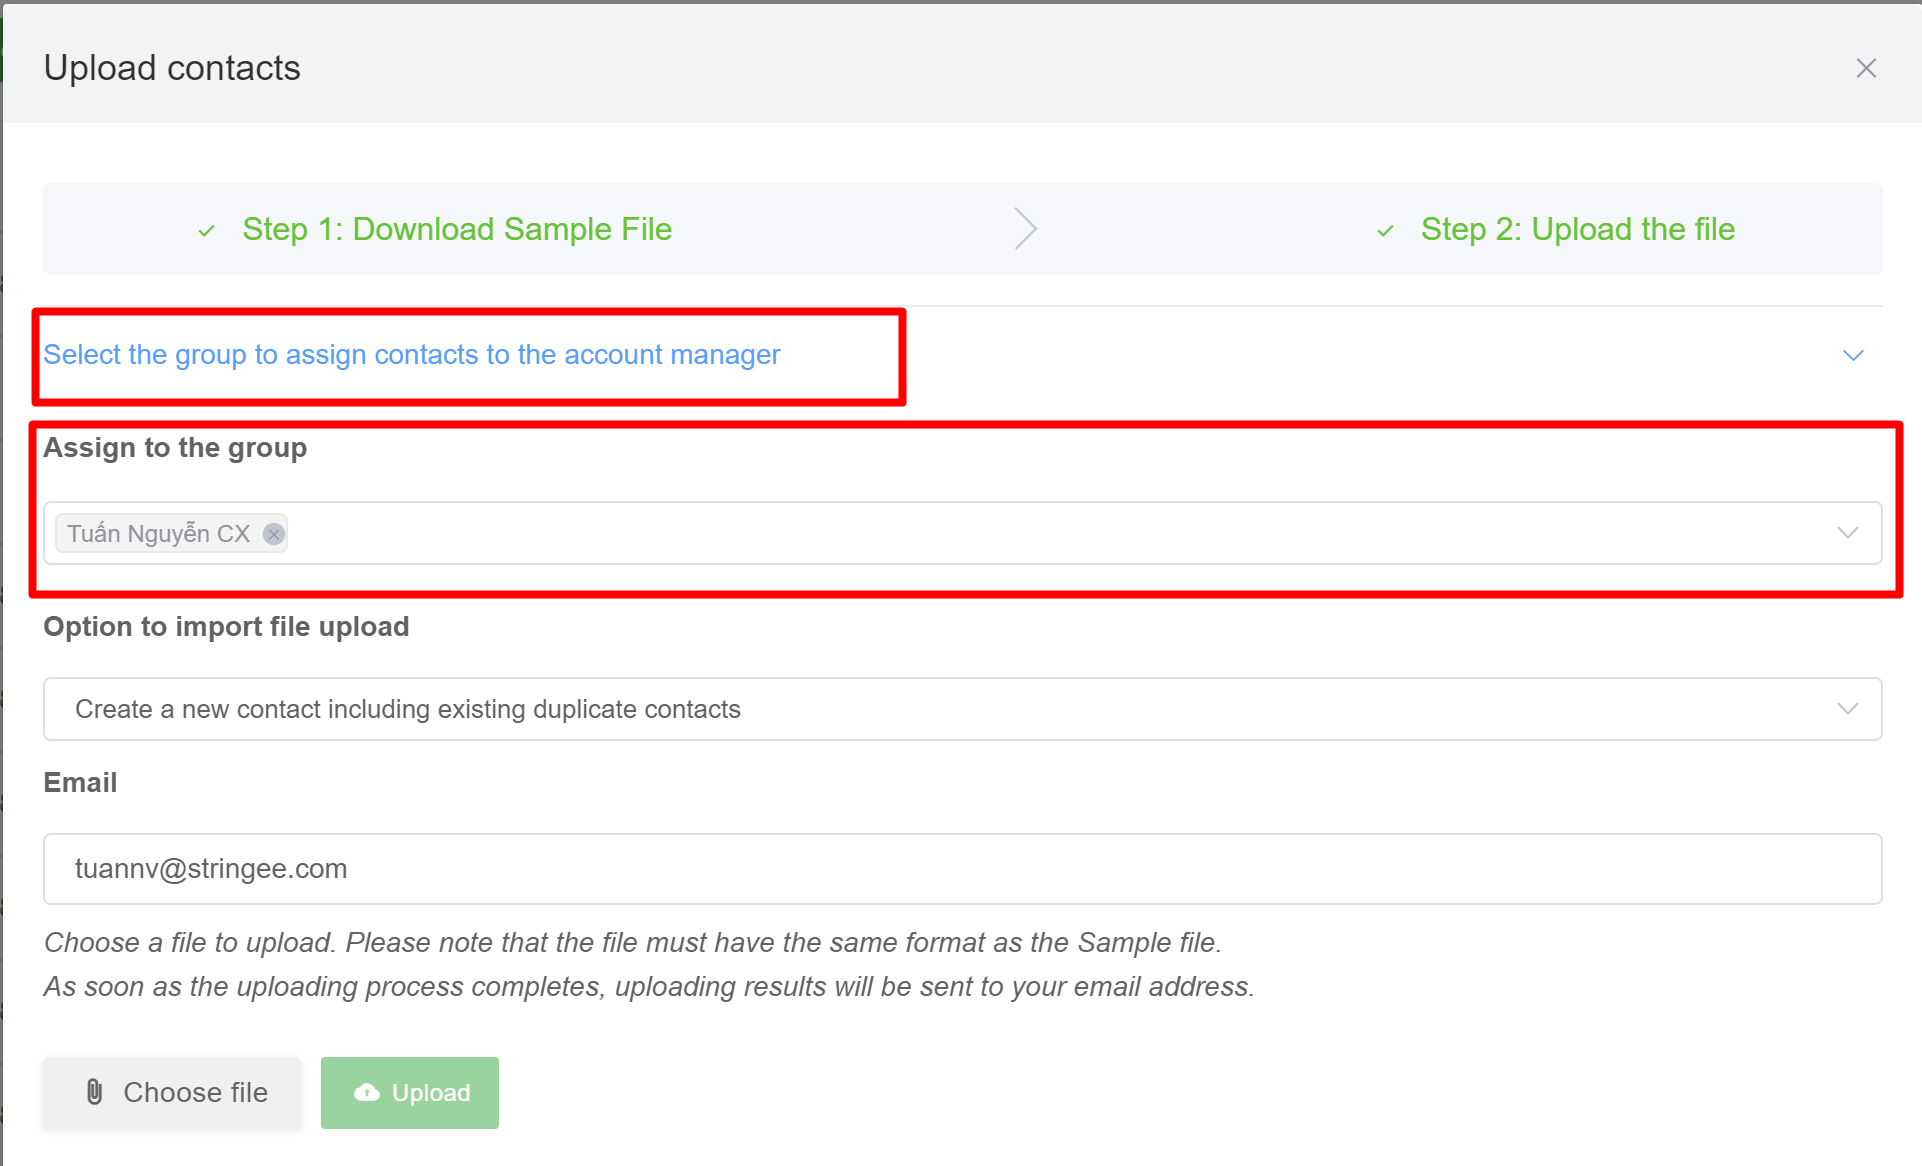
### Step 3: Select group
StringeeX allows users to upload contacts to the manager (supervisor) in the group. When uploading, users click "Select group to assign contacts to account manager"
### Step 4: Set up required fields
Set the required fields and press the Upload button to upload the list, the user can download the template in step 2 as shown. The information fields are needed to format the text. The phone number field should contain the country code, for example 84xxxxxxxxx
### Step 5: Notification email
Notification of upload results and email of list upload results (if any). The results include a file containing the contact's error code in the uploaded file (if any). Users can customize the email to receive this notification.
## **Merge Contacts**
The Merge Contacts feature allows users to consolidate source contacts into a single destination contact, helping eliminate redundant data and manage contacts more efficiently. After merging, the source contacts will be deleted, and all interaction data will be transferred to the destination contact.
### **Step 1: Select the contacts to be merged**
In this step, the user searches for and selects the contacts to be merged by checking the trigger box in front of the contact as shown in the image. After selecting the contacts, press "Merge contacts."
After selecting "Merge contacts," a merge contacts popup will appear for confirmation or to modify and update additional information, as shown in the image.
After confirming the information, select "Next step" to choose the final destination contact to be retained.
### **Step 2: Select the destination contact and update**
In this step, select the destination contact (the final contact that will retain the information of the contacts to be merged). The user clicks to select the destination contact to be retained and presses "Merge contacts" to complete the merging process.
**Note**: Immediately after merging the contacts, the system will:
* Transfer all records and notes from the source contacts to the destination contact
* Merge the fields of the source contacts into the destination contact
* The source contacts will be deleted after the merging process is completed
## Advanced features
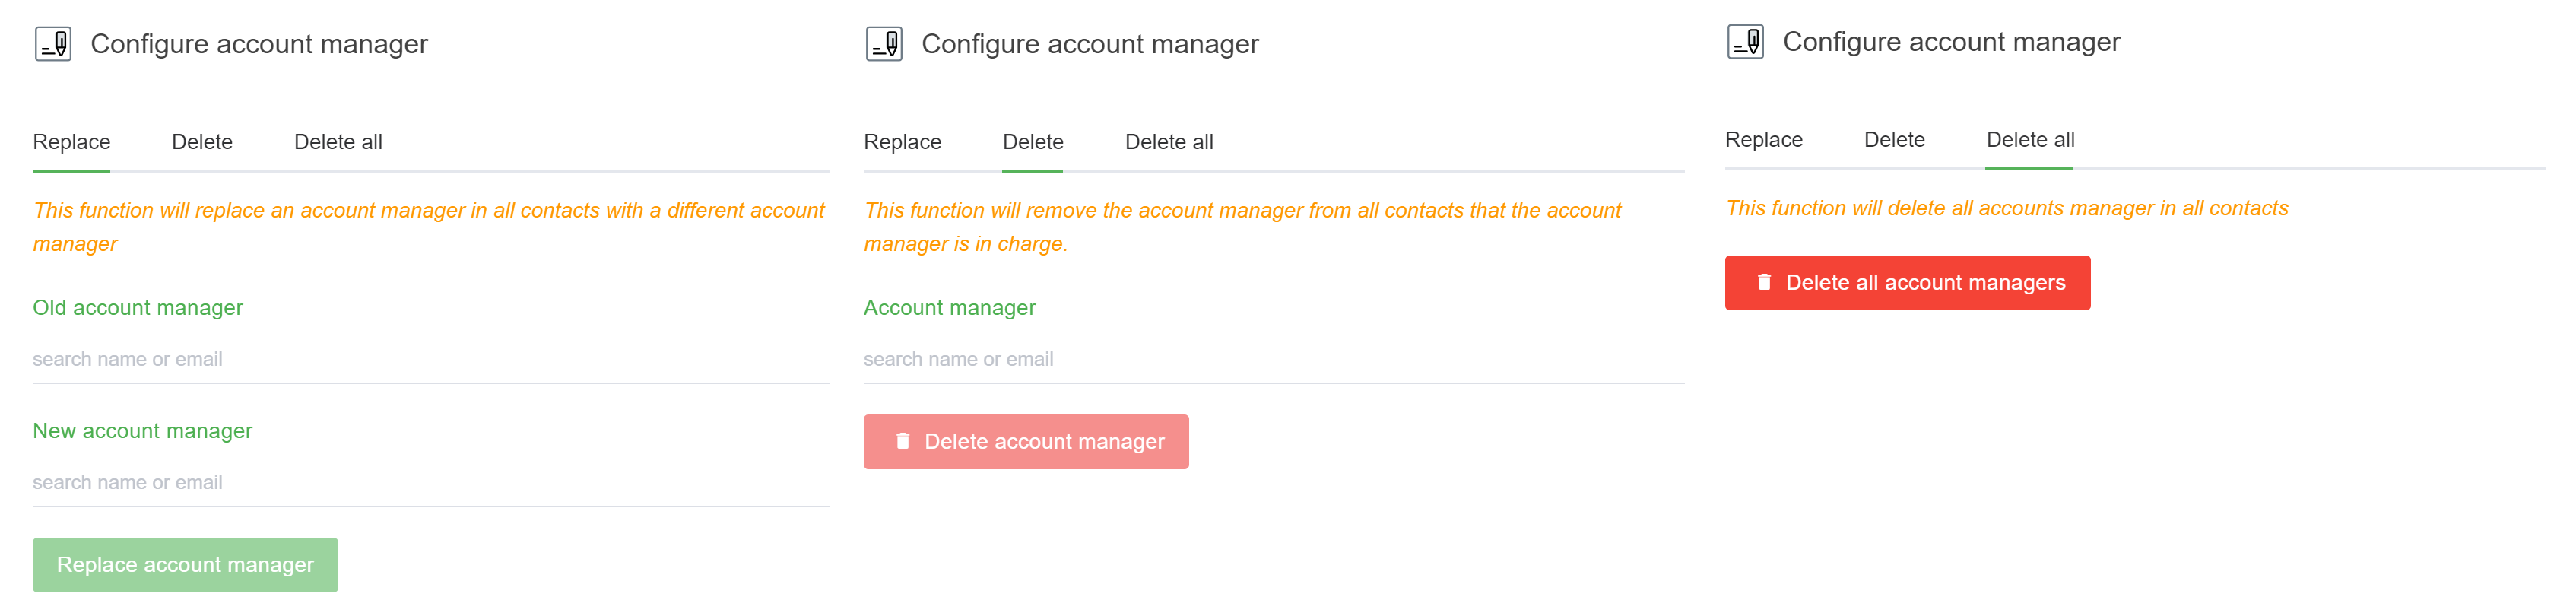
StringeeX supports advanced features Account manager configuration, supports new employees to manage contacts and tickets of old employees through the Contact interface.
After clicking Account manager configuration, the admin can select the options as shown below:
* **Replace:** This function will perform the replacement of the account manager in all contacts to another account manager. It also changes the field assigned to the new agent with the ticket of the corresponding contact
* **Delete:** This function will delete the account manager in all the contacts belong to this account manager
* **Delete All:** This function will perform delete all account managers in all contacts